
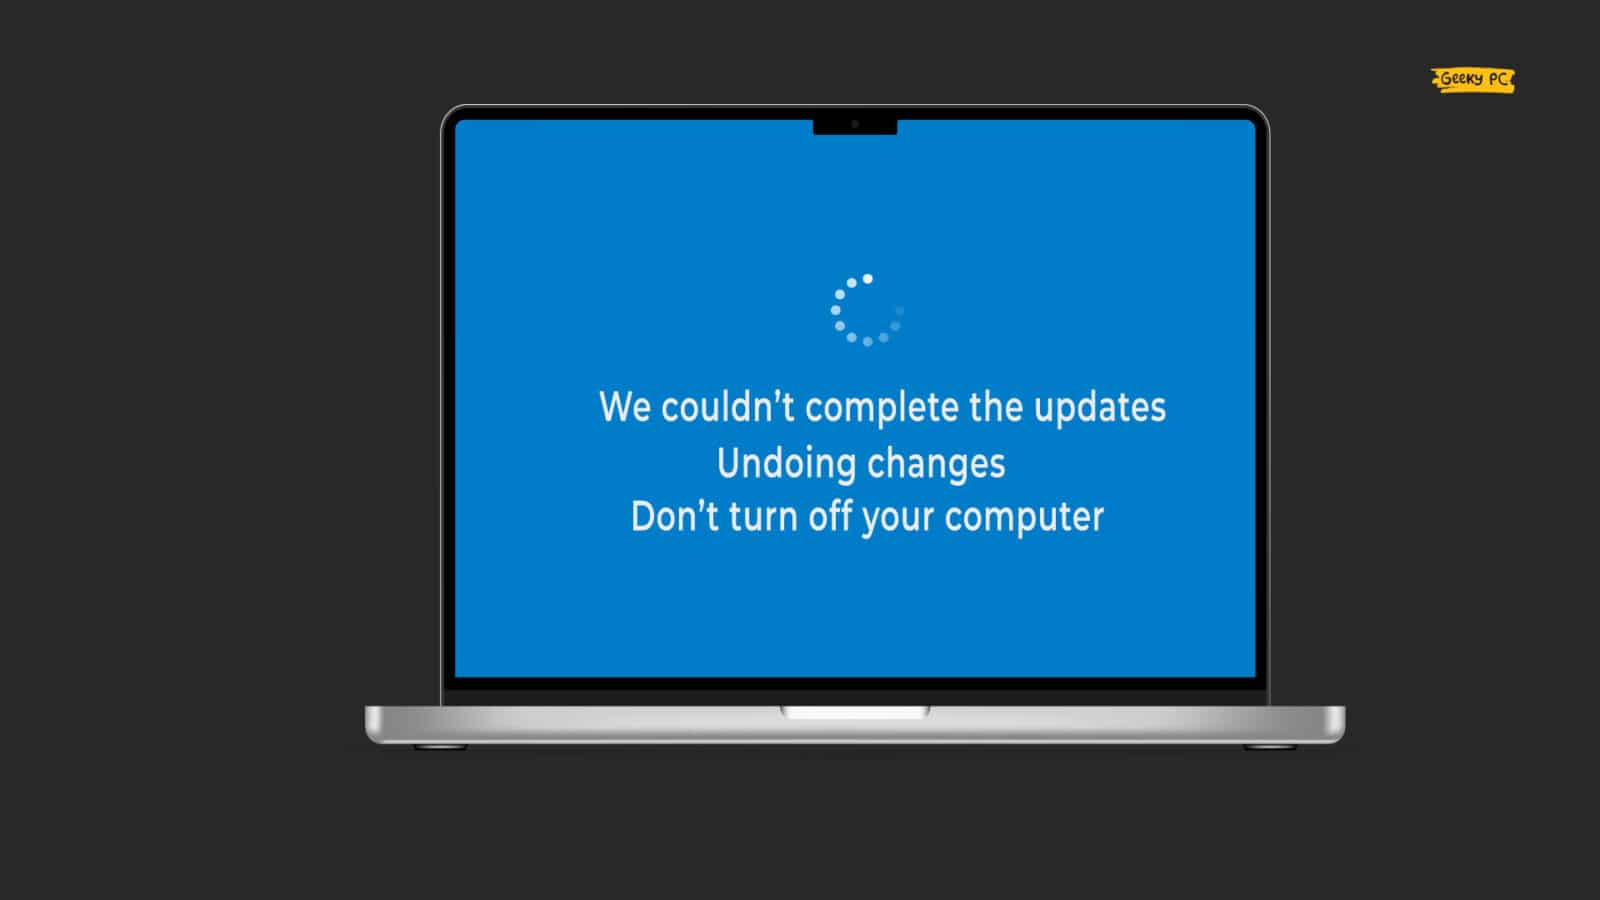
Updating Windows OS in a timely manner will ensure a smooth user experience and the utmost proficiency of Windows-based devices. But things start to become problematic when you suddenly get the “we couldn’t complete the updates undoing changes” error prompt amidst the update process. Isn’t it?
Disabling the automatic update feature or setting up a meter network connection will solve the update error. Besides, you should allot more space to the system drive. Running the SFC and DISM scan will also solve this issue. And if nothing works, you can restore the OS to a previous point.
However, these are not all the possible solutions we have to resolve this particular issue. But before we dive deep into the solution part, let’s understand what the primary reasons behind this error are.
What Are The Reasons Behind The “We Couldn’t Complete The Updates Undoing Changes” Error?
- The update installation file is not downloaded correctly on your system due to a network or power outage.
- There is no sufficient space left on your system drive for the installation file to download.
- Some of the files in your root directory are corrupted due to malicious infection from a virus attack.
- The Windows Update processes running in the background are corrupted or buggy.
- Any of the recent Windows Updates installation files are not supported by the current version of the OS.
- The app readiness service is turned off on your device, and the update process can’t start in the background.
Besides these six critical issues, this update error can still occur if you have junk files in your Software Distribution folder.
Besides, it can even happen if you have too many startup processes running on your system that are interfering with the Windows update process.
7+ Easy Fixes For The “We Couldn’t Complete The Updates Undoing Changes” Error
Before you try any advanced methods to resolve the “we couldn’t complete the updates undoing changes” error on your system that needs pro-level tweaks, you should first resort to the generic fixes.
And in almost 90% of cases, these generic fixes alone are sufficient to fix this issue in no time.
1. Disable Automatic Update Of Windows OS
Automatic update is a feature that lets your Windows stay updated all the time. And every time Microsoft releases any new update, this feature automatically downloads the latest update on your system in the background.
However, this automatic update feature can act buggy sometimes.
- Step 1: Click on the “Magnifying Glass” icon located at the bottom-left corner of your taskbar.
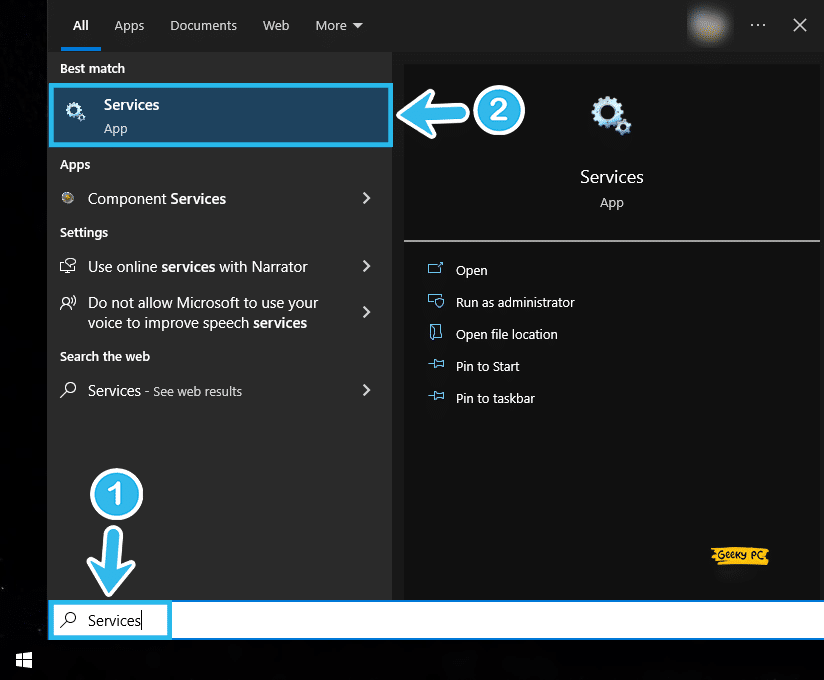
- Step 2: Once the search field appears, type “Services” in the designated box and click on the very first result that appears.
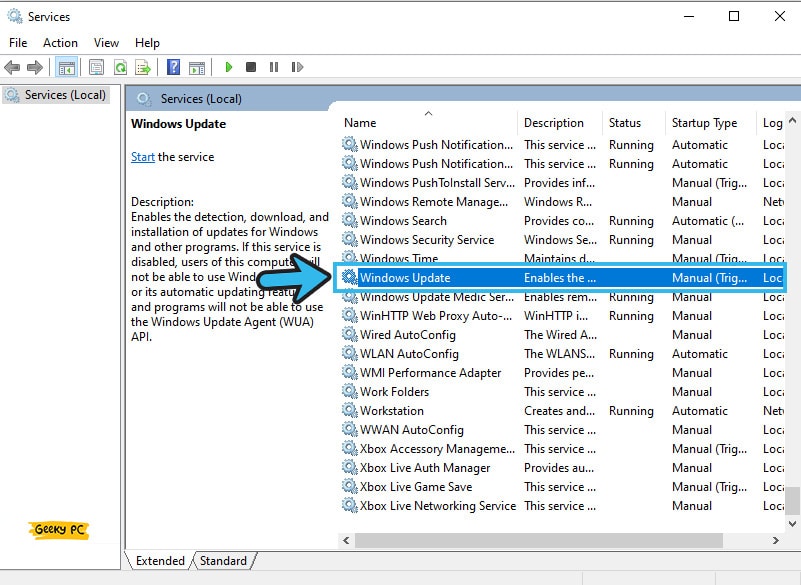
- Step 3: After the new Services window launches, navigate to the right panel, and locate the “Windows Update” service.
- Step 4: Double-click on it to open “Properties” and select the “Disabled” option from the drop-down menu beside the “Startup Type” option.
- Step 5: Now, if the service status is showing the “Running” option, click the “Stop” button to end it.
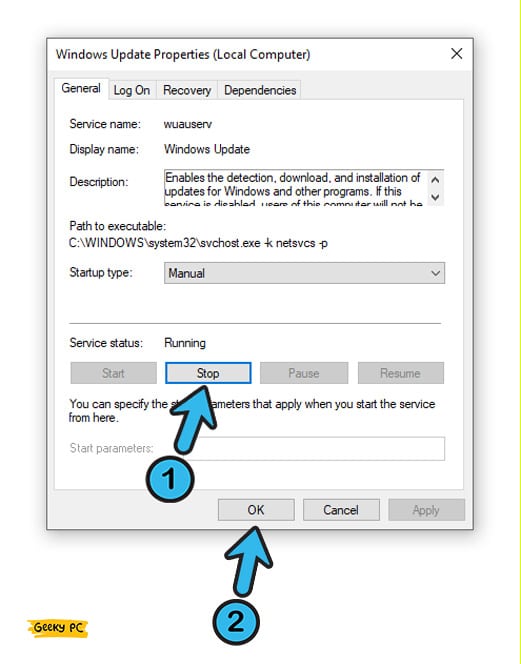
- Step 6: Click on the “Apply” button to save the settings and then “OK” to exit the app.
- Step 7: Restart your system and try to update your Windows OS again.
A few of our users have reported that they started getting a service host delivery error after they disabled the automatic update option.
If you are also facing similar issues, follow our step-by-step guide to fix the “Service host delivery optimization” error in Windows devices.
2. Set Metered Network Connection
At times, disabling the Windows automatic update process will not solve the issue, as it can override the service file to keep itself updated.
And you’ll still get the “we couldn’t complete the updates/undoing changes” error in your system. But, setting up a metered connection can solve this issue.
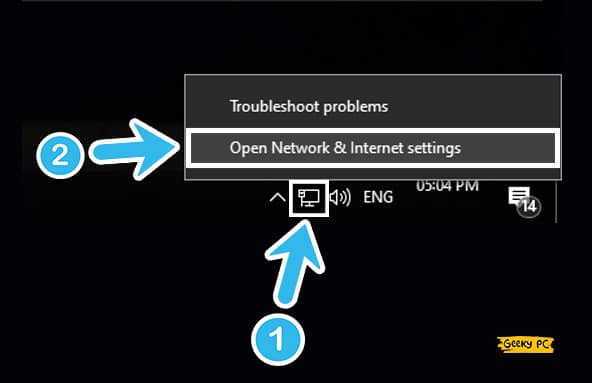
- Step 1: Right-click on your network icon located at the bottom-right corner of your taskbar.
- Step 2: Select “Open Network & Internet Settings” from the contextual menu.
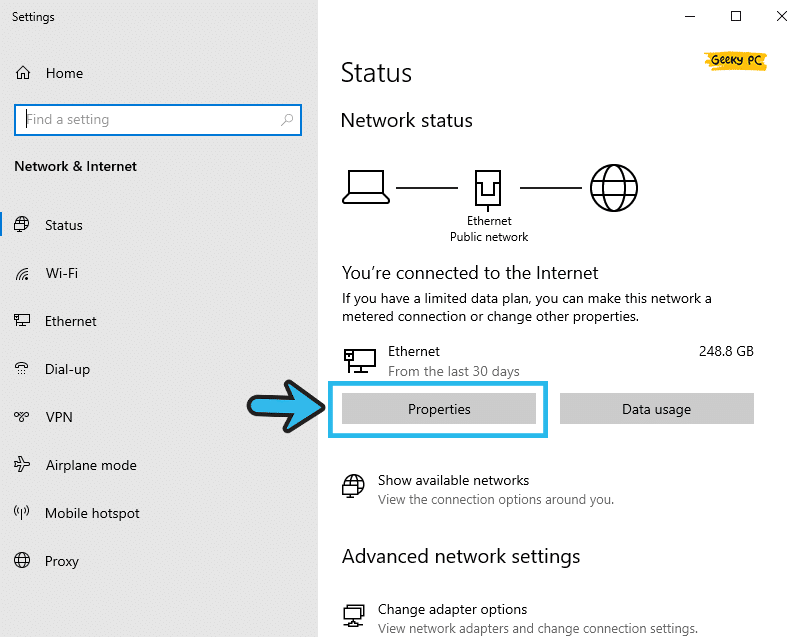
- Step 3: Once the “Network Status” page opens, navigate to your ethernet connection and click on the “Properties” tab.
- Step 4: Now, scroll down and toggle the switch under the “Metered Connection” segment.
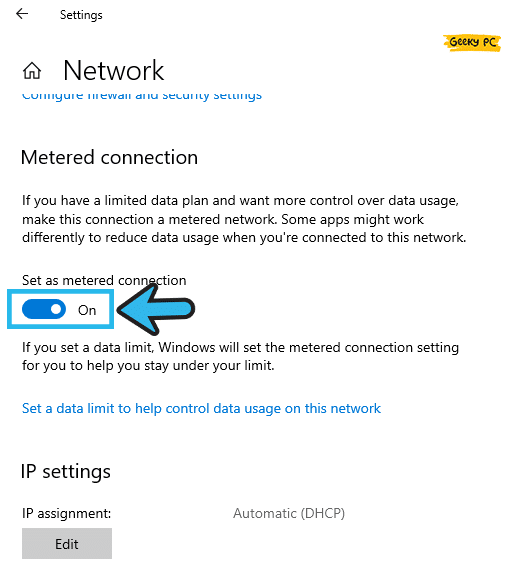
- Step 5: Exit from the window and try to update your Windows OS again.
Many people have started getting an undefined ethernet error once they have set a metered connection for their Windows update process.
3. Restart Windows Update Process
The Windows update process itself can start malfunctioning for various reasons, especially if you have any corrupted files in the installation directory.
However, you can easily fix it by restarting all your Windows update processes from your device settings.
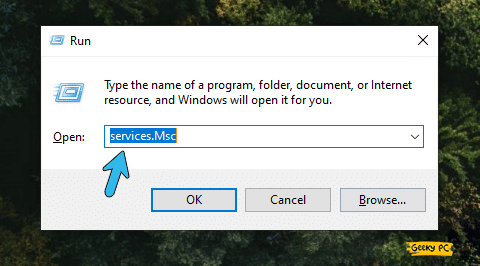
- Step 1: Press the “Windows Key + R” buttons together to launch the “Run” command window.
- Step 2: Type “services.msc” in the designated field and click on the “OK” button.
- Step 3: Once the new window appears, navigate to the left panel, and click on the “Services (Local)” tab.
- Step 4: Navigate to the right panel and locate the “Windows Update” service from the list.
- Step 5: Double-click on the process to initiate the “Windows Update Properties” Window.
- Step 6: After the new window appears, click on the “Stop” button to end the service.
- Step 7: Exit from the properties window and return to the “Services” window again.
- Step 8: Locate the “Windows Update” service, right-click to open the contextual menu and click on the “Restart” option.
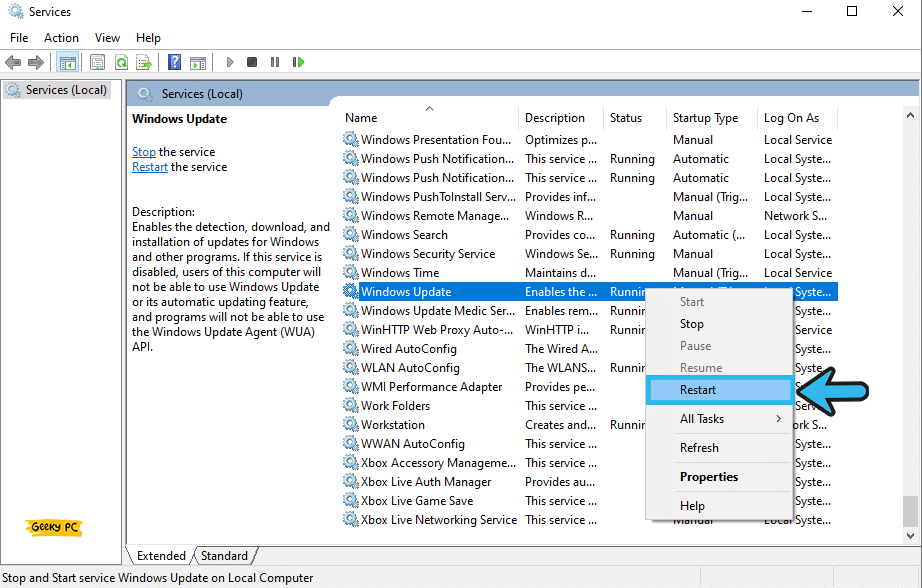
- Step 9: Once the “Windows Update” service restarts, exit from the window and try to update your Windows OS again.
At times, the security software installed on your system, especially the Windows Defender antivirus, can block the “Windows Update” service in the background.
So, it is better to disable it beforehand and then try to restart the update process again.
4. Delete The Recent Windows Updates
Even if you have updated your Windows OS recently, the “we couldn’t complete the updates fix” error message can still pop up.
And in that case, you need to manually delete the most recent Windows update from your system to ensure a smooth computing experience.
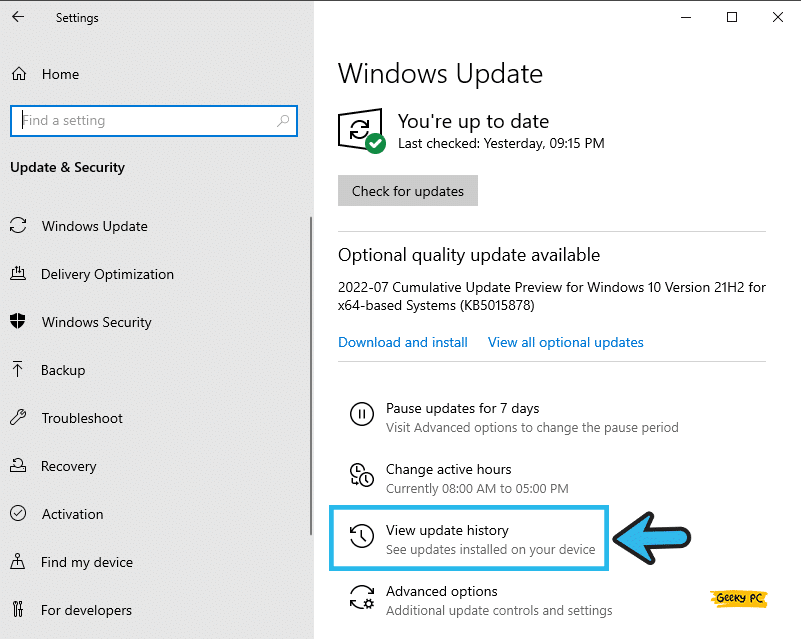
- Step 1: Press the “Windows Key + I” buttons together to launch the “Settings” app from your system.
- Step 2: Now, scroll down, and click on the “Update & Security” tab at the bottom of the page.

- Step 3: Navigate to the left panel and click on the “Windows Update” option.
- Step 4: Now, navigate to the right panel, scroll down, and click on the “View update history” option.
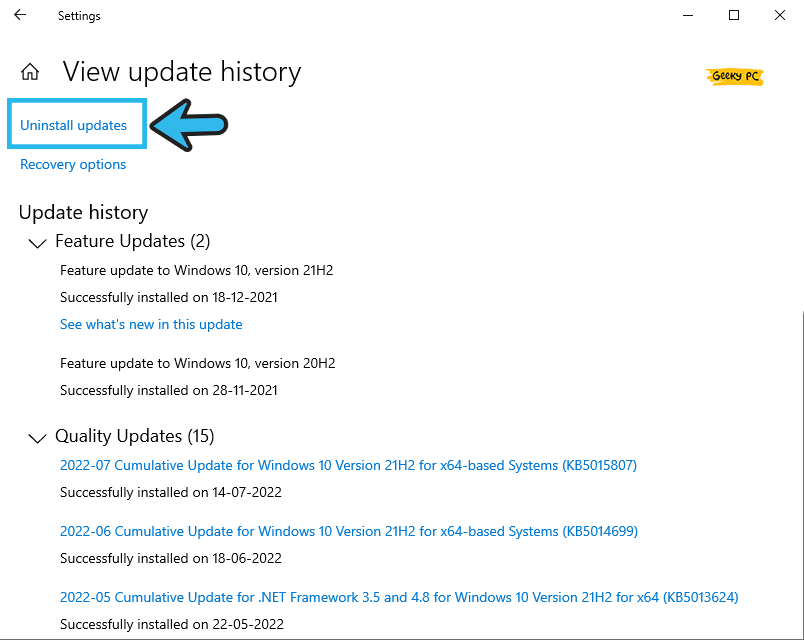
- Step 5: Once the new window appears, click on the “Uninstall Updates” option.
- Step 6: After the uninstallation window appears, right-click on the most recent update, and click on the “Uninstall” button.
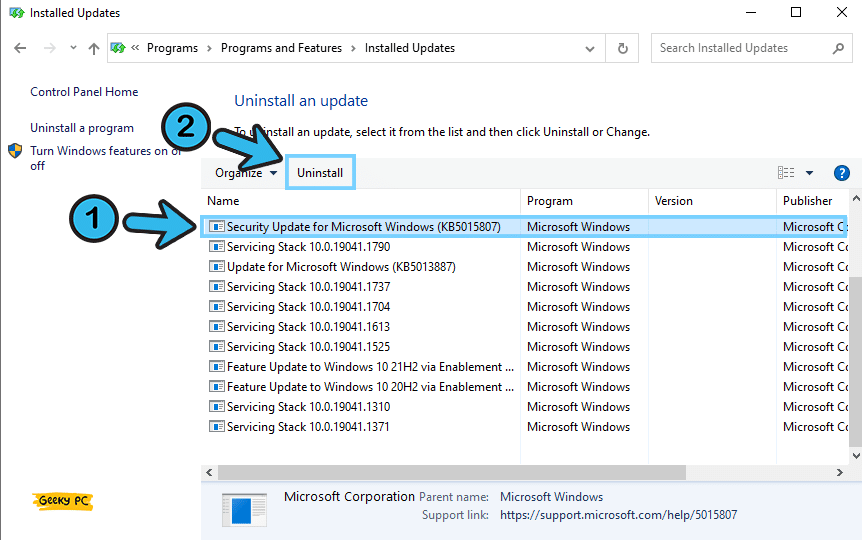
- Step 7: Once the procedure is over, reboot your system.
Many people have started getting an unresponsive taskbar once they have deleted the most recent Windows update from their systems.
5. Run The Windows Update Troubleshooter
Windows Troubleshooter is an effective tool that comes preinstalled with the latest variants of Windows OS, especially Windows 10 and 11.
And if you are getting the update error too frequently, you can make good use of this troubleshooter to rectify the bug.
- Step 1: Depending on the variant of your Windows OS, click either on the “Windows” or the “Start” button.
- Step 2: Click on the “Gear” icon (Settings) from the contextual menu.
- Step 3: After the “Settings” app launches, scroll down and click on the “Update & Security” option at the bottom of the page.
- Step 4: Now, navigate to the left panel and select the “Troubleshoot” option.
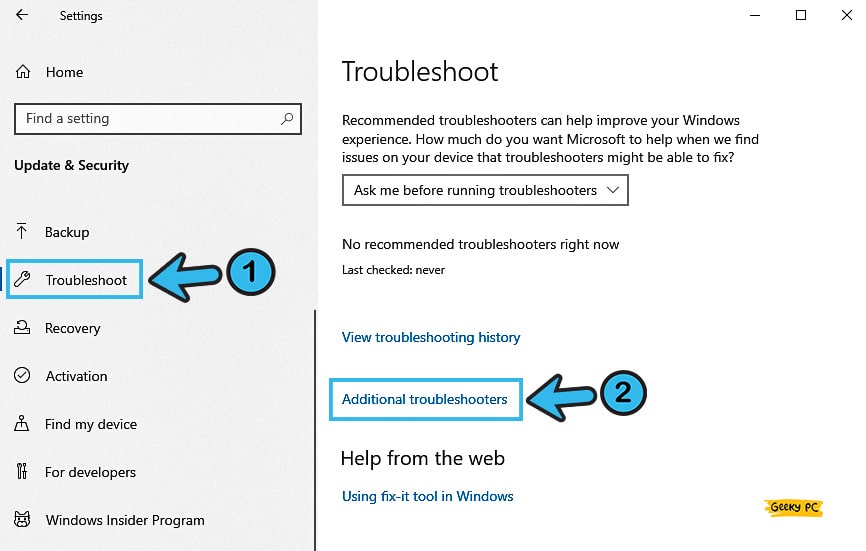
- Step 5: Return to the right panel and select the “Additional Troubleshooter” option.
- Step 6: After the new window launches, navigate to the “Additional Troubleshooter” option and click on the “Windows Update” option.
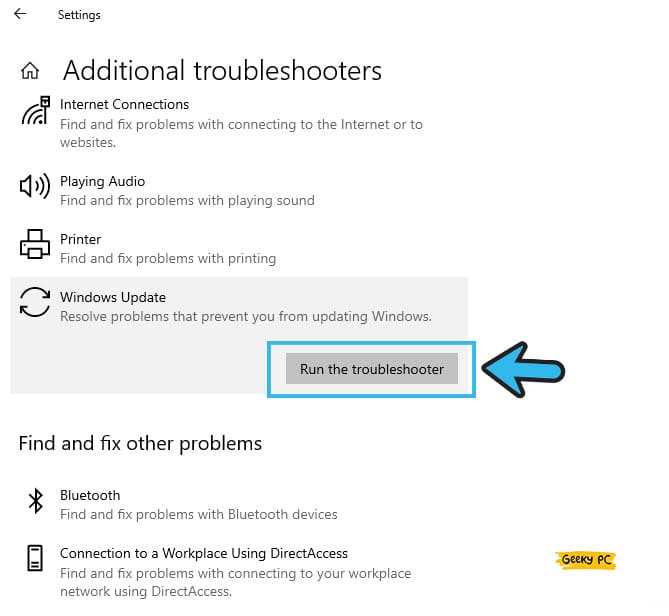
- Step 7: Now, follow the on-screen instruction to complete the troubleshooting process.
You should keep your internet connection activated during the whole procedure, as Windows will automatically download and install the missing files on your system to complete the troubleshooting procedure. And once the procedure is completed, reboot your system. And if you are also facing similar issues, follow our step-by-step guide to resolve the MSCOMCTL.OCX error in Windows devices.
6. Activate the App Readiness Service
App readiness is a process that helps all Windows apps to initiate the update rollout process once it is available from the client’s side.
However, this process itself can malfunction at times. And in that case, you need to activate the service again to eliminate the windows update service error.
- Step 1: Click on the “Magnifying Glass” icon located at the bottom-left corner of your taskbar to initiate the search field.
- Step 2: Type “services” in the designated field and click on the very first result that appears.
- Step 3: Now, navigate to the right panel and locate the “App Readiness” service from the list.

- Step 4: Double-click on the process to open the “Properties” menu.
- Step 5: Now, select the “Automatic” option from the drop-down menu beside the “Startup Type” segment.
- Step 6: Select the “Start” option under the “Service Status” option.

- Step 7: Click “Apply” to save the settings and then “OK” to exit from the window.
- Step 8: Reboot your system and try to update your Windows OS again.
Many people have reported getting a group policy error once they have tried to activate the app readiness service, especially while using their system under a network administrator.
If you are also facing the same, follow our step-by-step guide to fix the “This program is blocked by group policy” error in Windows devices.
7. Go For Windows Startup Repair
Windows startup repair is an inbuilt tool in the latest version of the Windows OS that can effectively help you to fix all the installation and update related bugs on your system.
And if none of the above methods are working to fix the update error, you can try to fix it with the Windows startup repair tool.
- Step 1: Shut down your computer and leave it without power for at least 3 minutes.
- Step 2: Press the power button to switch on the device and repeat the process three times in a row.
- Step 3: When you get the “Advanced Startup Repair” page on your welcome screen, select the “Automatic Repair” option to enter the “WinRE” segment.
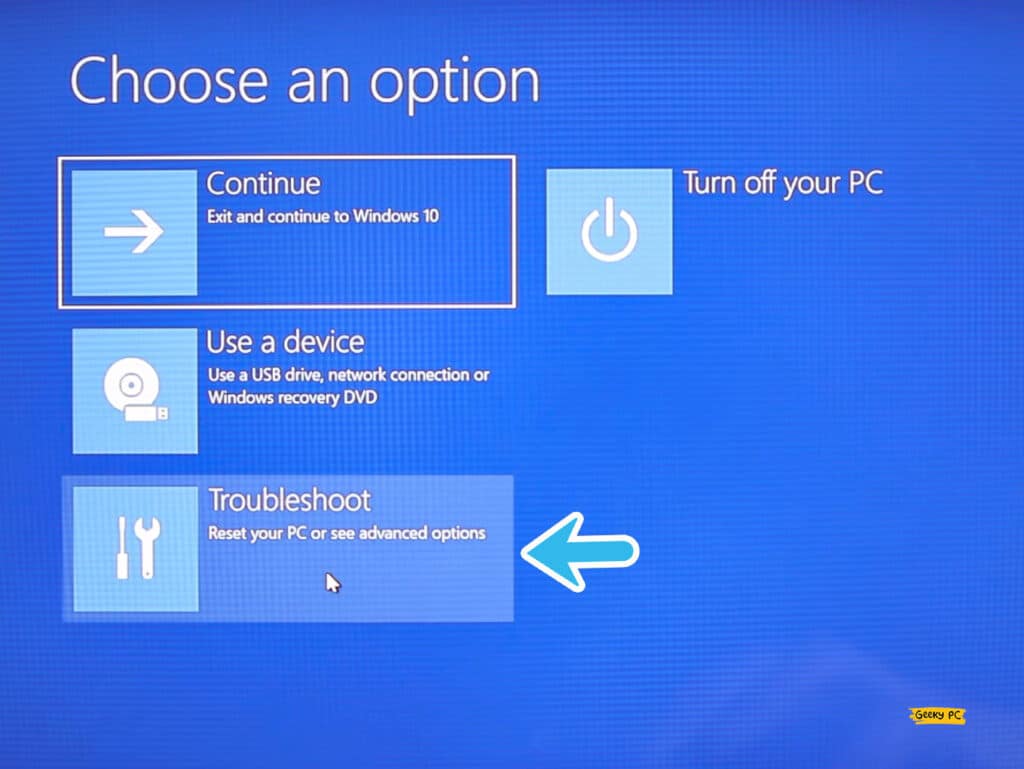
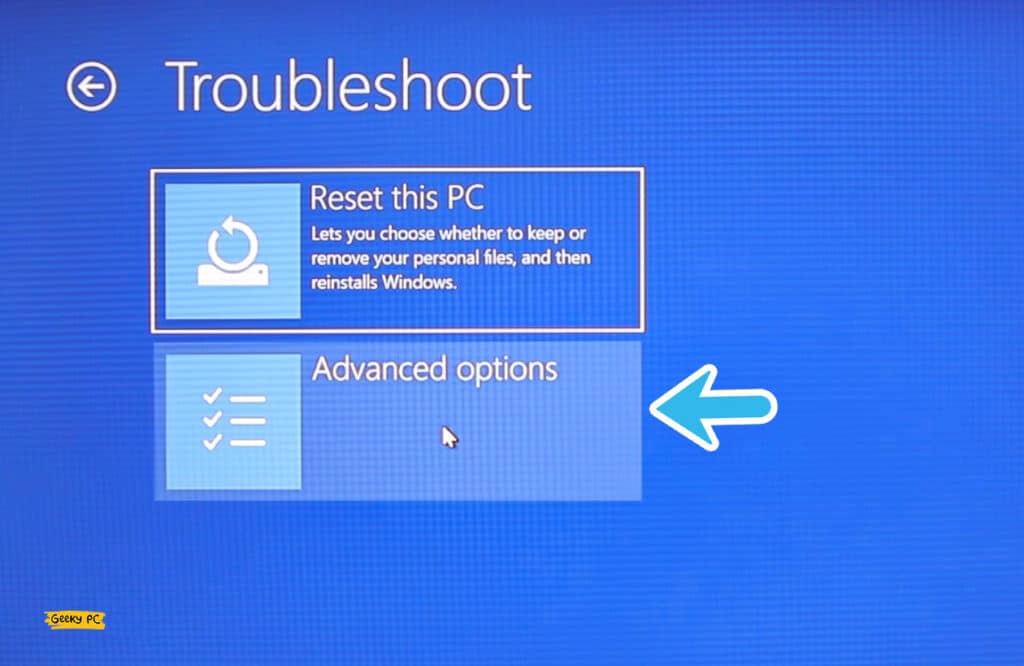
- Step 4: Now, click on the “Troubleshooting” option and then further click on the “Advanced” option.
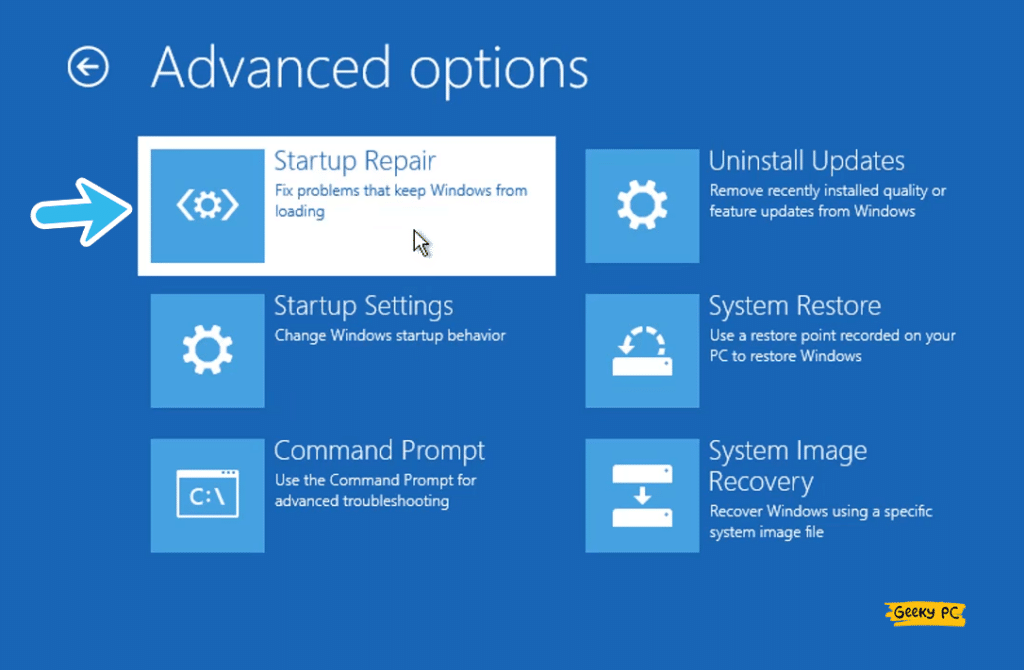
- Step 5: Navigate to the “Startup repair” option and click to activate it.
- Step 6: Wait until the startup repairing process is entirely over.
- Step 7: Once the procedure is done, reboot your system again and check whether you are still getting this issue.
During the startup repair process, your device will automatically restart a couple of times. But don’t unplug your ethernet cable or remove the power cord.
Otherwise, a series of errors can start triggering in your system. Besides, keep your computer in idle mode until the process is completely done.
7+ Advanced Fixes For The “Windows Update Undoing Changes” Error
If none of the above methods are working to resolve the “we couldn’t complete the updates undoing changes” error on your system, the problem is more profound than you can assume.
And in such cases, resorting to advanced tweaks is the only option left.
8. Expand The Partition Size Of The Windows System
At times, you have too small a partition left for your Windows update process to download and install on your system.
So, you need to keep sufficient space on your system drive or can expand it to allot some more space. And you can easily do it from the windows settings itself.
- Step 1: Press the “Windows Key + R” buttons together to launch the “Run” dialog box.
- Step 2: Type the “diskmgmt.msc” command in the designated field and click on the “OK” button.
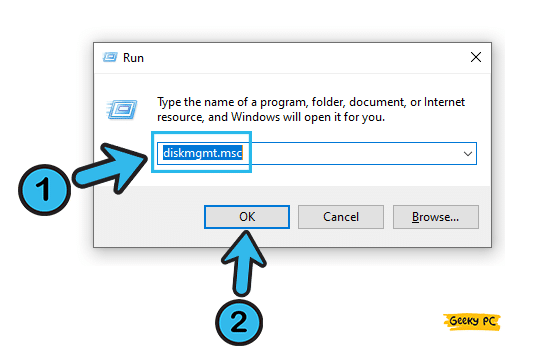
- Step 3: Once the “Disk Management” window launches, right-click on the partition where you have installed your Windows OS.
- Step 4: Select the “Shrink Volume” option from the menu.

- Step 5: Now right-click on the “Reserved Partition” and then click on the “Extend Volume” option.
- Step 6: Once you have successfully expanded the partition, reboot your system.
You can also make the system drive a little bigger than usual while installing the Windows OS for the first time on your system.
And in that way, you can make sure that future updates will have sufficient space on the system drive to download and install without any obligation.
9. Run The DISM Command
The DSM tool is also an effective tool that now comes preinstalled with the latest version of the Windows OS, especially Windows 10 and 11.
And if you can’t fix update changes on Windows 10, running the DISM command can be an effective fix, as it will sort out all the minor glitches and errors on your system.
- Step 1: To launch the “Run” dialog box, press the “Windows Key + R” buttons together.
- Step 2: Type “CMD” in the designated field and click the “OK” button.
- Step 3: Once the black “Command Prompt” window launches, type the “DISM /Online /Cleanup-Image /StartComponentCleanup” and hit the “Enter” button.
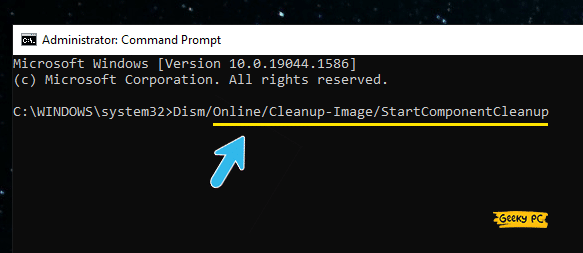
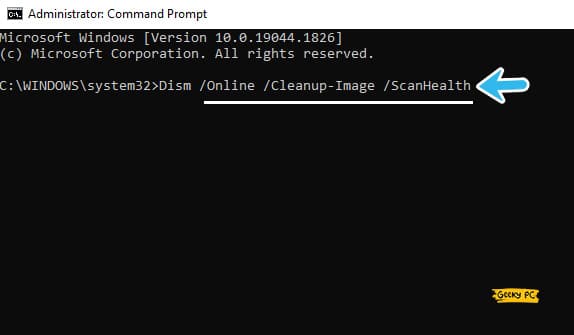
- Step 4: Now, type the “Dism /Online /Cleanup-Image /ScanHealth” command and hit the “Enter” button again.
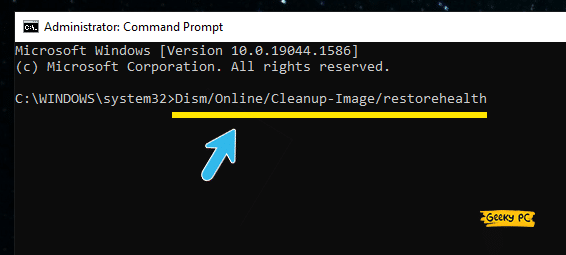
- Step 5: Once it is done, type the “
DISM.exe /Online /Cleanup-image /Restorehealth” command and hit the “Enter” button.
- Step 6: Now, type “Exit” and hit the enter button to close the “Command Prompt” window.
- Step 7: Reboot your device and check whether you are still getting the same issue.
It is better to disable your security software beforehand, especially the Windows Defender antivirus before you run the DISM command on your system.
Otherwise, the security software can block the DISM tool from accessing the root files on your system. However, it is not recommended to keep your antivirus turned off for a long time.
10. Execute The SFC Scan
If the DISM scan can’t resolve the update error on your Windows devices, there is another tool called SFC that can help you to sort out this issue in no time.
And the System File Checker tool now comes preinstalled on the latest variant of the Windows OS.
- Step 1: To initiate the “Run” command, press the “Windows Key + R” buttons together.
- Step 2: Type “CMD” in the designated box and click on the “OK” button to launch it.
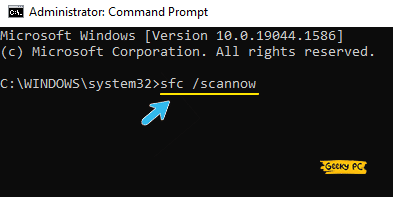
- Step 3: Once the black window of “Command Prompt” appears, type the “sfc /scannow” command and hit the “Enter” button.
- Step 4: Wait until the SFC tool identifies and fixes the errors on your root installation directories.
- Step 5: Once the operation is done, type “Exit” to close the “Command Prompt” window.
- Step 6: Now, reboot your system and check whether you are still getting the same issue or not.
11. Delete The Software Distribution Folder Content
If you are repeatedly getting the “we couldn’t complete the updates undoing changes” error message in your system, the problem may have been lying in the software distribution folder itself.
And manually deleting all the contents of the folder can resolve this issue.
- Step 1: Press the “Windows Key + R” buttons together to launch the “Run” command.
- Step 2: Type “CMD” in the designated field and click on the “OK” button to launch the “Command Prompt” window.
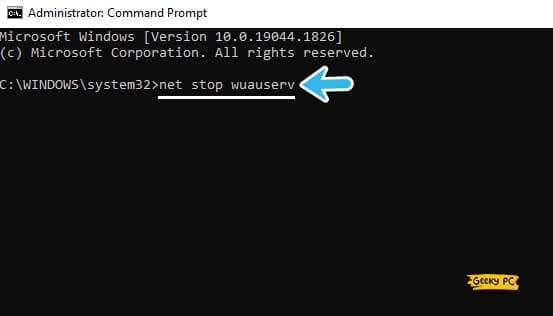
- Step 3: Once the black window appears, type the “net stop wuauserv,” “net stop bits,” “net stop cryptSvc,” and “net stop msiserver” commands one after another and press the enter button after each command line.
- Step 4: Now, press the “Windows Key + E” buttons together to launch the “File Explorer” window.
- Step 5: Navigate to the “C:\Windows\SoftwareDistribution” path (if “C:” is your default system path).
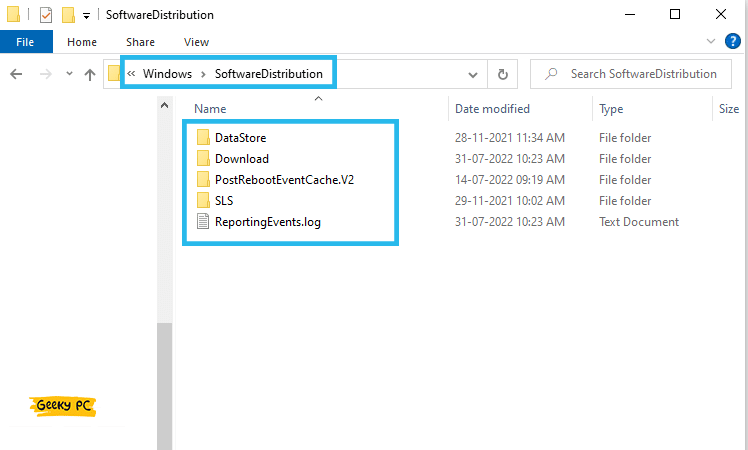
- Step 6: Select all the content inside the folder and delete those.
- Step 7: Now, come back to the “Command Prompt” window, “net start wuauserv,” “net start bits,” “net start cryptSvc,” and “net start msiserver” commands one after another, and press the enter button after each command line.
- Step 8: Once the operation is over, type “Exit” and hit the enter button to close the “Command Prompt” window.
If you can’t delete the files inside the “Software Distribution” folder, it may be due to administrative access. So, you need to first open the folder with administrative privilege and then delete all the files inside it.
Besides, you should also reboot your system once you have deleted all the contents of that folder.
12. Reset All Windows Update Components
Many update components run simultaneously in the background of your Windows OS to ensure a smooth updating process. But, at times, any of those components can start malfunctioning to trigger this bug.
So, it is better to reset all the windows update components on your system to resolve it.
- Step 1: To launch the “Run” dialog box, press the “Windows Key + R” buttons together.
- Step 2: Now, type “CMD” in the designated field and press the “OK” button.
- Step 3: After the black “Command Prompt” window launches, type the following commands and hit enter after each line; “net stop wuauserv,” “net stop cryptSvc,” “net stop bits,” and “net stop msiserver.”
- Step 4: Now, to rename the “SoftwareDistribution” folder, type “ren C:\Windows\SoftwareDistribution SoftwareDistribution.old” and hit the enter button.
- Step 5: To rename the “Catroot2” folder on your system, type the “ren C:WindowsSystem32catroot2 Catroot2.old” command and hit the enter button.
- Step 6: Once both these two operations are done, type the following command lines and hit the enter button after each line; “net start wuauserv,” “net start cryptSvc,” “net start bits,” and “net start msiserver.”
- Step 7: Now, type “Exit” and hit the enter button to close the “Command Prompt” window.
- Step 8: Reboot your system and check whether you can now install the latest Windows update or not.
You should enter these command lines with extreme caution or only under expert supervision. If you mistakenly rename a different folder or enter a wrong command in CMD, it will instantly trigger a series of problems on your device.
13. Reset Your Windows In Safe Mode
If you are frequently getting the “we couldn’t complete the updates. undoing changes. don’t turn off your computer” message on your system, there may be a problem with your Windows installation file itself.
However, you can effectively resolve it by resetting it in safe mode.
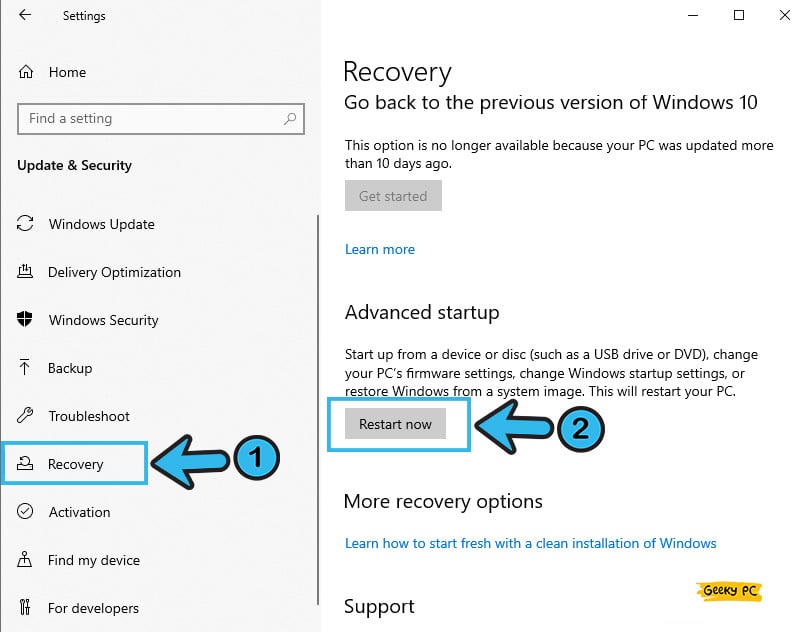
- Step 1: To launch the “Settings” app, press the “Windows Key + I” buttons together on your device.
- Step 2: Once the “Settings” window launches, scroll down and click on the “Update & Security” option.
- Step 3: Now, navigate to the left panel and click on the “Recovery” option.
- Step 4: Navigate to the right panel now, locate the “Advanced Startup” option, and click on the “Restart” button.
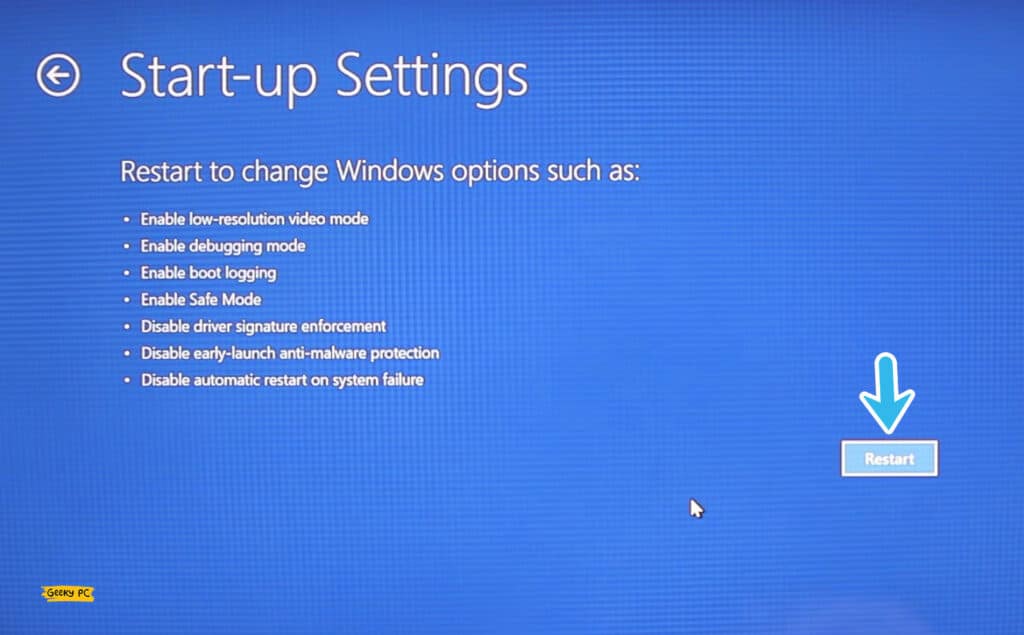
- Step 5: Once your Windows restart, select the “Safe Mode” option from the boot screen.
- Step 6: Select the “Troubleshoot” option under the “Safe Mode” and further click on the “Reset This PC” option.
- Step 7: Follow the on-screen instructions and let Windows automatically reset the PC.
Many of our users have reported getting an unresponsive start button once they have fully reset their computers to resolve the update errors. If you are also encountering similar issues on your device, follow our step-by-step guide to fix the “Start button is not working” on Windows systems.
14. Restore Windows OS To A Previous Point
If none of the above methods are working to resolve the update bug on your system, the problem may lie in the installation or root directory itself.
And it mainly happens due to a corrupted installation file or a virus infection in your root directory. In such cases, restoring your Windows OS to a previous point is the only option left.
- Step 1: Right-click on either the “My Computer” or “This PC” icon on your home screen, depending on your Windows OS variant.
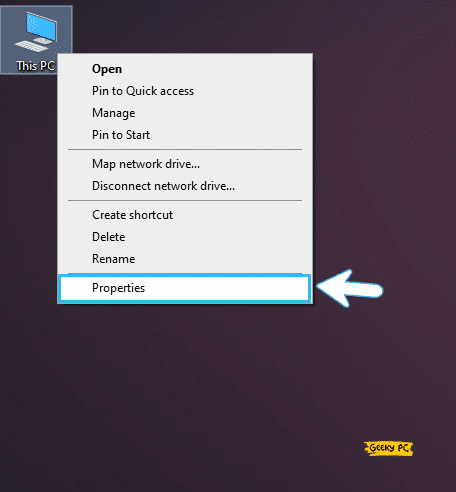
- Step 2: Click on the “Properties” tab from the contextual menu to open the “System Settings” app.
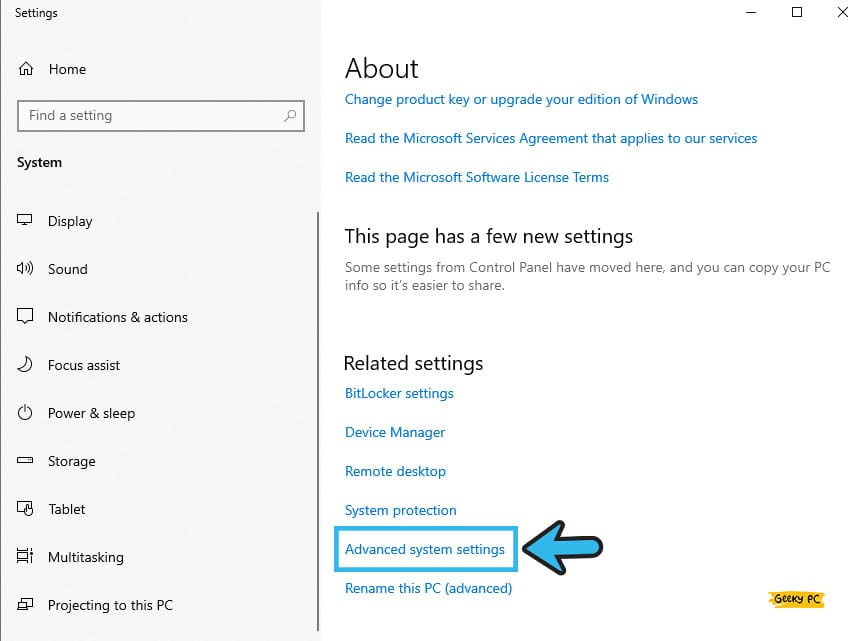
- Step 3: Once the new page appears, click on the “Advanced System Settings” option.
- Step 4: Navigate to the header menu and click on the “System Properties” tab.
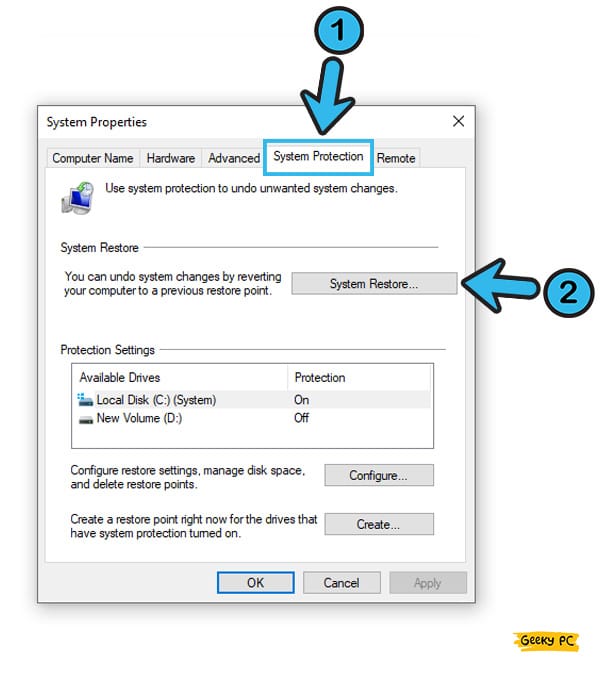
- Step 5: Now, click on the “System Restore” button and then click on the “Next” button.
- Step 6: Click on the “Show more restore points” option to check all the available options.
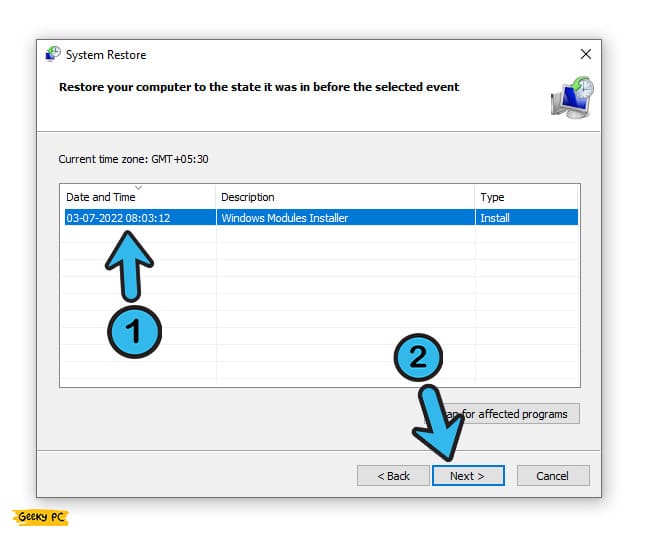
- Step 7: Select any of the previous restore points and follow the on-screen instruction.
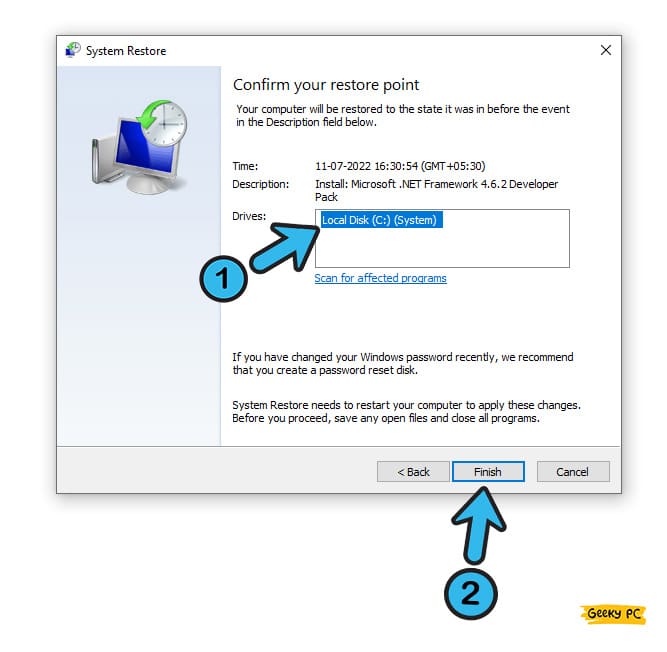
- Step 8: Once the Windows OS is fully restored to a previous point, check whether you can update your OS now or not.
A few of our users have started getting a gateway error once they have restored their OS to a previous point, especially while using a static IP connection.
If you are also facing similar issues on your system, follow our comprehensive guide to the “ Error Code 0x80070035” error on Windows devices.
Conclusion
The generic fixes we have mentioned above are sufficient to rectify the “we couldn’t complete the updates undoing changes” error in your system.
However, if you have to try any advanced methods, you must create a “System restore point” beforehand to roll back if any unintentional occurrence happens on the system.
So, that’s all the possible solutions we have for the update errors in Windows devices. If you think we have missed any, or if you have any working solution that can fix this issue, feel free to drop your suggestions and feedback in the comment box below.
FAQs
Q. How long should Windows update take?
It completely depends on your system configuration. If you have a Windows 10/11 PC with SSD, typical updates will take around 10 minutes, and extensive updates will take up to 30 minutes. But, if you are still using the conventional HDD in your system, this update process can take up to an hour.
Q. How to fix a stuck Windows Update installation?
Restarting your device into safe mode is the first thing you should do if the Windows update installation is stuck in your system. Besides, you can also run the SFC and DISM tools to fix any errors in the foot directories. And if nothing works, you can restore your Windows OS to a previous point.
Q. Can you cancel Windows Update in progress?
You can’t cancel the Windows update process once it starts on your device. Shutting down amidst the updating process will create errors. However, you can keep the “Windows Automatic Update” turned off on your device so that the update process won’t start without your notice.
Q. What happens if you turn off the computer during an update?
A sudden power outage or unintentional shutdown amidst the Windows Update process may lead to severe damage to your system. You may lose vital root files, and the Windows OS can act buggy after an unintentional shutdown. So, you should keep your system powered during the update process.