
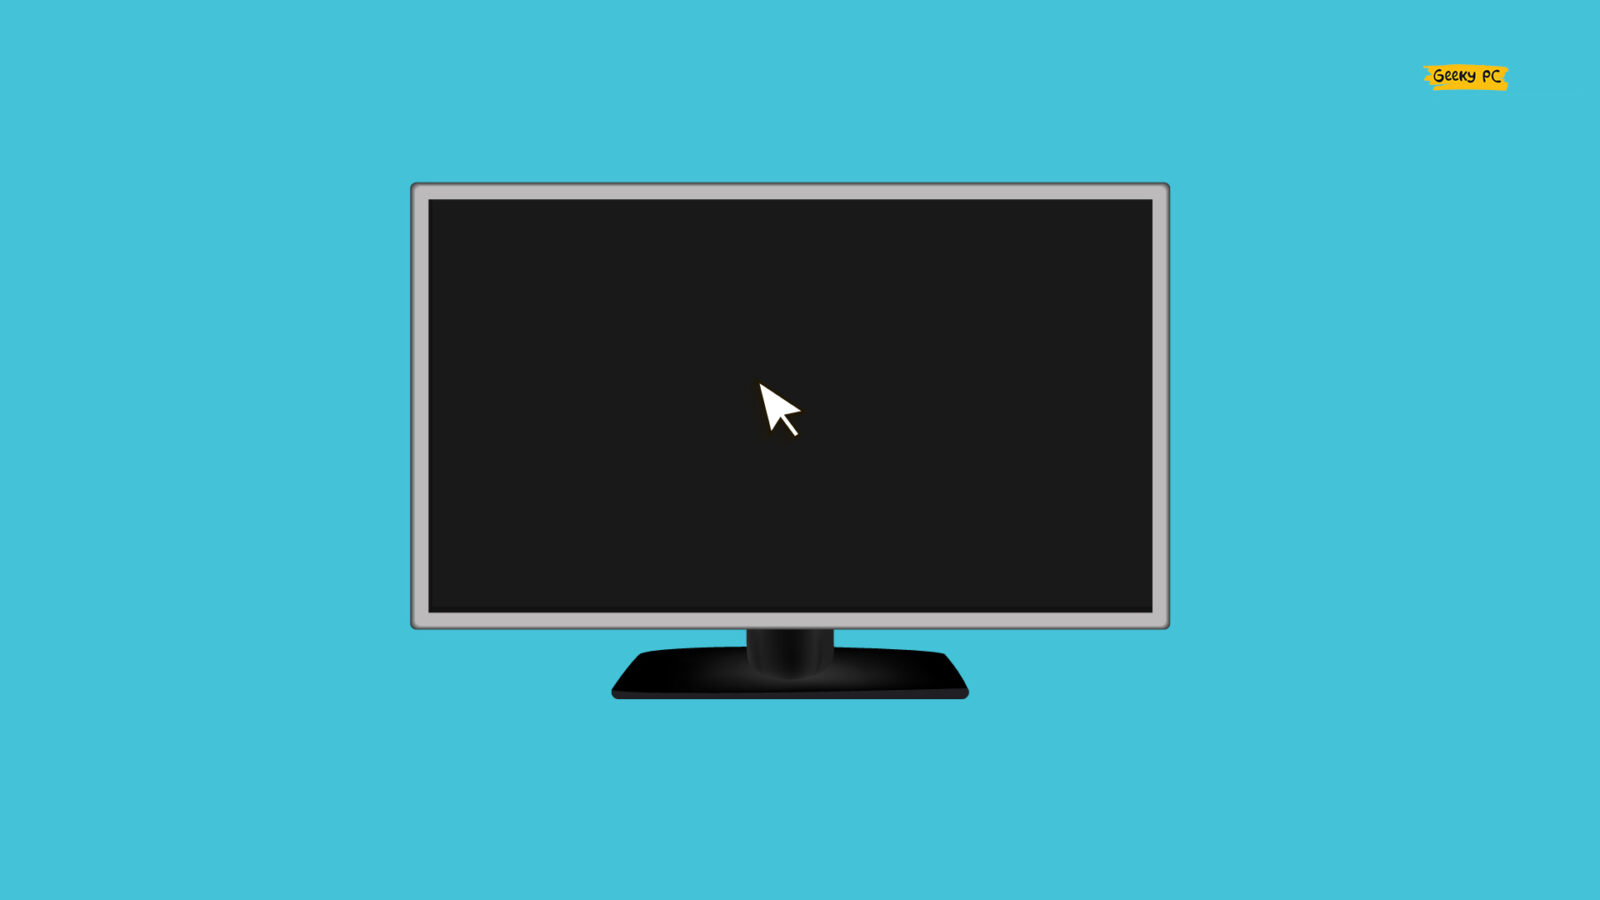
Although Windows 10 and 11 are pretty stable OS, we have to bang our heads in frustration once the Windows 10 black screen with cursor error occurs on your system, isn’t it? However, it is quite common these days, especially with people using a high-end graphics card.
The black screen with cursor error can be solved by replacing the monitor cables and removing the battery. Besides, you must update the Windows OS and the GPU driver. You must disable both the app readiness service and the fast startup option. Restarting Windows Explorer can also fix it.
However, these are not all the fixes we have to resolve this issue. But, before we dive deep into the solution part of this problem, let’s understand what the primary reasons behind this Windows error are.
What Are The Primary Reasons Behind The Windows 10 Black Screen With Cursor Error?
We all faced the Windows 10 black screen with cursor error while using our devices, especially after the recent update release. However, it mainly triggers due to wrong system configuration or hardware malfunction. But, in a broad spectrum, this issue can mainly trigger for seven main reasons.
- The connecting cable of your monitor is damaged, broken, or unsupported by your system.
- The brightness level on your monitor settings or GPU settings is too low.
- You are using an outdated variant of the Windows OS that needs an urgent update.
- There is an obsolete GPU driver installed on your system that is not supported by the Windows OS.
- You have enabled the fast startup option that is taking too many system resources.
- The app readiness service is enabled on your device, which is causing an interference issue.
- A problematic app installed on your device is directly influencing the GPU driver.
Besides these main reasons, the black screen error can even trigger on Windows devices if there is a problem in the Windows Explorer process. It can also occur if there is a bug or error in the root files or installation directories.
Hardware Tweaks To Fix The Black Screen With Cursor Error In Windows OS
Not just software, even faulty hardware can also trigger the Windows 10 black screen with cursor error on your device. So, before trying any system tweaks, you must follow these two hardware tweaks first to resolve this issue.
1. Replace Your Display Cable (For Desktop)
If you are getting the black screen error all of a sudden while using an old monitor cable, the problem may lie in the cable itself.
It can even trigger if you are using any monitor cable that is not supported by your system. You can also get this issue if any of your monitor connection cables are loose.
- Step 1: Unplug the connecting cable from both your CPU and monitor (you may also need to unscrew the attachment first if you are using a VGA cable).
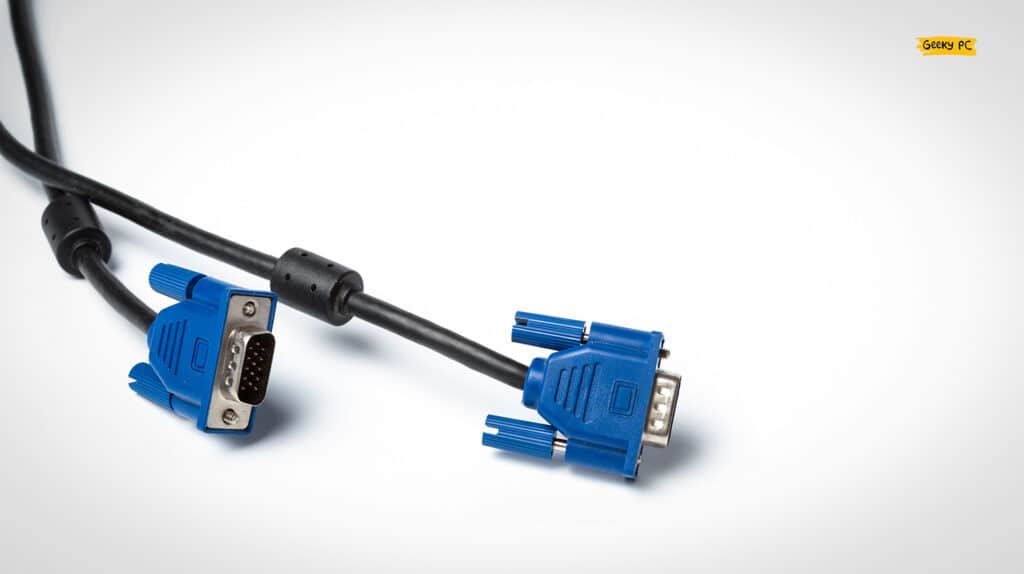
- Step 2: Check whether the connecting cable is showing any sign of damage, wear, and tear.
- Step 3: If the old cable is broken, buy a new cable to replace the old one.
- Step 4: Secure the connecting cable in both the CPU and monitor tightly (Screw the connectors if you are using a VGA cable).
- Step 5: Reboot your device and check if you are still getting a black screen on your monitor.
A few of our users have reported to us that they are getting a generic PnP monitor error once they have physically replaced the connection cable.
If you are also facing the same issue on your device, follow our step-by-step guide to fix the “generic PnP monitor” error in Windows 10/11 devices.
2. Remove Battery And Long-Press The Power Button (For Laptops)
If you are getting the Windows 10 black screen with a cursor error on your laptop, you may need to give your system a fresh restart after removing the battery.
Most laptops nowadays also need you to long-press the power button once the battery is removed to give it a fresh start.
- Step 1: Shut down your laptop and remove the charging cable from it.
- Step 2: Now, hold the laptop upside down, remove the battery cover plate, and remove the battery pack from the device.
- Step 3: Once the battery is removed, long-press the power button and keep it on hold for at least 60 seconds.
- Step 4: Plugin the battery pack on your device and close the cover of the battery compartment.
- Step 5: Turn on your laptop and check whether it is still displaying a black screen.
If these steps can’t fix the black screen error on your laptop, the problem may even lie in the display unit. And to check that, you need to contact a computer mechanic or can visit the nearest service center of your laptop’s manufacturer.
You can also check the display issue by connecting a secondary display unit to your laptop.
7+ Easy Fixes For The Windows 10 Black Screen With Cursor Error
You should try the generic fixes first to resolve the Windows 10 black screen with cursor error before trying any advanced fixes. And in most cases, these generic methods alone are sufficient to resolve the issue in no time.
3. Reboot Your System In Safe Mode
A few times, you may get the Windows 10 black screen task manager error on your device, not just due to cable damage but also due to external interference from third-party apps.
And in that case, you need to reboot your system in safe mode to minimize all the interference issues.
- Step 1: To launch the “Settings” app on your device, press the “Windows Key + I” buttons together.

- Step 2: Once the “Settings” app launches, scroll down the page and click on the “Update & Security” option.
- Step 3: After you get a new window, navigate to the left panel and click on the “Recovery” option.
- Step 4: Now, navigate to the right panel and click on the “Restart” option under the “Advanced Startup” header.
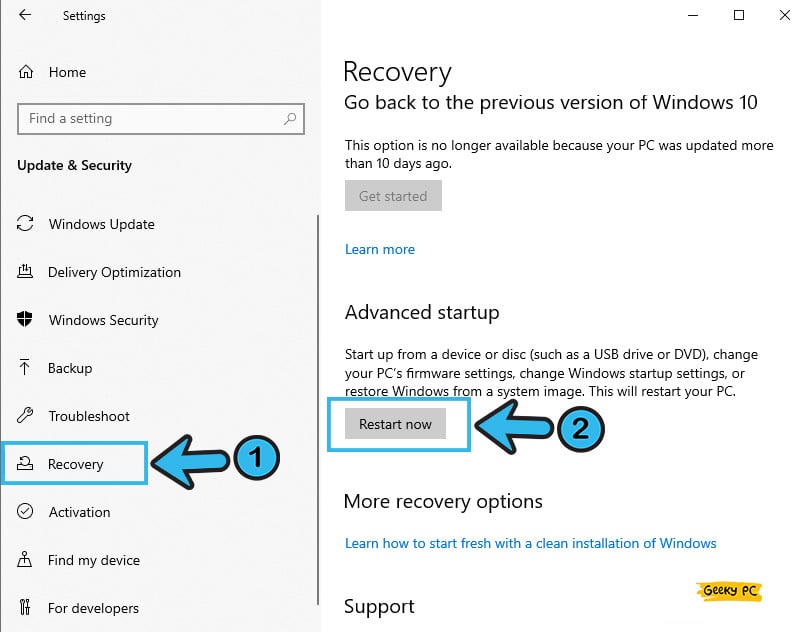
- Step 5: Let your Windows automatically restart itself and choose “Safe Mode” once you get the bootup screen.
- Step 6: Once your windows fully restart, check whether you are still getting the black screen or not.
At times, you may not get the black screen after you start your device, but get it every time you open twitch. It may happen that the problem is in your device or the website itself. But to resolve it, follow our step-by-step guide to fix Twitch’s black screen errors effectively.
4. Change The Brightness Of Your Display
If you have faulty brightness settings on your device, such as extremely low brightness, you may get the black screen error on your Windows devices, especially while using a LED monitor.
However, you can tweak the brightness of your display unit in a few simple steps.
- Step 1: Press the “Windows Key + X” buttons together to launch the contextual menu on your device.
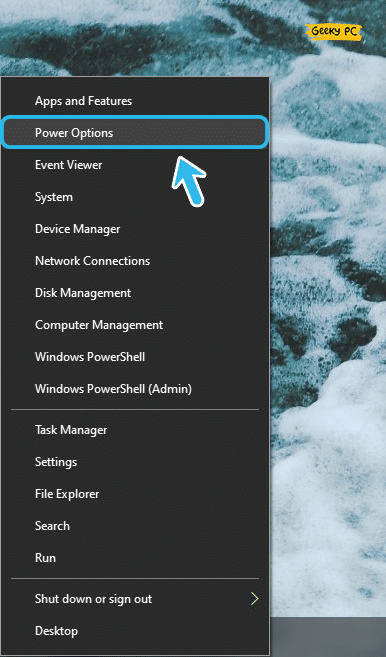
- Step 2: Once a new menu appears, click on the “Power Option” tab.
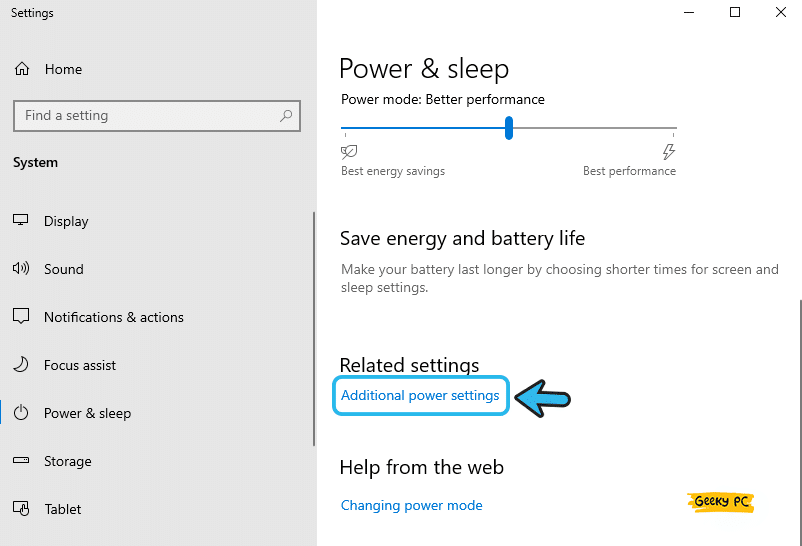
- Step 3: After a new window appears, navigate to the right panel, and click on the “Additional power settings” option under the “Related Settings” header.
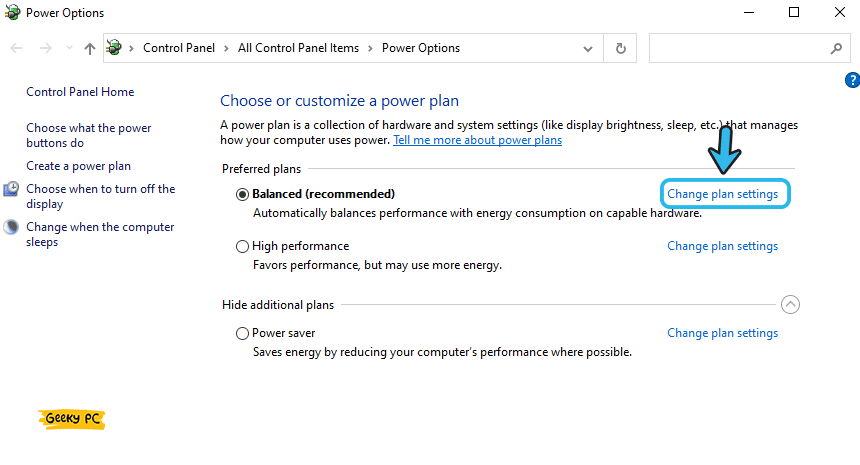
- Step 4: Navigate to the power plan you are using and click on the “Change plan settings” option.
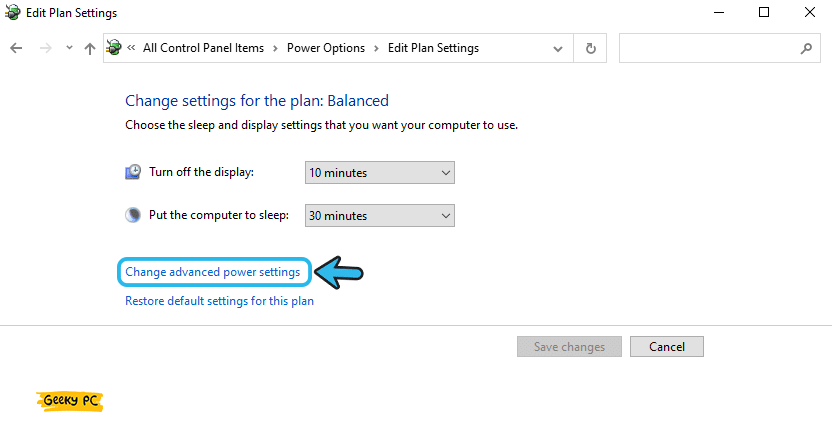
- Step 5: Once you get another new page, click on the “Change advanced power settings” option.
- Step 6: Now, navigate to the “Display Brightness” settings and slide the brightness bar up to 99%.
- Step 7: Click “OK” to save the settings and restart your device.
If you are using a graphics card on your device, you may not get the “Display Brightness” option on your power settings window. However, you can alter the brightness of your display while using the graphics card software.
You should also locate the brightness switch on your monitor and keep it on the maximum brightness level.
5. Change The Display Settings
If the windows 10 black screen doesn’t work on your device, it may happen due to an improper display setting. It can even happen if the current graphics card settings mismatch with your monitor settings.
However, you can easily tweak the display settings from Windows itself.
- Step 1: To launch the “Run” dialog box, press the “Windows Key + R” buttons together.
- Step 2: Type “Control” in the designated field and click on the “OK” button to launch it.
- Step 3: Once the “Control Panel” window launches, navigate to the top-right corner and click on the drop-down menu beside the “View by:” header.
- Step 4: Click on the “Large Icons” option from the drop-down menu.
- Step 5: Now, navigate to the main window and click on the “Display” option.
- Step 6: Once the new menu appears, select the “Change Display Settings” option.
- Step 7: After you get a new window, click on the “Advanced Settings” option, and finally, select the “Monitor” tab.
- Step 8: Now, click on the “High Color 16-bit” option from the menu.
- Step 9: Click “Apply” to save the new settings and reboot your device.
Several people have reported to us that they have started getting an unresponsive start button once they have tweaked their display settings.
If you are also encountering similar situations on your device, follow our comprehensive guide to fixing the “Start button not working” error in Windows 10 devices.
6. Disable Secondary Output from Device Manager
If you are using a dual monitor system on your device where one of the display units is showing a black screen, you may have a faulty secondary display setting on your device.
However, you can manually disable the secondary output from Windows itself to disable the faulty monitor.
- Step 1: Press the “Windows Key + X” buttons together to launch the contextual menu on your device.
- Step 2: Click on the “Device Manager” option from the contextual menu.
- Step 3: Once the new window appears, navigate to the left panel, and click on the “Display Adapters” option.
- Step 4: After the “Display Adapters” option is selected, navigate to the header tab and click on the “View” button.
- Step 5: Now, click on the “Show hidden device” option from the menu.
- Step 6: Navigate to the right panel and locate the “Secondary Output” option.
- Step 7: Right-click on the secondary output and click on the “Disable” option in the contextual menu.
- Step 8: Reboot your device and check whether you are still getting the black screen error.
If disabling the secondary display output option can’t resolve the error on your device, you may need to alter the monitor attached to your system.
You need to just swap the connection cables of your monitors and then reboot your device to check whether you are getting the same error in both your display units.
7. Disable Fast Startup In Windows
If you are getting Windows 10 black screen with a cursor too frequently on your device, it may be due to interference caused by the fast startup, which is a unique feature in the latest variants of the Windows OS.
However, you may need to disable it from your device to eliminate the interference issue.
- Step 1: Click on the “Magnifying Glass” button located at the bottom-left corner of your taskbar.
- Step 2: Once you get the new search field, type “Control Panel” and click on the very first result that appears.
- Step 3: After the new window launches, click on the drop-down menu beside the “View by:” header located at the top-right corner of the page.
- Step 4: Now, click on the “Large Icons” option.
- Step 5: Once you get all the new menus, click on the “Power Option” tab.
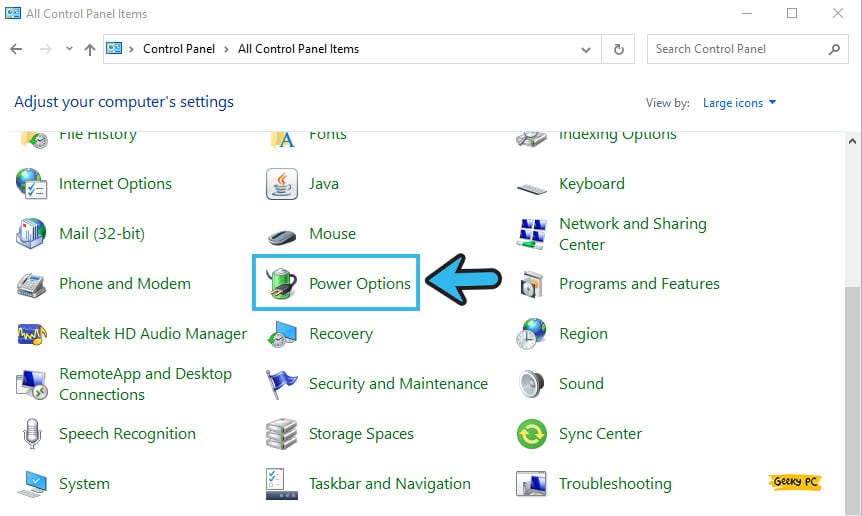
- Step 6: After you get a new window, navigate to the left panel and click on the “Choose what the power buttons do” option.
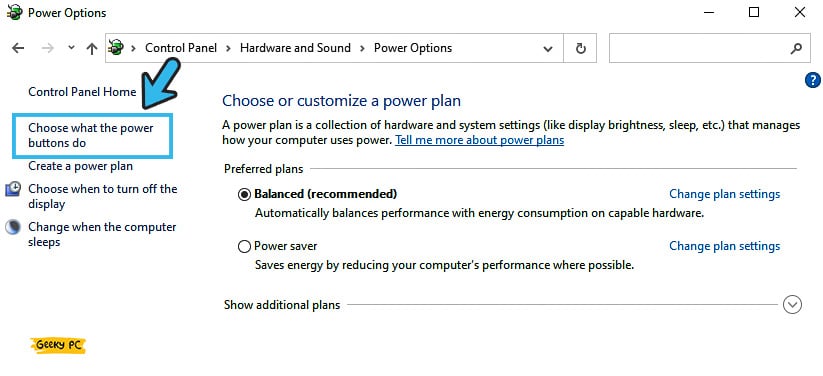
- Step 7: Now, uncheck the adjacent box to the “Turn on fast startup (Recommended)” option to disable it.
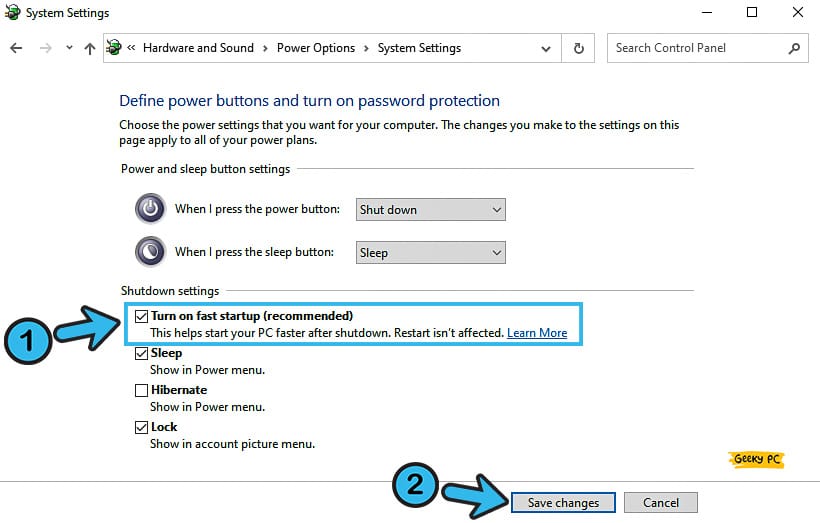
- Step 8: Click on the “Save Changes” option to apply the settings and then reboot your device.
You shouldn’t keep the “Fast Startup” option disabled for a long time on your windows device. Or else it will hamper the overall experience while using the Windows OS.
So, once you fix this black screen error on your device from the root, you must reenable the fast startup option.
8. Restart Windows Explorer
A malfunctioning windows explorer process can also trigger the windows 10 black screen error before login. It can directly influence the graphics card driver installed on your system to trigger additional bugs as well.
So, to eliminate it from the root, you need to restart the Windows Explorer process.
- Step 1: Press the “Ctrl + Shift + Esc” buttons altogether to launch the system menu on your device.
- Step 2: Once you get a new menu, click on the “Task Manager” app.
- Step 3: Now, navigate to the “Processes” tab from the header selection menu.
- Step 4: Scroll down and click on the “More Details” option located at the bottom of the page.
- Step 5: Locate the “Windows Explorer” process from the list and right-click on it to fetch the contextual menu.
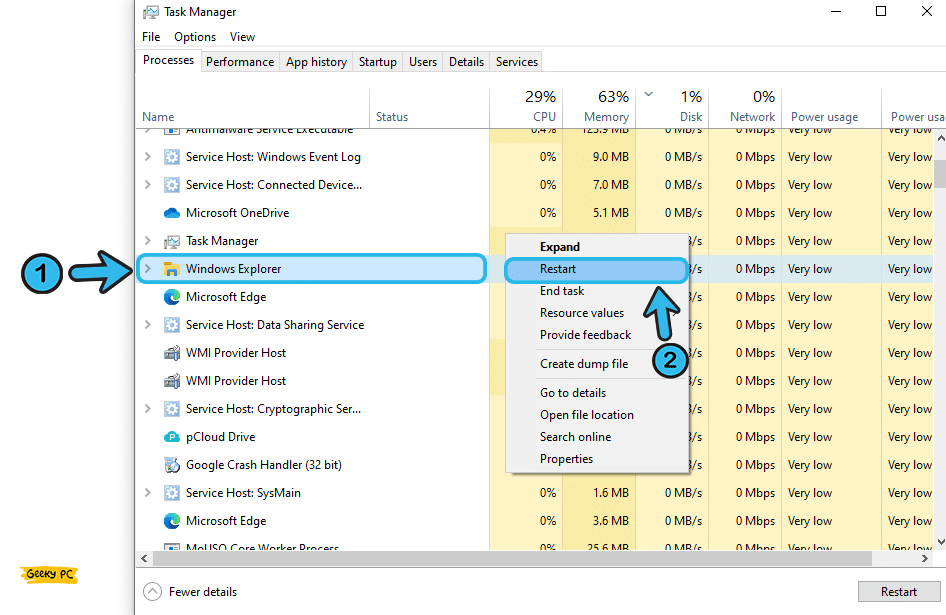
- Step 6: Now, click on the “Restart” button to give the process a fresh restart.
- Step 7: Close the “Task Manager” app and check whether you are still getting the black screen.
A few of our users have already reported to us that they are getting a group policy error whenever they try to restart their Windows Explorer, especially while using their system under a network administrator.
If you are also facing the same, follow our detailed guide to fix the “This program is blocked by group policy” error in Windows 10/11.
9. Update Your GPU Driver
The back screen error, especially with the cursor still appearing on the screen, can easily trigger if you are using an obsolete graphics card drive on your device.
So, you need to update the GPU driver. It is also necessary to update the graphics driver at a timely interval to fix all the minor issues and bugs related to graphics.
- Step 1: Right-click on either the “Start” button or the “Windows” icon (depending on the variant of your Windows OS).
- Step 2: Now, click on the “Device Manager” option to launch the app.
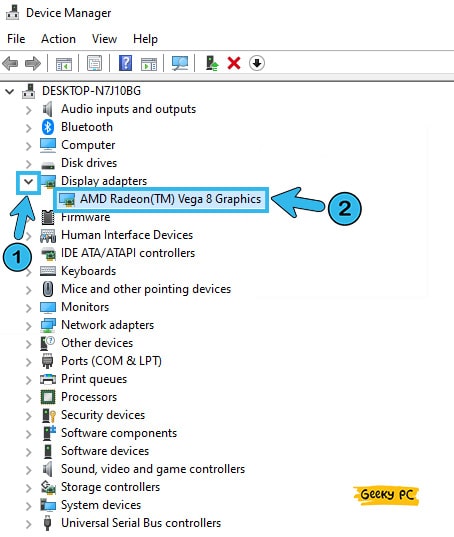
- Step 3: Once you get a new window, navigate to the left panel and click on the “Display Adapters” option.
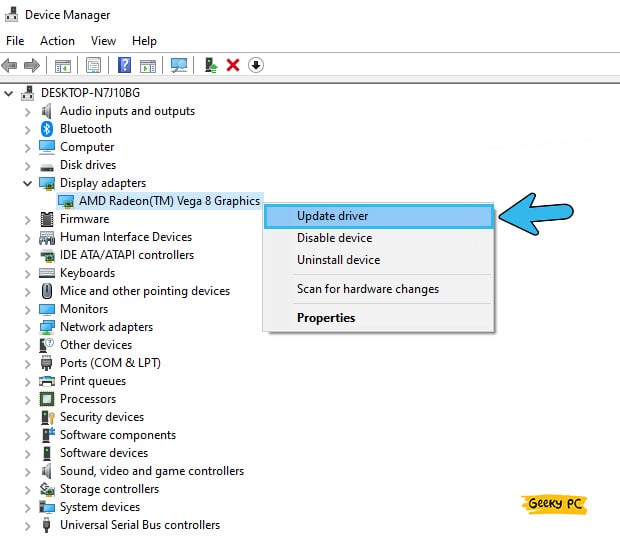
- Step 4: Find your GPU from the expanded list and right-click on it to fetch the contextual menu.
- Step 5: Click on the “Update Driver” option.
- Step 6: Once you get a new prompt, click on the “Search automatically for drivers” option and follow the on-screen instruction.
- Step 7: After your GPU driver is fully updated, reboot your device.
If updating the GPU driver that you are using can’t fix this issue, you may need to update all the available graphics drivers from the device manager app. And you can do it by following the same steps we have mentioned above for each of your GPU and related drivers.
7+ Advanced Fixes For The Black Screen With Cursor Error
If the generic methods we have listed above can’t fix the Windows 10 black screen with cursor error, the problem may be way deeper rooted than you think. And in that case, restoring to the advanced tweaks is the only option left to fix this issue.
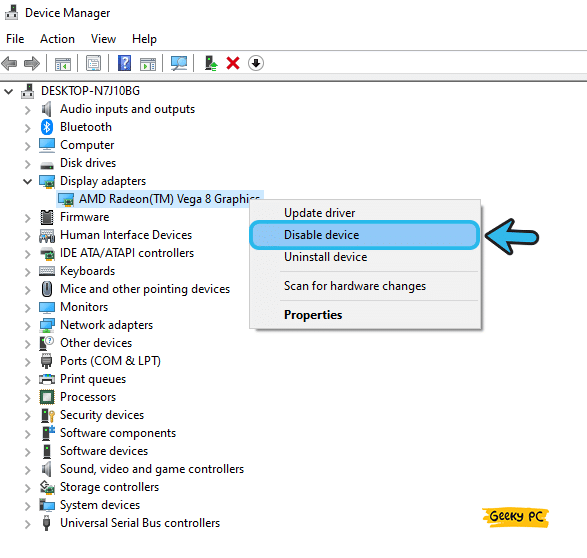
10. Uninstall GPU Driver
If you are still getting the black screen error on your Windows device even after updating your GPU driver, there is a chance that the GPU driver itself is unsupported by the version of OS you are using.
In that case, you need to manually uninstall the graphics card driver and move to the default driver option.
- Step 1: Press the “Windows Key + X” buttons together to fetch the contextual menu on your device.
- Step 2: Click on the “Device Manager” option to launch the app.
- Step 3: Once you get a new window, navigate to the left panel, and click on the “Display Adapters” option to expand the menu.
- Step 4: Now, navigate to the GPU driver you are currently using and right-click on it to fetch the contextual menu.
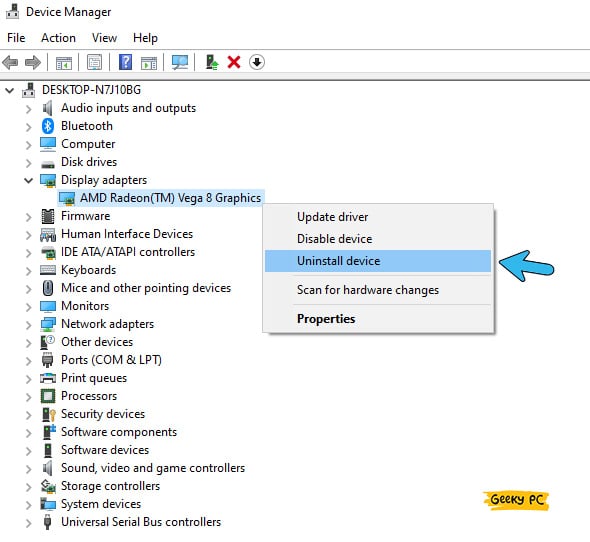
- Step 5: Click on the “Uninstall Device” option to remove your GPU driver.
- Step 6: Once a new prompt appears, select the box beside the “Delete the driver software for this device” option.
- Step 7: Click on the “Uninstall” button and follow the on-screen instruction.
- Step 8: Once the GPU driver is completely removed from your system, reboot your device.
After you reboot your system, Windows OS will automatically find the right graphics driver for your device and install it.
Alternatively, you can also manually remove the graphics card installed on your system and re-plug the monitor connecting cable to the video output of your motherboard.
11. Disable App Readiness Service
App readiness is a modern-day service that now comes preinstalled with the latest generation of Windows OS, such as Windows 10 and 11. This service enabled all the apps to launch and perform quickly.
However, you can even get a windows black screen error with the cursor after login in from this service.
- Step 1: Press the “Ctrl + Shift + Esc” buttons together to launch the system menu.
- Step 2: Now, select the “Task Manager” option to launch the app.
- Step 3: Once you get a new window, click on the “Services” button located in the top-right corner.

- Step 4: Click on the “Open Services” button to launch it
- Step 5: Now, navigate to the left panel and locate the “AppReadiness” service from the list.
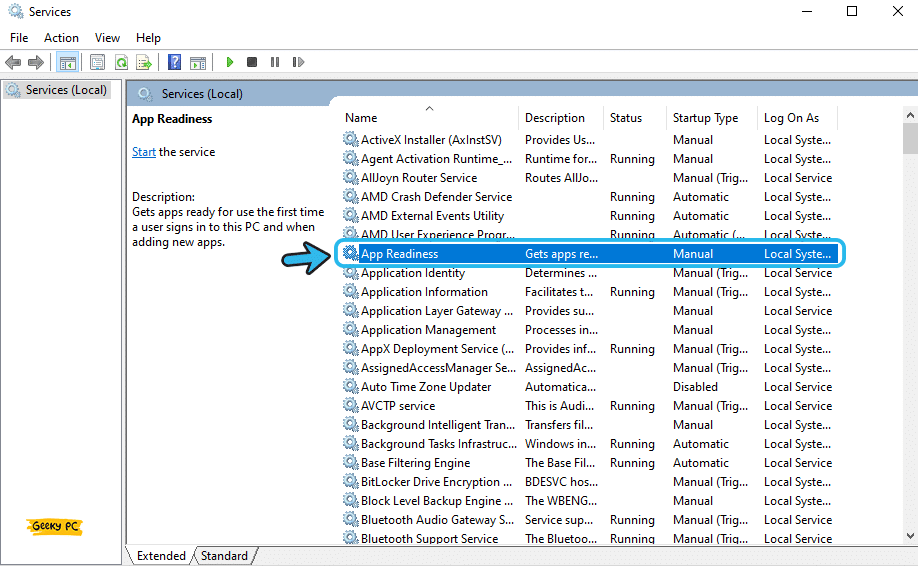
- Step 6: Double-click on it to launch the properties of this service.
- Step 7: Click on the drop-down menu beside the “Startup type” option and select the “Disabled” option.
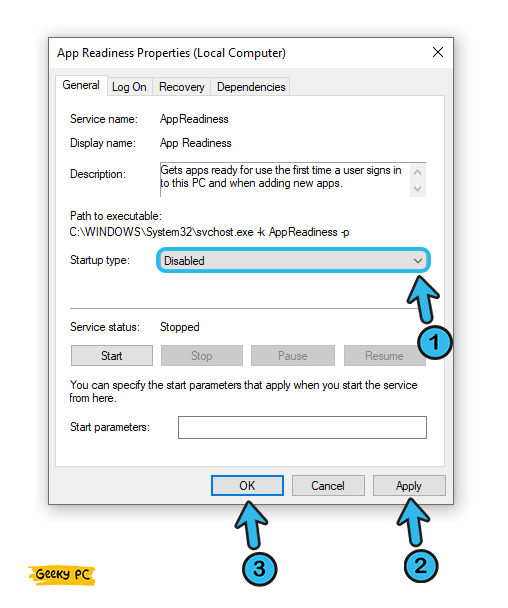
- Step 8: Click “Apply” to save the settings and then “OK” to exit from the “Task Manager” app.
If you disable the app readiness service in the latest Windows 10 and 11 systems, the overall user experience may get hampered. So, once you sort out the root causes of this black screen error on your device, you must reenable the app readiness service to ensure a smooth computing experience.
12. Repair The Problematic App
You may get frequent black screen errors on your Windows device if any of the problematic apps installed on your system directly interfere with the graphics driver. In that case, repairing or uninstalling the problematic app completely from your system will fix this issue.
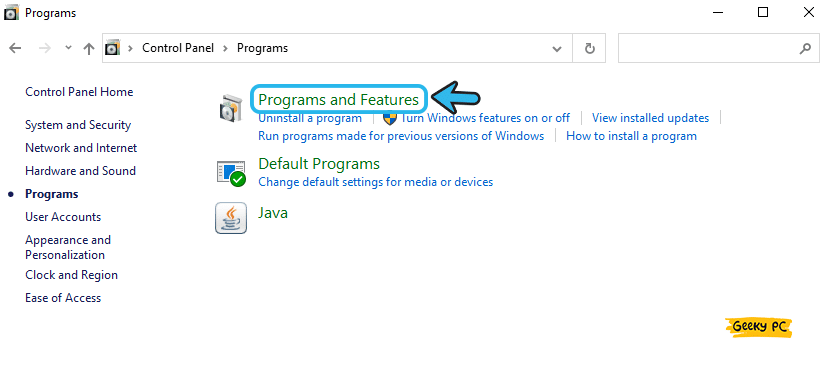
- Step 1: Press the “Windows Key + R” buttons together to launch the “Run” dialog box.
- Step 2: Type “Control” in the designated field and press the “OK” button to launch the app.
- Step 3: Once the new “Control Panel” window appears, navigate to the top-right corner and choose the “Category” option under the “View by:” header.
- Step 4: Now, scroll down and click on the “Programs” option.
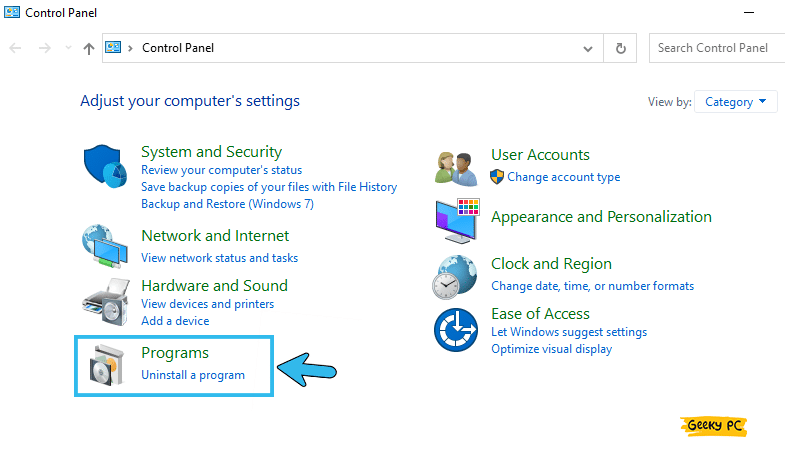
- Step 5: Once the “Programs” window appears, navigate to the right panel, and click on the “Programs and Features” tab.
- Step 6: Navigate to the problematic app once you get the full list of installed apps.
- Step 7: Now, select the problematic app and click on the “Repair” option from the header menu.
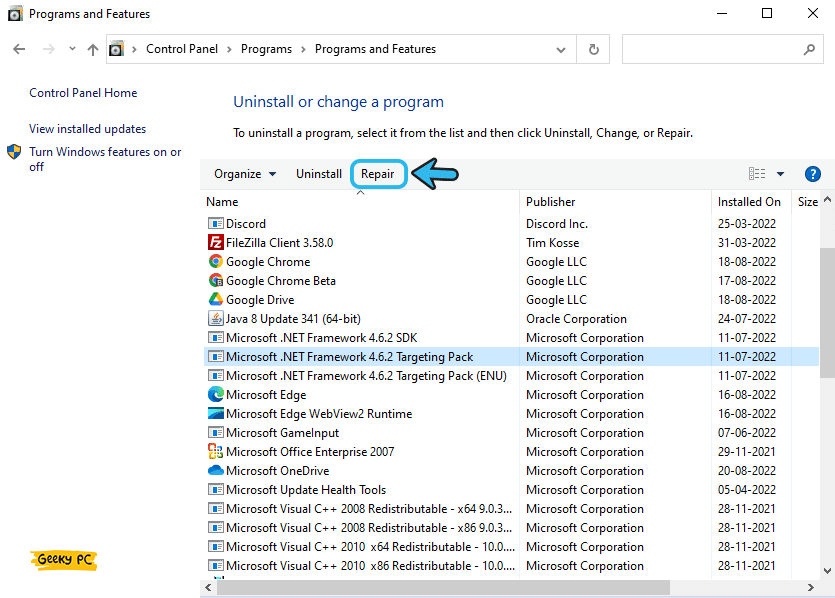
- Step 8: Follow the on-screen instruction to let Windows automatically repair the app.
- Step 9: Once the procedure is done, reboot your device and check whether you are still getting the issue.
13. Uninstall The Recent Windows Updates
You may get a black screen with a cursor error after your recent Windows update. It may be due to various reasons, from an unsupported path file to an error in your root directory. However, you need to completely remove the recent Windows update to fix this issue in no time.
- Step 1: To launch the “Settings” app on your device, press the “Windows Key + I” buttons together.
- Step 2: Scroll down to the bottom of the page and click on the “Update & Security” option.
- Step 3: Now, navigate to the left panel and click on the “Windows Update” option.
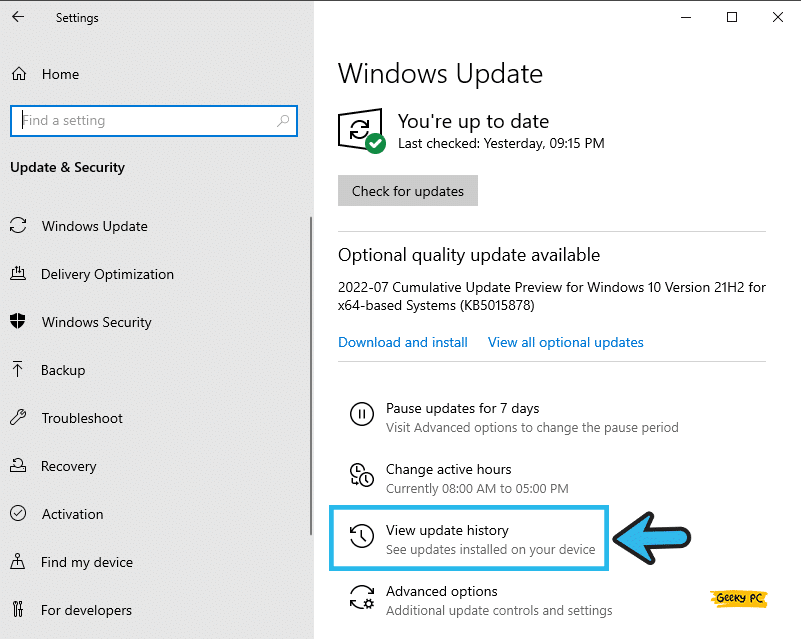
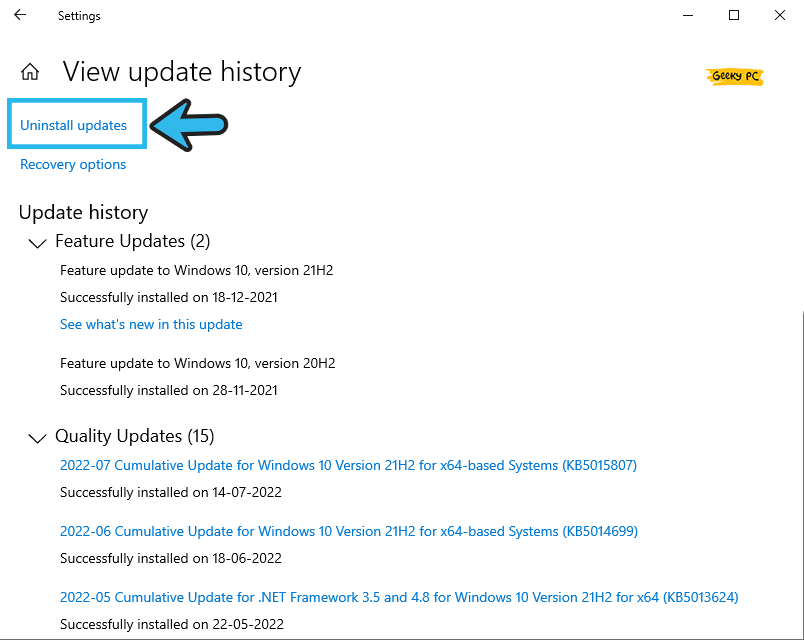
- Step 4: Go to the right panel and click on the “View update history” option.
- Step 5: Once a new window launches, click on the “Uninstall Updates” tab.
- Step 6: Once you get the full list of updates, right-click on the most recent Windows update and click on the “Uninstall” button.
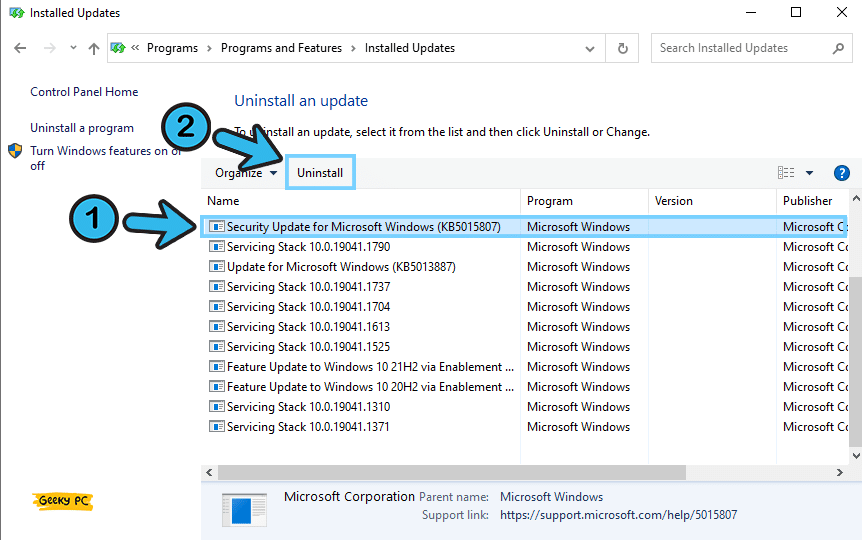
- Step 7: Once the update path is completely removed, reboot your device.
A few of our users have started getting an unresponsive taskbar once they have removed the most recent Windows update from their systems.
14. Reset Windows System
If you are still getting the Windows 10 black screen with a cursor even after removing the recent update patch, the problem may lie in the root installation directory of your Windows OS. And in that case, you need to reset your Windows OS-based system completely to fix the error.
- Step 1: Press the “Windows Key + I” buttons together to launch the “Settings” app on your device.
- Step 2: After the new window appears, scroll down to the bottom and click on the “Update & Security” option.
- Step 3: Once you get a new window, navigate to the left panel, and click on the “Recovery” tab.
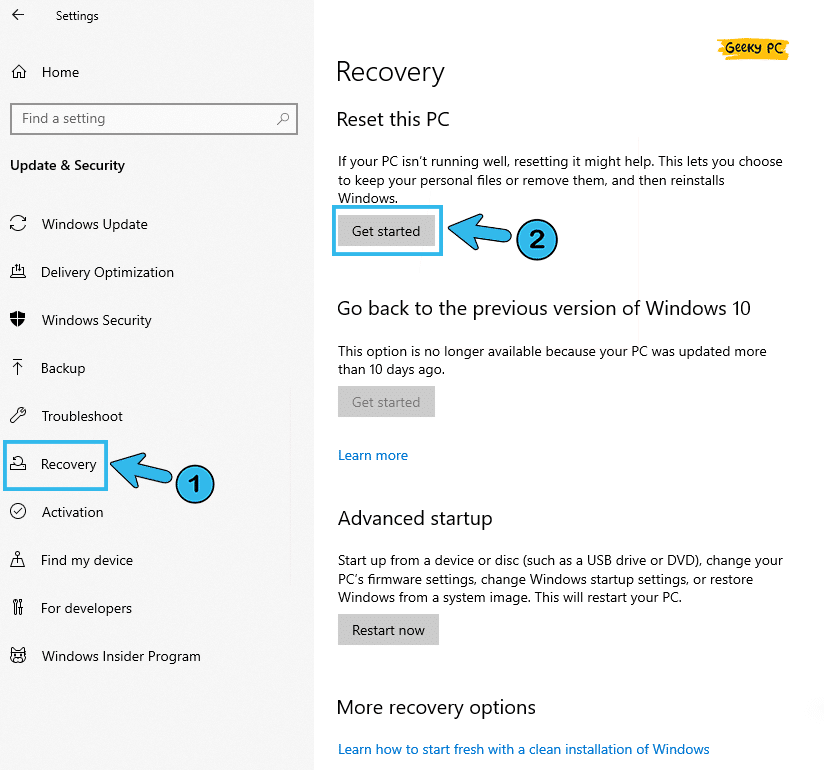
- Step 4: Navigate to the right panel, find the “Reset this PC” header, and click on the “Get Started” button.
- Step 5: After you get a new on-screen prompt, click on the “Keep my files” option.
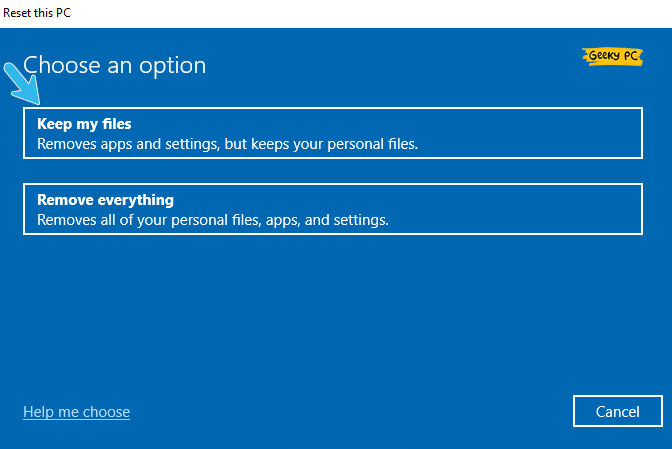
- Step 6: Now, click on the “Local reinstall” button to proceed.
- Step 7: Finally, click on the “Next” button and then on the “Reset” button to initiate the resetting procedure.
- Step 8: Once the system is fully reset, reboot your device and check whether you are still getting the error or not.
Some of our existing users have reported to us that they are getting an undefined network error with a yellow triangle sign on their internet connection after resetting their Windows OS.
15. Restore Windows To A Previous Point
If deleting the recent update file or even resetting the entire Windows OS can’t fix the black screen with a cursor error in windows 11, the problem may lie deep down in your root directories. And in such cases, you need to fully restore your Windows device to a previous point when everything was running smoothly.
- Step 1: Right-click on either the “This PC” or “My Computer” icon (depending on the Windows OS variant).
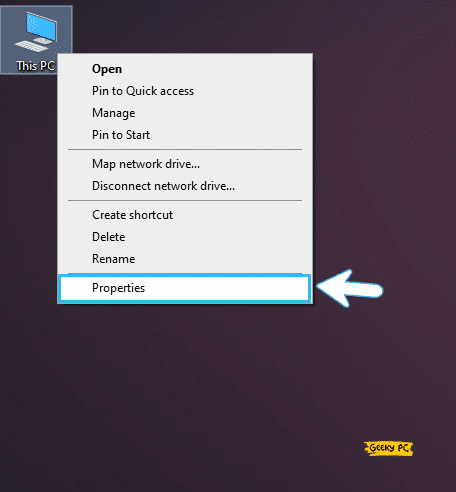
- Step 2: Once the contextual menu launches, click on the “Properties” tab.
- Step 3: After the “System Settings” window launches, click on the “Advanced System Settings” option.
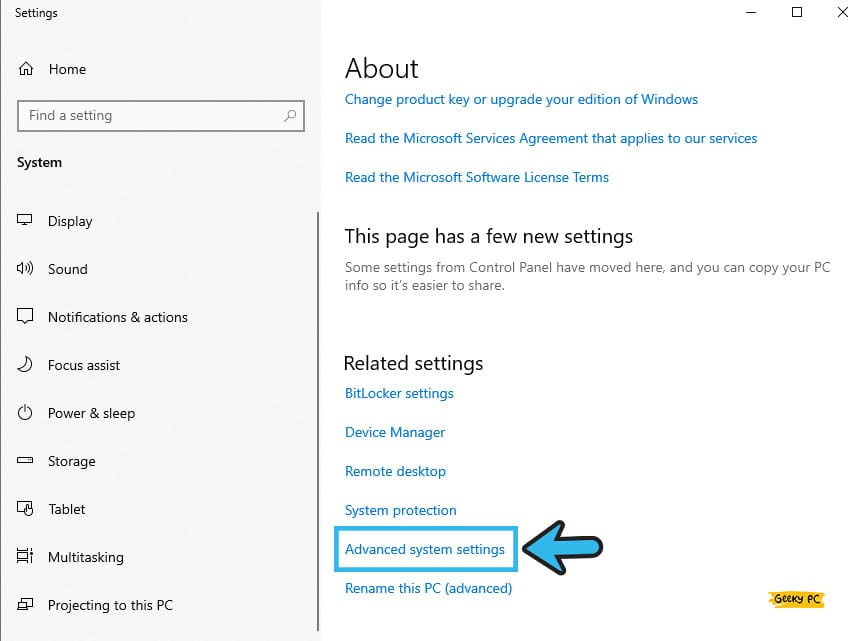
- Step 4: Click on the “System Properties” tab from the header selection menu.
- Step 5: Now, click on the “System Restore” option and then on the “Next” button to initiate the procedure.

- Step 6: Click on the “Show more restore points” option to view all the available restore points.
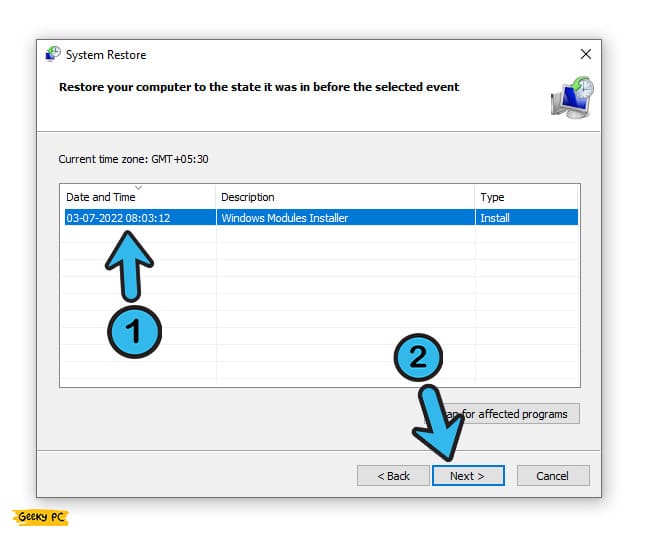
- Step 7: Select any of the restore points and click on the “OK” button.
- Step 8: Once your Windows OS is fully restored, reboot your device.
Many people have started getting a gateway error on their internet connection once they have restored their Windows OS to a previous point, especially while using a static IP connection. If you are also encountering similar situations on your device, follow our comprehensive guide to fix the “Wi-Fi Keeps Disconnecting” error in Windows 10 devices.
16. Reinstall Windows OS Completely
If you are still getting the same black screen issue on your device even after restoring your Windows OS to a previous point, the problem may lie in the installation folder itself. And you can roll back to a previous version of Windows OS to eliminate this error from your device.
- Step 1: To launch the “Settings” app on your device, press the “Windows Key + I” buttons together.
- Step 2: Once the new page appears, scroll down and click on the “Update & Security” option.
- Step 3: After you get a new window, navigate to the left panel and click on the “Recovery” option.
- Step 4: Now, navigate to the right panel, locate the “Go back to the previous version of Windows 10” header, and click on the “Get Started” button.
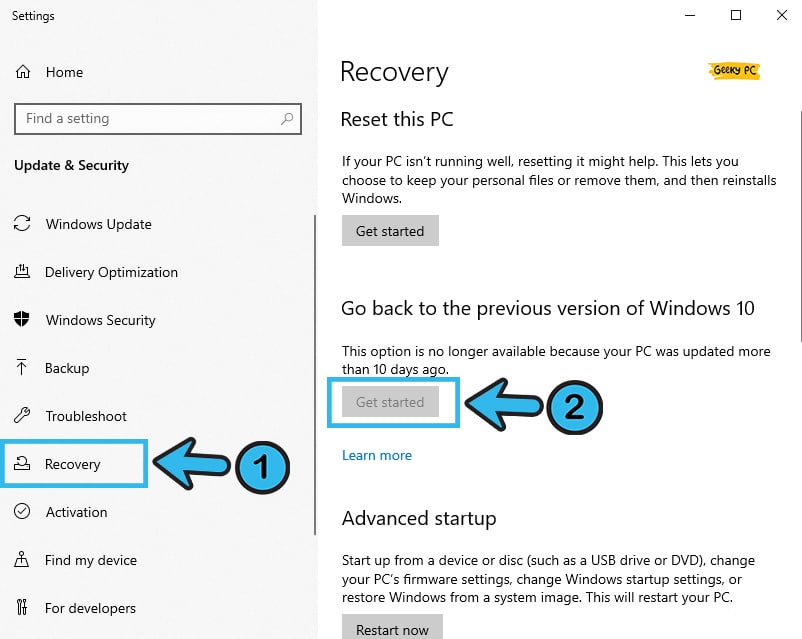
- Step 5: Click on the “Choose an Operating System” option once you get an on-screen prompt.
- Step 6: After you select an operating system, click on the “Windows Rollback” button.
- Step 7: Once the procedure is done, reboot your device again to check whether you are still getting the black screen.
You must back up all your data stored on your device to an external drive, such as an external HDD or pen drive. Otherwise, you may lose all your data once the OS is fully restored. You can also use free tools like Google Password Manager to store your passwords safely.
Conclusion
Before trying any advanced fixes that need pro-level tweaks, you must try all the generic methods first to resolve the Windows 10 black screen with cursor error. However, if you have to resort to advanced fixes, you must create a system restore point beforehand to roll back if anything happens during the tweak.
So, that’s all the possible solutions we have for the black screen error in Windows devices. If you think we have missed any method or if you know of any other fix to resolve it, don’t forget to drop your suggestion and feedback in the comment box below.
FAQs
Q. What causes a black screen with a cursor?
A faulty monitor cable or an unsupported one can cause a black screen with a cursor error in Windows devices. Besides you can also get it if you are using an obsolete version of the Windows OS or the GPU driver. Enabling the fast startup option can also trigger this error in a few systems.
Q. How do I fix a black screen with a cursor on startup?
Start by restarting your Windows device into safe mode to minimize external interference. You may also need to update your Windows OS along with the GPU driver. You must also restart your Windows Explorer process and disable the fast startup option to fix it.
Q. What causes the black screen of death in Windows 10?
An unfinished or interrupted Windows update is the main cause of BSOD error in Windows 10. However, it may even happen if you are using an outdated version of Windows OS or the GPU driver that is not supported by your system. Fast startup and App Readiness services can also trigger this issue.
Q. Does resetting the PC fix the black screen with the cursor?
Yes, resetting your Windows-based PC is likely to solve the black screen with cursor error in your device. You can either repair your Windows OS or can fully reset it through a local reinstall. Besides, you may also completely restore the system to a previous point when everything was working fine.