

At times, the start button on the desktop and the windows key on our keyboard suddenly stop working without any reason. And we have to bang our head when the start button is not working in Windows 10 while we are doing any important task, isn’t it?
Updating the Windows 10 OS and drivers can resolve the unresponsive start button. Besides, you can manually disable the filter key and restart your system in safe mode to rectify this issue. More advanced users can try to create a new registry file and rebuild the entire index file as well.
However, these are not the only solution if you face the start menu bug or related issues on your Windows devices. But before we reveal all those possible solutions, let’s understand the root causes behind this problem.
What Are The Root Causes Of The Start Button Not Working In Windows 10?
Many of us have already faced a situation where the Windows 10 start menu is not working without any reason at all! And we had to try different tweaks to make it start working again!
But you may not know that this start menu error can typically trigger for seven primary reasons, especially if you consider a broader horizon.
- You are using an obsolete version of Windows 10, or the OS itself is corrupted.
- You may have a damaged keyboard, or the Windows key in the keyboard itself is damaged.
- Gaming mode is enabled in your Windows 10 system, influencing the system’s performance.
- You have accidentally disabled the windows key from the registry editor.
- Any third-party antivirus or firewall conflicts with the keyboard or the display drivers.
- You have enabled the filter key features on Windows 10 system that conflict with the default key functions.
- You have corrupted or buggy registry or index files on the root directory.
Besides these seven, there can be other auxiliary reasons as well, such as a faulty Microsoft account. However, all these issues can be solved with some generic and advanced fixes that we will now discuss.
6+ Easy Fixes If The Start Button Is Not Working In Windows 10
Before you resort to any advanced methods that need pro-grade system tweaks if the start button is not working in Windows 10, you need to try the generic techniques first. And in almost 80% of the cases, these generic methods alone will likely fix this bug.
1. Restart With Safe Mode
You may have already countered such a situation where the start button is not working even after several restarts, even though the rest keyboard is working absolutely fine.
In such cases, it is better to reboot your system in safe mode to know if any startup application is conflicting with the keyboard driver or not!
- Step 1: Click the “Magnifying Glass” icon on your taskbar and type “Settings” in the search field.
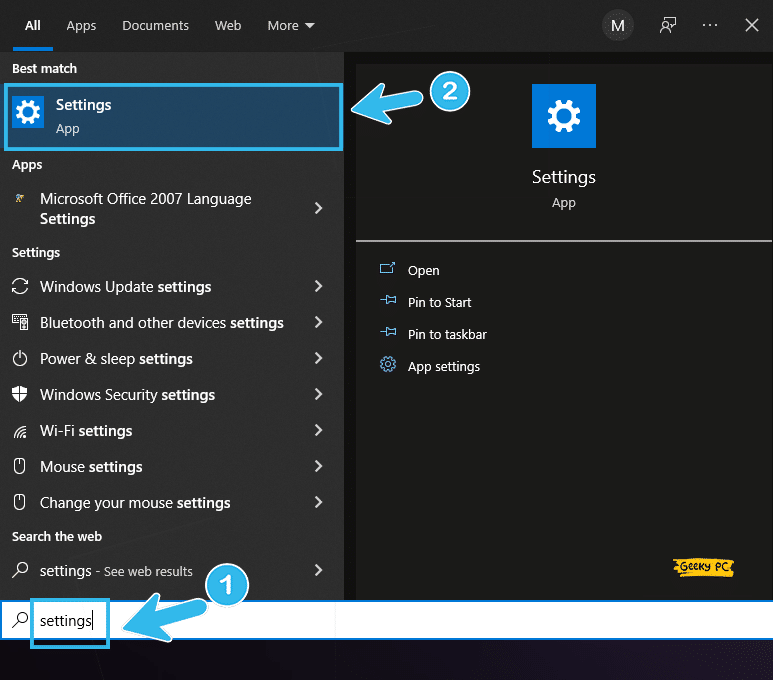
- Step 2: Click on the first result that displays to open the “Settings” app.
- Step 3: Once the new window appears, scroll down and click on the “Update & Security” option.

- Step 4: Navigate to the left panel and click on the “Recovery” option.
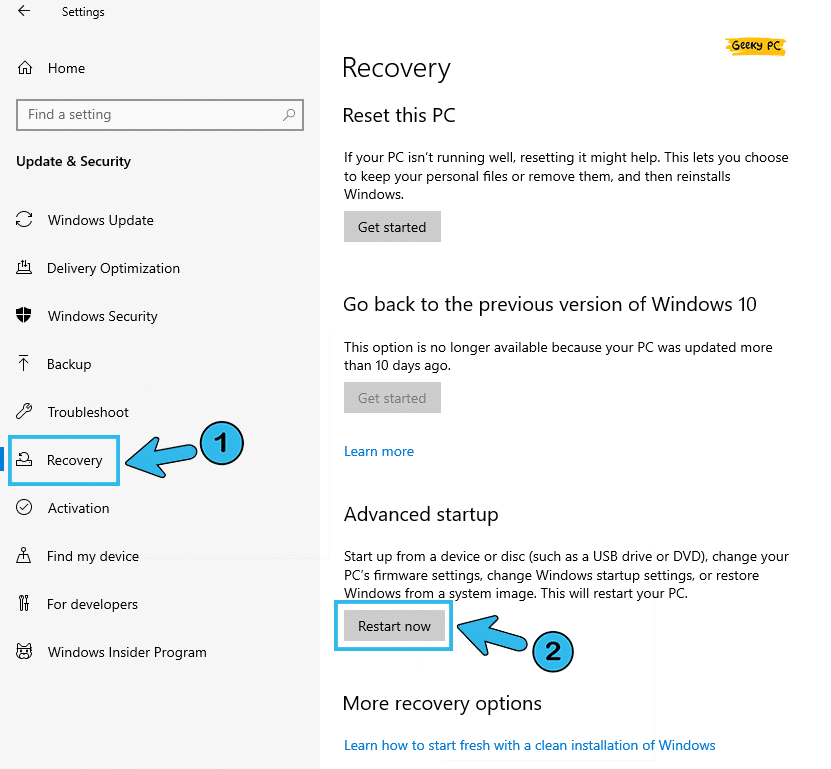
- Step 5: Now navigate to the right panel and click on the “Restart” button under the “Advanced startup” header.
- Step 6: Let Windows reboot itself and select the “Safe Mode” option from the bootup screen.
- Step 7: Once the Window starts in “Safe Mode,” check whether the issues still persist.
After repeatedly starting their Windows PC with safe mode, several users have reported getting graphical issues, especially if they use Nvidia graphics cards. In that case, follow our detailed guidelines to fix the No Operation Can Be Performed On Local Area Connection in Windows 10 systems.
2. Disable Filter keys
Filter key is a newly integrated option in Windows 10 that effectively eliminates keystroke reparation. However, it may sometimes conflict with the driver itself, which can further cause an unresponsive start button.
And in such cases, disabling the filter key option can be the true solution.
- Step 1: Click on the “Magnifying Glass” icon on your taskbar to initiate the search option.
- Step 2: Type “Control Panel” on the search field and click on the first result that appears.
- Step 3: Once the “Control Panel” app launches, navigate to the “View by” option located at the top-right corner and set it to the “Category” mode.
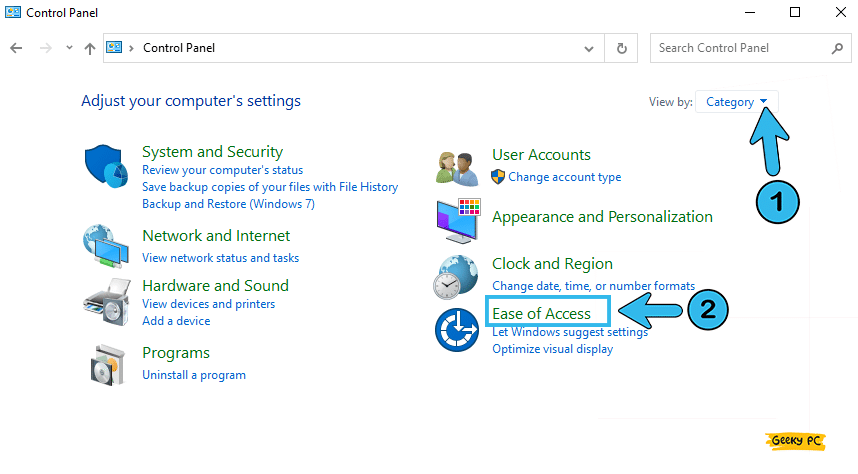
- Step 4: Now scroll down and click on the “Ease of Access” option.
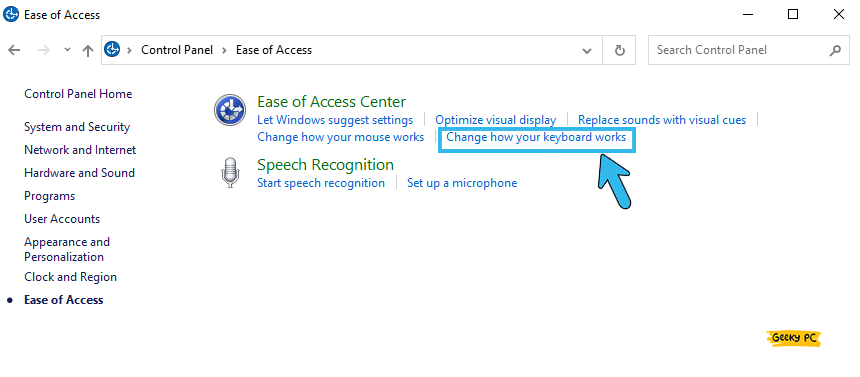
- Step 5: Once the new menu launches, click on the “Change how your keyboard works” option from the right panel.
- Step 6: Uncheck the box before the “Turn on Filter Keys” option located under the “Make it easier to type” header.
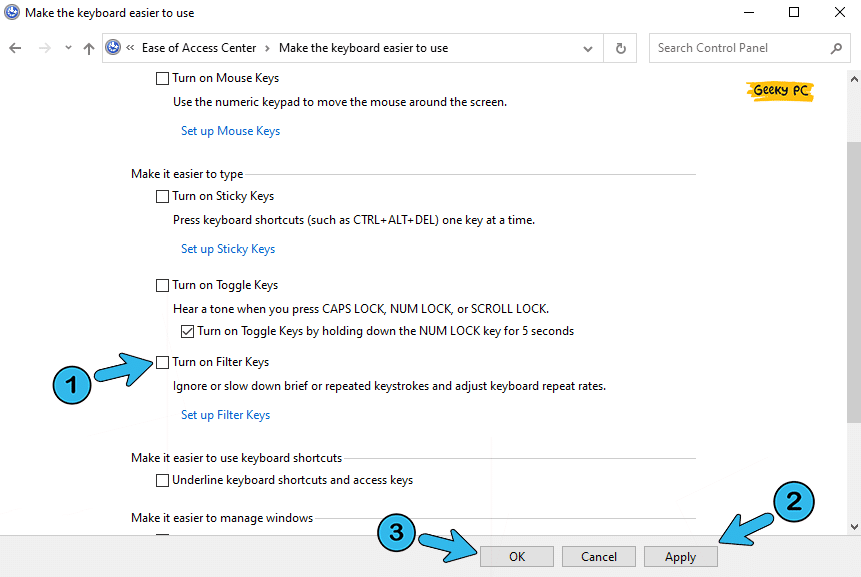
- Step 7: Click “Apply” and then “OK” to save the settings and exit from the “Control Panel” window.
If you are using any high-end keyboard or a mechanical one that comes with its own UI, you should disable the filter key or repeat key option from that UI too.
Otherwise, this issue may still persist if you disable it only from the windows settings.
3. Update Windows 10
After an unsuccessful run of Windows 8 and Vista, Microsoft came up with this brilliant design and usability in Windows 10. However, it still has some minor issues that the developers constantly deal with by releasing frequent updates.
So, whenever it is available, you should update your OS.
- Step 1: Click the “Magnifying Glass” icon to launch the search bar and type “Windows update” in the respective field.
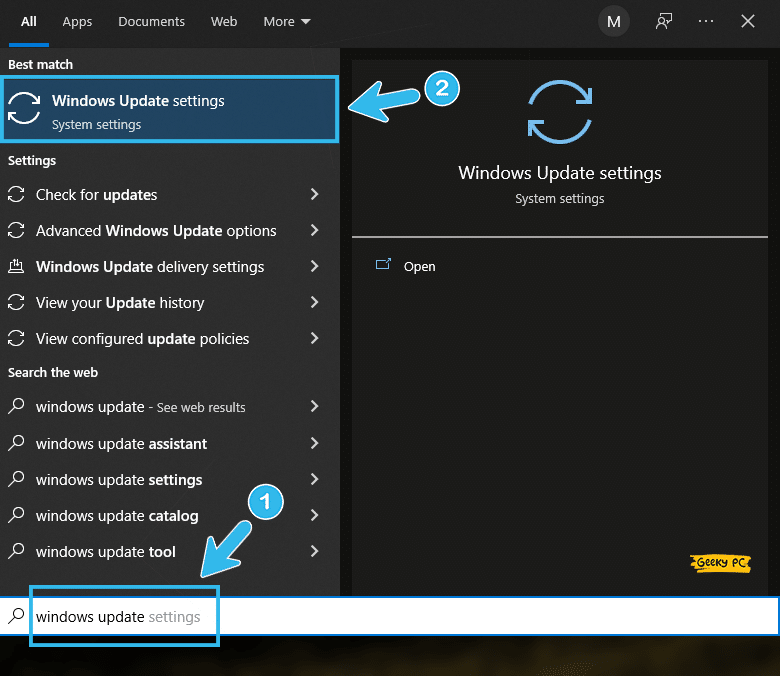
- Step 2: Click on the first result and let the Windows update settings menu launch.
- Step 3: Once the new menu appears, navigate to the left panel, and click on the “Windows Update” option.
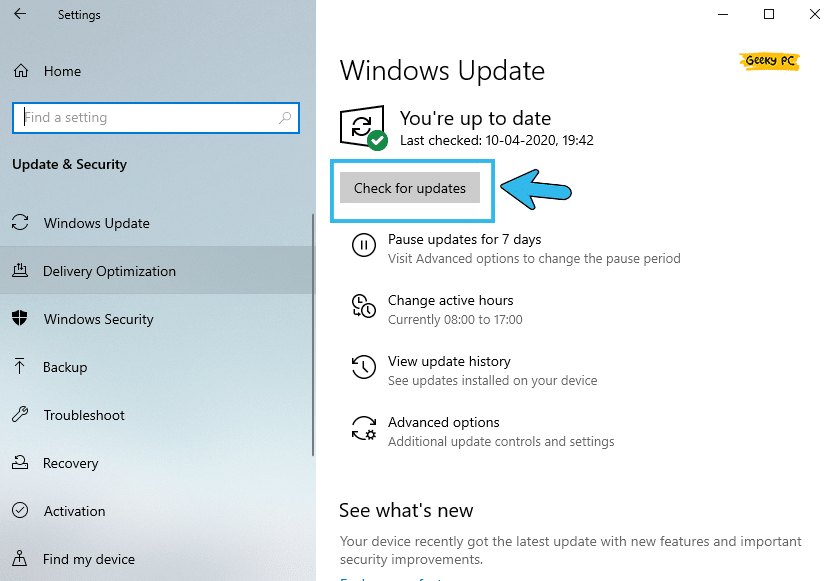
- Step 4: Come to the right panel and click on the “Check for updates” button.
- Step 5: Let Windows update the OS and restart your system when it is done.
Several people have reported getting a nonresponsive taskbar along with the start button issues in Windows 10, especially after the upgrade from Windows Vista.
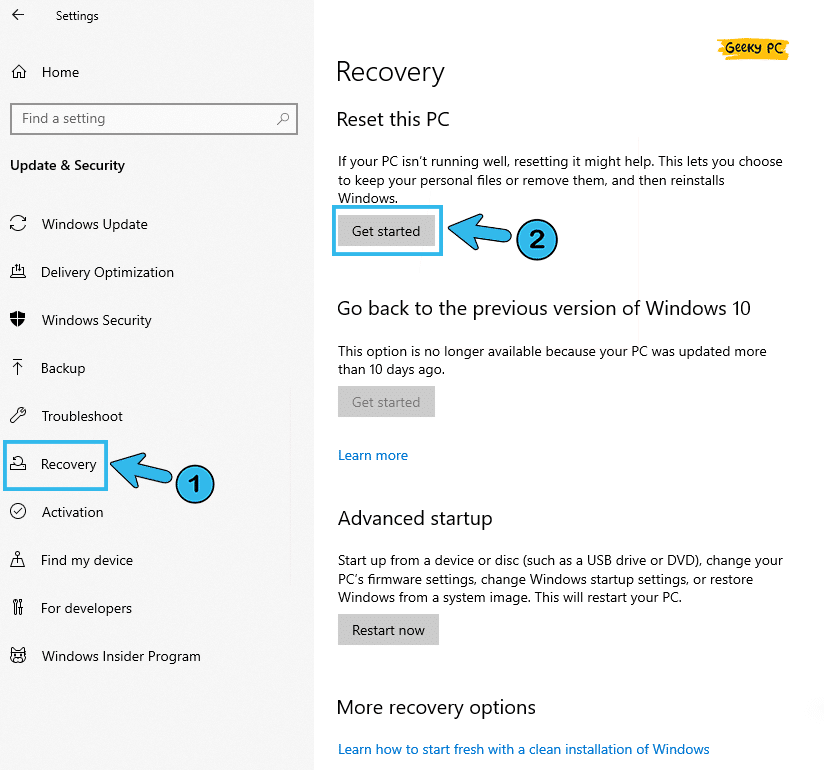
4. Reset Windows System
At times, it is even possible that the root directory files of your Windows 10 device are corrupted due to a security breach or due to malware infections.
In such cases, it is better to reset the Windows device altogether. And it will not just solve the start button issues but also the other related issues as well.
- Step 1: Press the “Windows Key + I” buttons together to launch the “Settings” app.
- Step 2: Scroll down and click on the “Update & Security” option.
- Step 3: Once the new window appears, click on the “Recovery” option located on the left panel.
- Step 4: On the right panel, navigate to the “Reset this PC” header and click on the “Get Starter” button.
- Step 5: Once prompted, select the “Keep my files” option and then select the “Local reinstall” button.
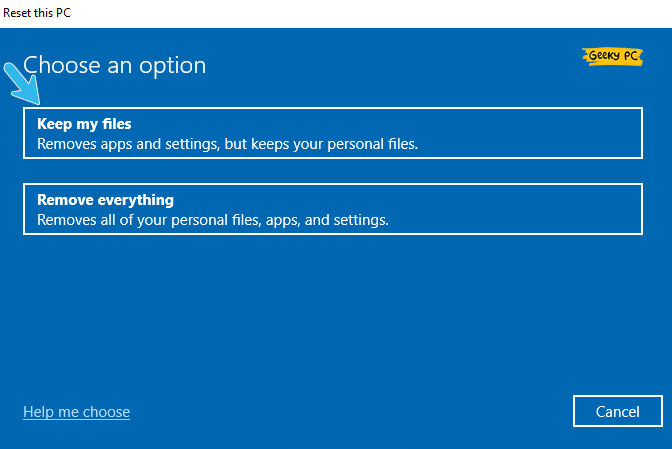
- Step 6: Click the “Next” button, followed by the “Reset” button, to start the process.
- Step 7: Once the resetting is over, reboot your system and check if the start button is still unresponsive.
5. Reset Windows 10
With the latest introduction of PowerShell as an inbuilt app on the current version of Windows 10, it is now possible to reset the entire OS in a few simple steps.
But close all the programs and save all your unfinished work before resetting your system.
- Step 1: Press the “Windows Key + R” buttons together to launch the Run command window.
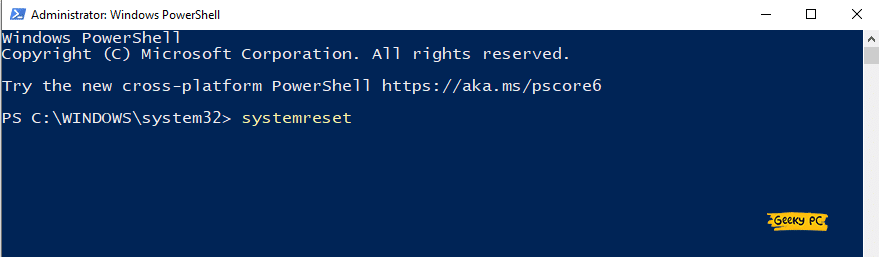
- Step 2: Type “PowerShell” in the designated box and press the “Ctrl + Shift + Enter” buttons together to launch it with administrative privilege.

- Step 3: Once the bluescreen terminal is open, type the “
systemreset” command and hit enter.
- Step 4: Once you get a popup message, click on the “Keep my files” button to proceed further.
- Step 5: Shortly after, a new window will appear with a complete list of apps that will be removed while resetting the OS.
- Step 6: Click on the “Next” button and follow the on-screen instruction to reset Windows 10.
- Step 7: Once the OS is fully reset, reboot your system, and recheck the start menu.
Always keep a backup copy of your entire data on any external drive or on a cloud space like Google Drive or iCloud.
Besides, you also need to download all the third-party apps afresh after resetting the Windows. But yes, you can directly get the Microsoft app from the app store itself!
6. Create New Microsoft User Account
Even your Microsoft account can sometimes conflict with the system settings in the background, further attracting various issues, including the unresponsive start button.
In such cases, you can create and use a new Microsoft account altogether to fix the Windows start button bug.
- Step 1: Press the “Windows Key + I” buttons together to launch the “Settings” app.
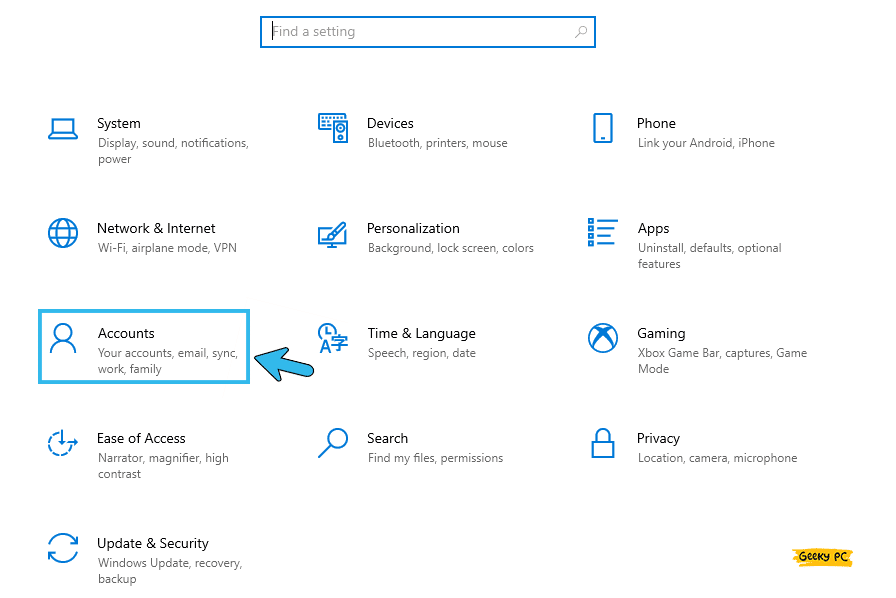
- Step 2: Click on the “Accounts” option and then select “Family and other users” from the left panel.
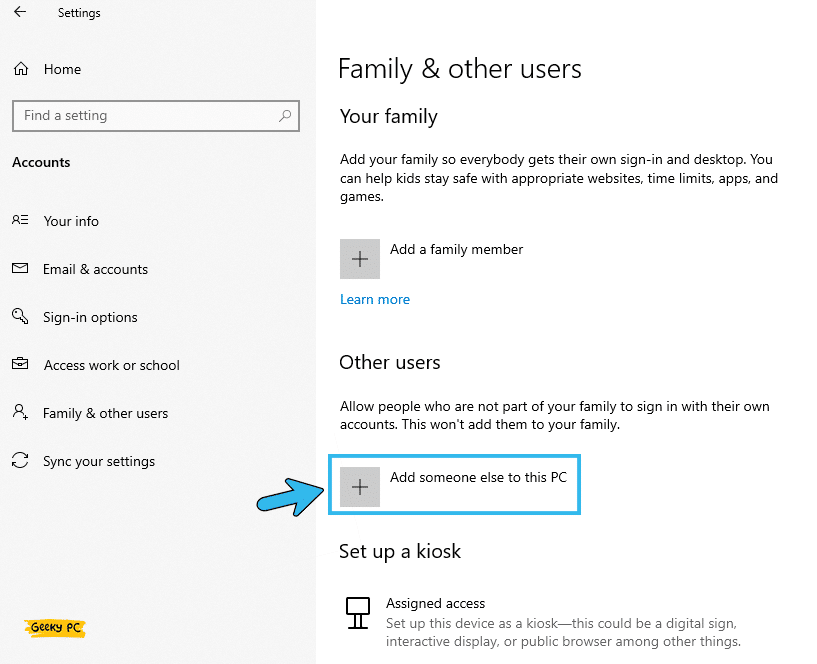
- Step 3: Navigate to the right panel and click on the “Add someone else to this PC” option located under the “Other users” header.
- Step 4: Once the new popup window appears, click on the “I don’t have this person’s sign-in information” option.
- Step 5: Click on the “Add a user without a Microsoft account” option if you don’t have a separate Microsoft account.
- Step 6: Put your desired ID and password in the desired field to open a new account.
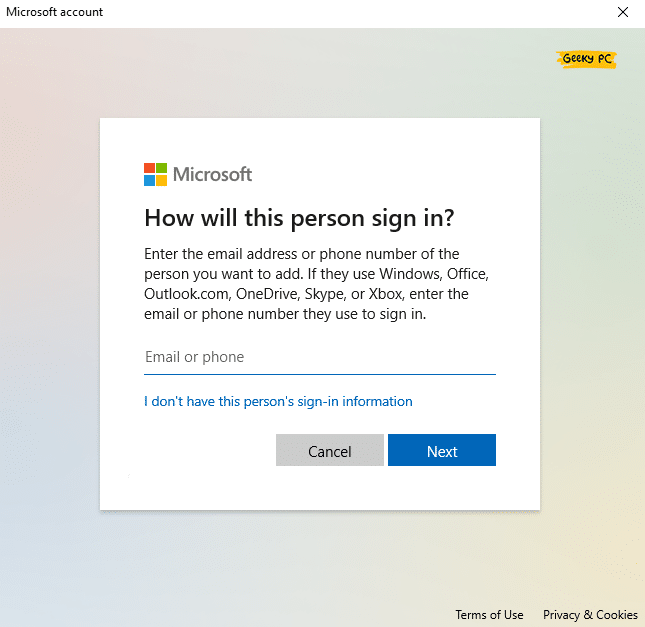
- Step 7: Click “Apply” to save the settings and reboot your system with the new user account.
It is always better to use a single Microsoft account on all your devices to sync your data throughout your devices.
So, you need to log in from every device with the same user ID after you create a new account.
10+ Advanced Tweaks If The Start Menu Not Working In Windows 10
If the start button is not working in Windows 10 even after trying all the six generic methods we have listed above, your problem can be way more deep-rooted than you can possibly assume.
However, there are several advanced tweaks available to rectify this bug in no time!
7. Disable Game Mode
Many people don’t even know that there is a pre-installed game mode on their Windows 10 devices. In this mode, you’ll get optimized performance from your PC when you need more speed.
But this mode can interfere with several drivers. So, it is better to disable it if the start button doesn’t work in Windows 10.
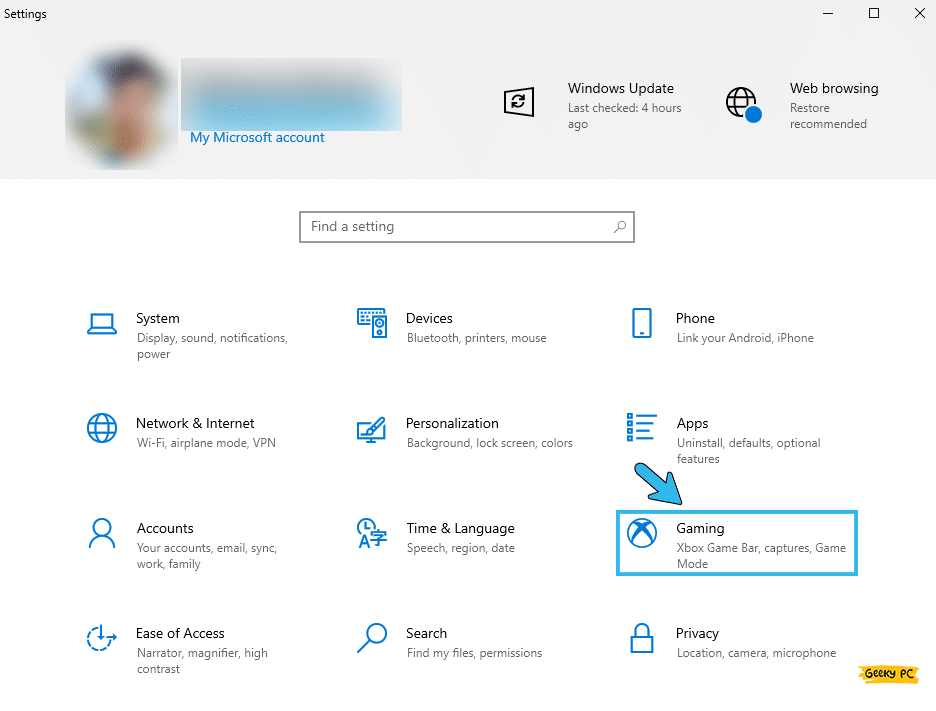
- Step 1: Press The “Windows Key + I” buttons together to initiate the “Settings” app on Windows 10.
- Step 2: Click on the “Gaming” option to launch the game settings.
- Step 3: Navigate to the left panel and click on the “Game Mode” option.
- Step 4: Now, come to the right panel and toggle the switch adjacent to the “Game Mode” option to disable it.
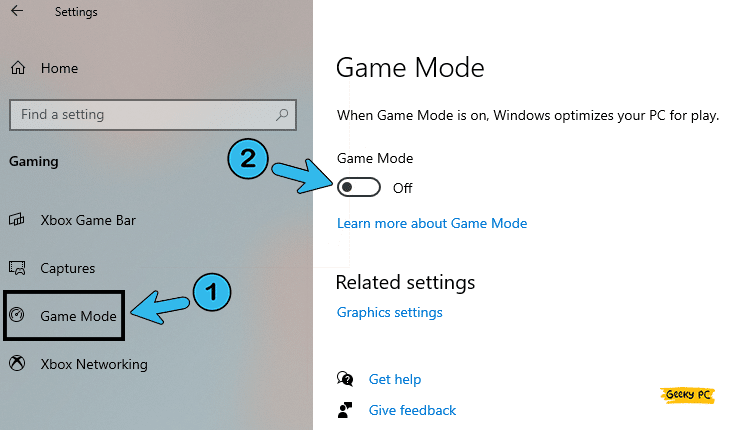
- Step 5: Reboot your system and check whether you are still getting the same error.
If you suddenly shift from the game mode to the default mode, it is very much possible that you may encounter graphics-related issues, especially if you are using any generic monitor available on the open market.
In that case, follow our step-by-step guide to fix generic PnP monitors in Windows devices.
8. Run SFC Scan
SFC simply stands for System File Checker! It actually cross-checks the system files in the root directory to find any bugs.
It is a pre-built troubleshooting mechanism in Windows devices that can effectively identify even the most critical bugs. And you can simply do it from the command prompt.
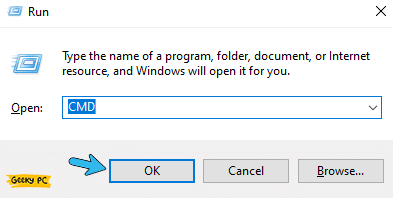
- Step 1: Press the “Windows Key + R” buttons together to launch the “Run” app.
- Step 2: Type “CMD” in the command field and then press the “Ctrl + Shift + Enter” buttons altogether to launch the command prompt menu with administrative privilege.
- Step 3: Once the “Do you want to make changes on your device” popup message appears, click on the “Yes” button to apply the settings.
- Step 4: Now, once the CMD app launches, type “sfc /scannow” and hit enter.
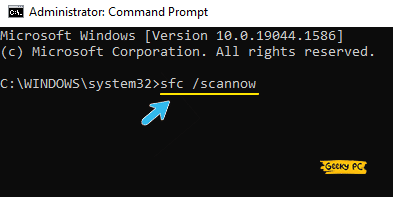
- Step 5: Let windows find the corrupted system files in the background and reboot your system when the procedure is over.
If the problem is on the system files, SFC will search and help you to restore that file to finally deliver a smooth user experience.
But yes, you need to disable your antivirus before running this scan to let this tool access every place on your device.
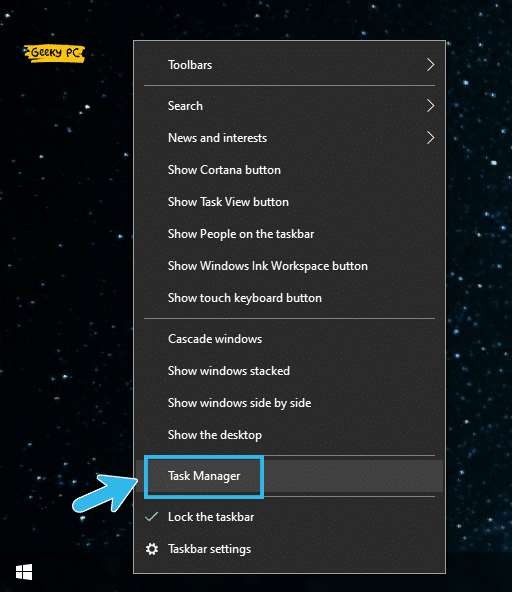
9. Restart Start Menu With File Explorer
With the newest update of Windows 10, it is now even possible to restart each background process. So, you can manually just restart your entire start menu on the device if the menu itself is unresponsive.
And you can do it without any heavy tweaks to your system.
- Step 1: Right-click on your taskbar at the bottom of your screen and select “Task Manager” from the menu.
- Step 2: Once the “Task Manager” app launches, scroll down and find the “Start” process from the left-hand list.
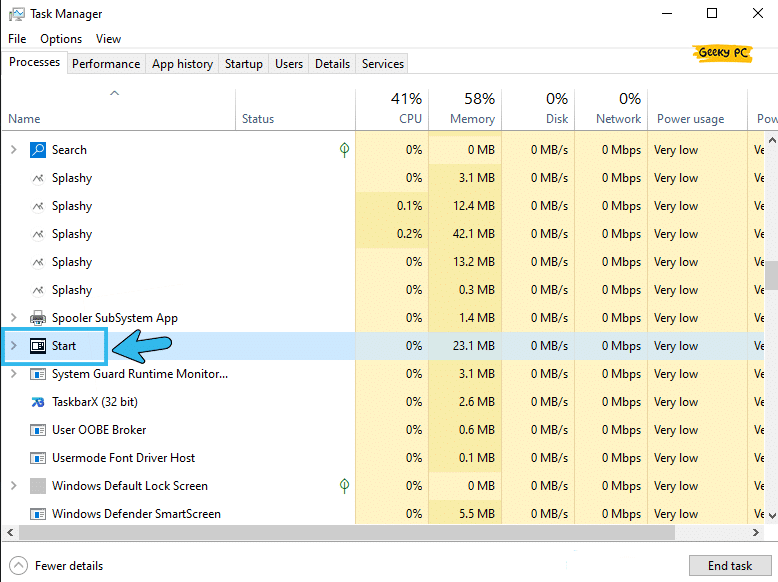
- Step 3: Click on the “>” button before the Start process to expand it.
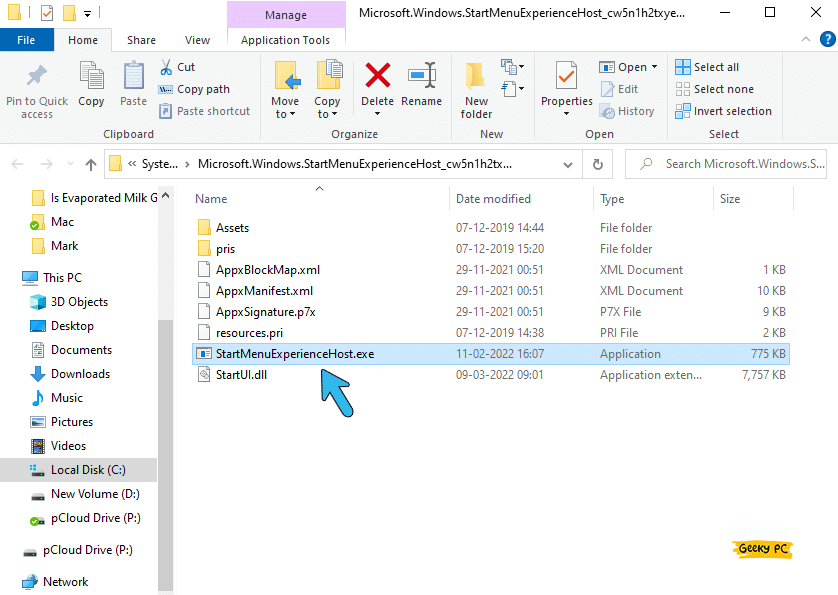
- Step 4: Now right-click on the second “Start” process once it is expanded, and click on the “Open file location” option.
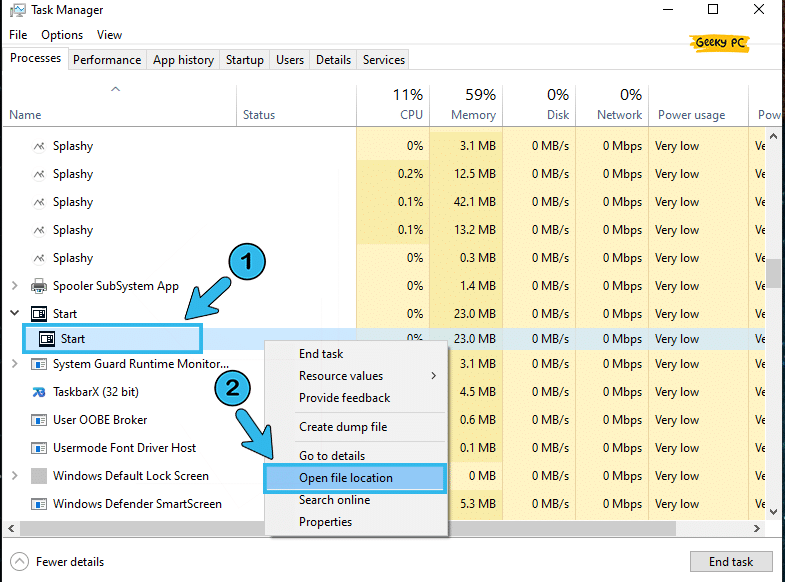
- Step 5: Once the new window appears, double-click on the “StartMenuExperienceHost” option to launch it.
You can alternatively just end the entire “explorer.exe” process and then relaunch it by clicking the “New Task” button and then entering the “explorer.exe” again. That way, you can even give your system a restart without powering it off.
10. Use DISM Command In CMD
In a broad spectrum, DISM is a similar command to SFC as both these commands can search and repair the root files.
But in DISM, the OS mainly searches for any error or bug in the image of Windows 10. And like SFC, you can also run the DISM command from the command prompt app itself.
- Step 1: Press the “Windows Key + R” buttons together to launch the “Run” command.
- Step 2: Type “CMD” in the respective field and hit the “Ctrl + Shift + Enter” keys together.
- Step 3: Once the “Do you want to allow this app to make changes on your device?” message pops up, click on the “Yes” button to launch it.
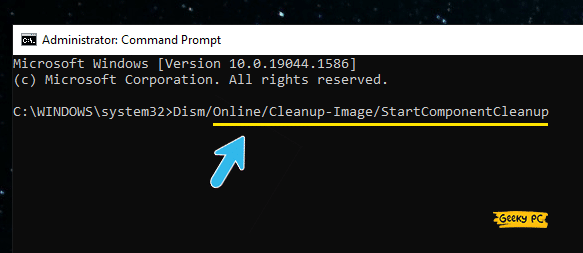
- Step 4: After the command prompt window appears, type the “
Dism/Online/Cleanup-Image/StartComponentCleanup” command and hit enter.
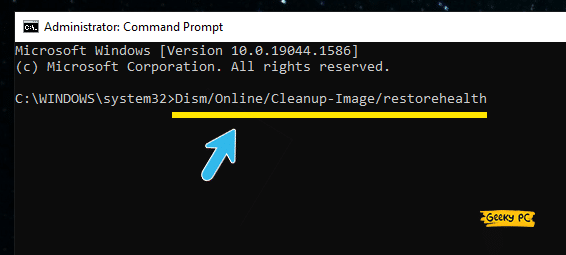
- Step 5: Type the “
Dism/Online/Cleanup-Image/restorehealth” command and hit enter.
- Step 6: Once these two operations are completed, restart your system and check whether the start button bug still exists.
Many users of the latest Windows OS reported getting a DISM error after running the command through their CMD app. If you encounter similar issues, you can follow our detailed guide to fix the DISM error code 87 in Windows 10 devices.
11. Tweak With CMD
Besides running the SFC and the DISM scan, you can also alter a few other parameters from the command prompt.
And in many cases, it can effectively solve the issues such as an unresponsive start button just by fixing the error lines in the code or resolving the entire bug in a single go!
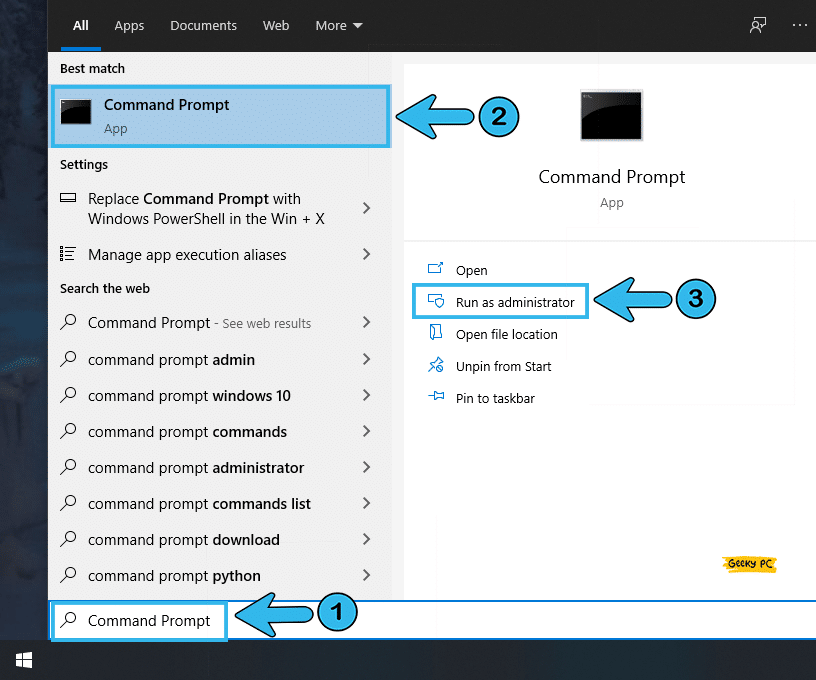
- Step 1: Click on the “Magnifying Glass” button located at the bottom-left corner of your taskbar to launch the search menu.
- Step 2: Type “CMD” in the search field, right-click on the first result that appears and select the “Run as administrator” option.
- Step 3: Click “Yes” once the “Do you want to allow this app to make changes on your device?” message appears.
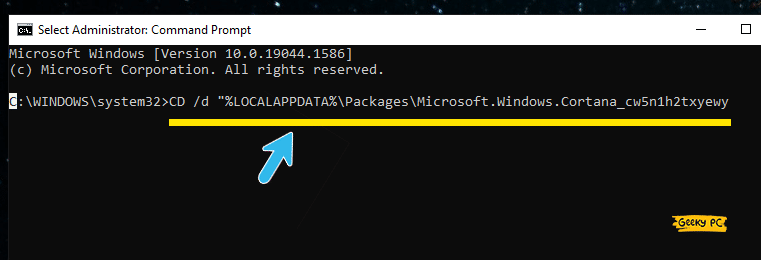
- Step 4: Once the command prompt window appears, type CD /d “%LOCALAPPDATA%\Packages\Microsoft.Windows.Cortana_cw5n1h2txyewy command and hit enter.
- Step 5: Then, type the “Taskkill /F /IM SearchUI.exe” command and hit enter.
- Step 6: Type the RD /S /Q Settings command and hit enter.
- Step 7: Type “exit” and hit enter to close the command prompt window once the processes are done.
You should restart your system once these operations are over. Besides, once the corrupt system files are adequately restored, you can just manually refresh the “explorer.exe” app again through the task manager. It will help you flush the cache files on your system as well.
12. Tweak With PowerShell
First introduced way back in 2006, PowerShell is actually a programming language from Microsoft that empowers task automation.
It mainly consists of command-line shells and related scripts to streamline all the Microsoft programs running on a single Windows-based device.
- Step 1: Press the “Windows Key + R” buttons together to launch the “Run” command.
- Step 2: Type “PowerShell” in the empty field and hit the “Ctrl + Shift + Enter” keys together to open it with administrative rights.
- Step 3: Once the “Do you want to allow this app to make changes on your device?” message appears, click on the “Yes” button to proceed.
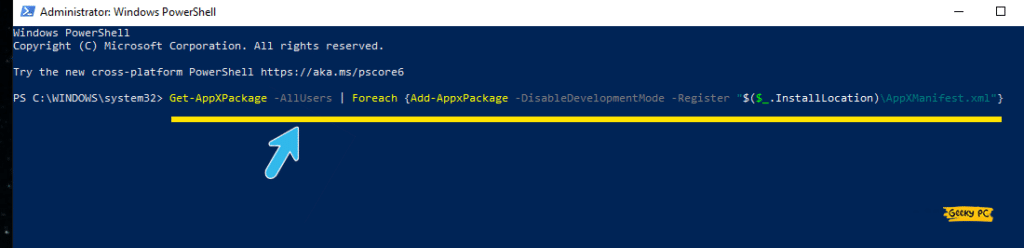
- Step 4: After the blue screen PowerShell window appears, type the
Get-AppXPackage -AllUsers | Foreach {Add-AppxPackage -DisableDevelopmentMode -Register “$($_.InstallLocation)\AppXManifest.xml”}command, and hit enter.
- Step 5: Let the process finish, exit from PowerShell, and reboot your system.
PowerShell is a very advanced programming language. So, you need to be extra careful about tweaking your system through it. It is better to copy the lines and paste them exactly to avoid any alteration. You can definitely go for further tweaks if you know how to deal with them.
13. Enable The Windows key
If you access the start menu by pressing the Windows key, there could be an issue with the key itself.
So, it is also better to cross-check the Windows key if the start menu is not working in Windows 10. And you can simply do it by registry edit.
- Step 1: Press the “Windows Key + R” buttons together to start the “Run” command.
- Step 2: Once the new command window appears, type the “regedt32” command in the empty field, and hit enter.
- Step 3: Once the new warning message pops up, click on the “Yes” button to allow the app.
- Step 4: Navigate to the left panel and click on the “HKEY_LOCAL_MACHINE” to expand it.
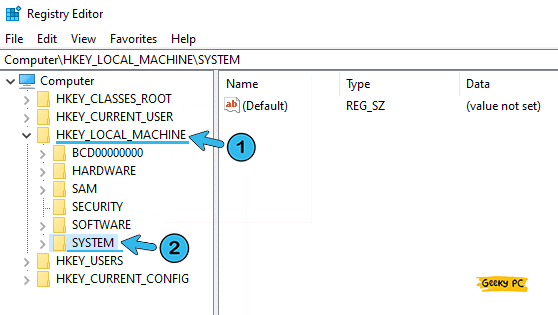
- Step 5: Further click on the “System” folder once the menu is expanded.
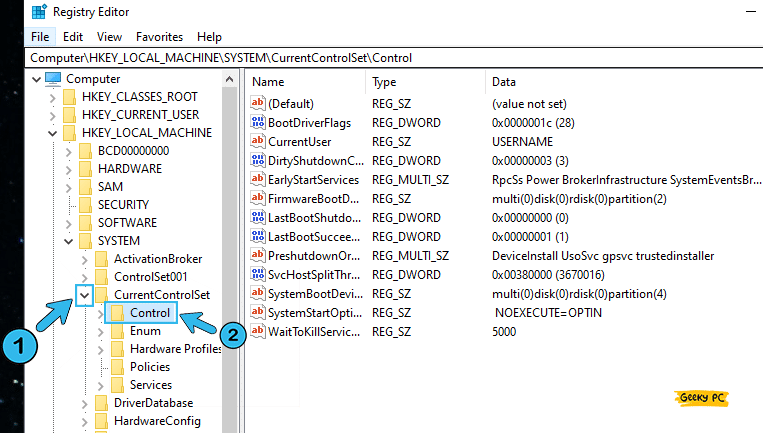
- Step 6: Navigate to the “CurrentControlSet” and then click on the “Control” folder.
- Step 7: Once it is expanded, scroll down and click on the “Keyboard Layouts” folder.
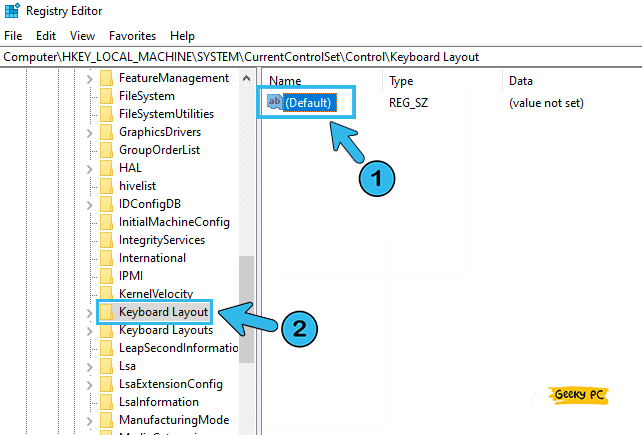
- Step 8: Now, navigate to the right panel and check if it has any “scancode map registry entry” or similar files.
- Step 9: Right-click on it and click on the “Delete” option from the additional menu.
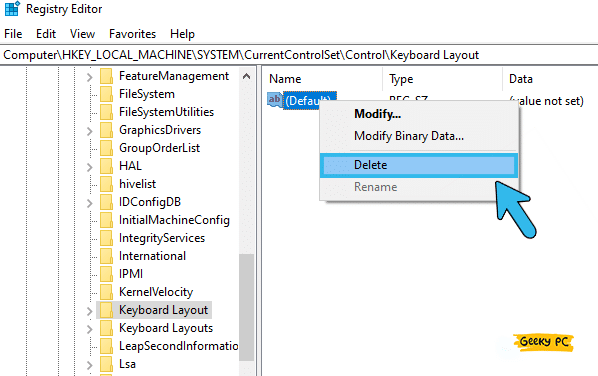
- Step 10: Click the “Yes” button once the new warning message appears to save the settings.
- Step 11: Restart your system and check if the start button is still unresponsive.
Registry editing is a complicated and challenging process. Besides, it can attract various errors afterward if you can’t do it right.
So, be extremely careful while editing and rewriting your registry files on Windows devices. But if anything goes wrong, you can simply restore your system to a previous point.
14. Modify Registry File
Besides creating a new registry file altogether to solve the start button bug, you can also just modify and tweak your existing registry file through the in-built registry editor.
And in such cases, it will remove the complicated process of recreating a registry.
- Step 1: Press the “Windows Key + R” buttons to launch the “Run” command with administrative rights.
- Step 2: Type “regedit32” in the empty field, hit enter, and click on the “Yes” button once the message appears.
- Step 3: Click on the “HKEY_LOCAL_MACHINE” folder located on the left panel.
- Step 4: Once it is expanded, click on the “SYSTEM” folder, and then further click on the “CurrentControlSet” folder.
- Step 5: Once you get an expanded list, click on the “Services” folder.
- Step 6: Scroll down and click on the “WpnUserService” folder.
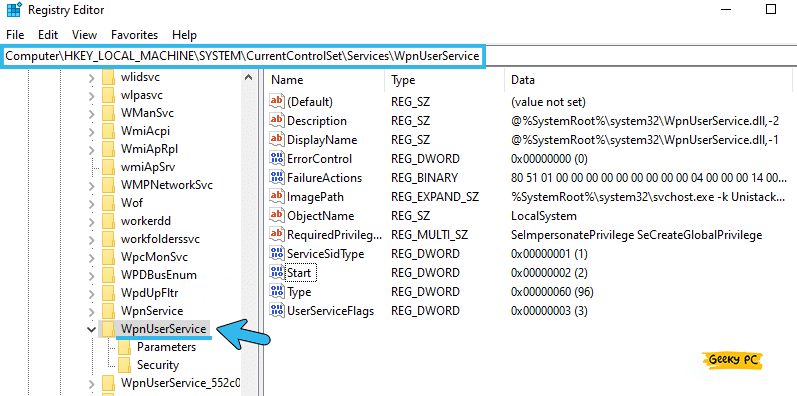
- Step 7: Now, come to the right panel and right-click on the “Start” file to launch the additional options.
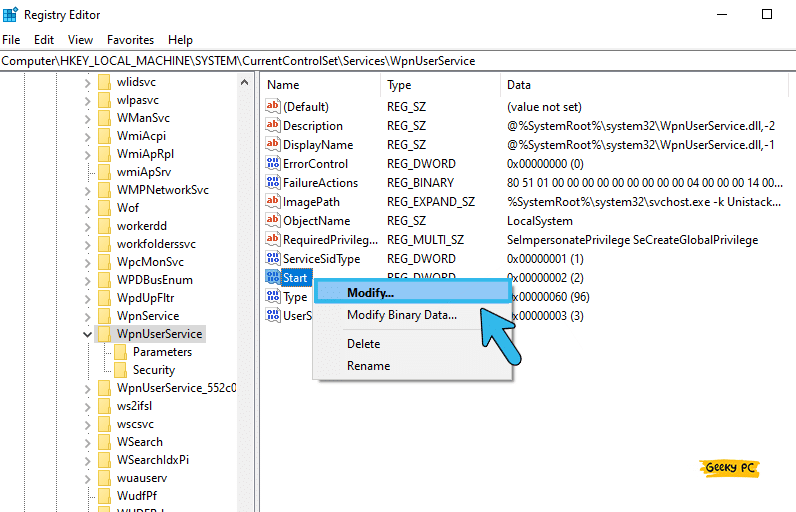
- Step 8: Select “Modify” and put the Value date to 4.
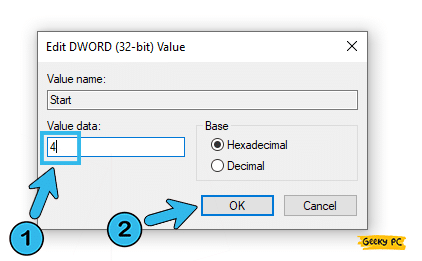
- Step 9: Click on the “OK” button to save the settings and exit from the registry editor.
It is always better to perform this task under expert guidance. If you modify any other values in the registry file than the service file itself, that wrong parameter can trigger several buggy operations in a cycle.
So, follow the steps strictly to avoid any unforeseen circumstances.
15. Create New Registry File
There are times when you can’t find the actual registry file that can restore the start menu. Besides, a virus or an infected application can also override that registry file to create further issues.
In such cases, it is better to create a new registry file altogether to fix the unresponsive start menu.
- Step 1: Press the “Windows Key + R” buttons together to launch the Run command window.
- Step 2: Type “regedt32” in the command field and hit enter to launch the registry editor app.
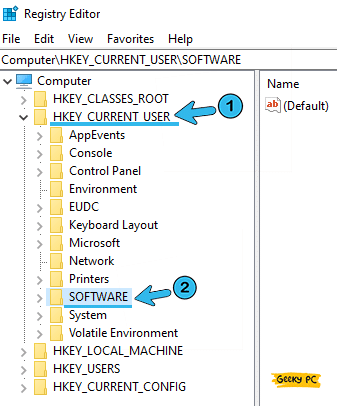
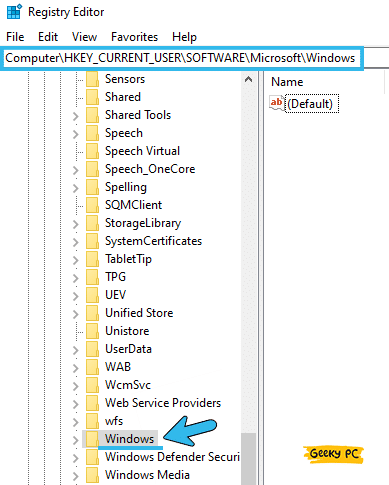
- Step 3: From the left panel, click on the “HKEY_CURRENT_USER” folder to expand it, and then click on the “Software” folder.
- Step 4: Click on the “Microsoft” folder and further navigate to the “Windows” folder.
- Step 5: Once it is expanded, click on the “CurrentVersion,” then on the “Explorer” folder, and then finally on the “Advanced” folder.
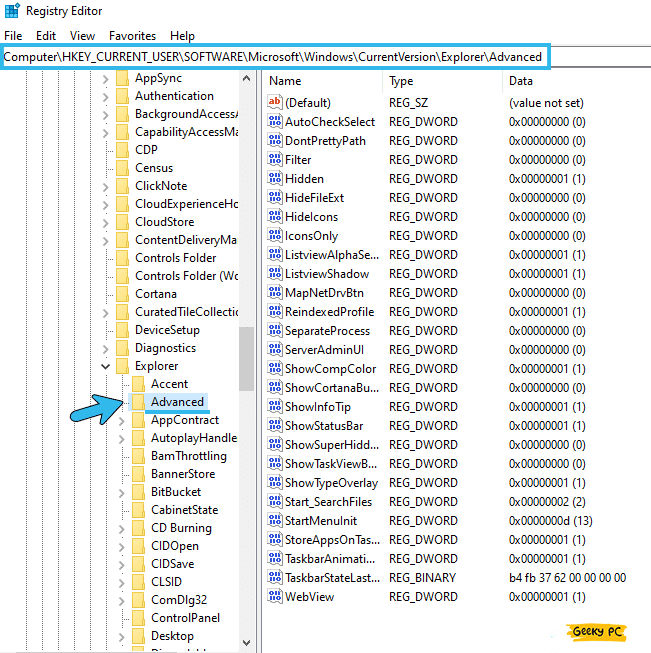
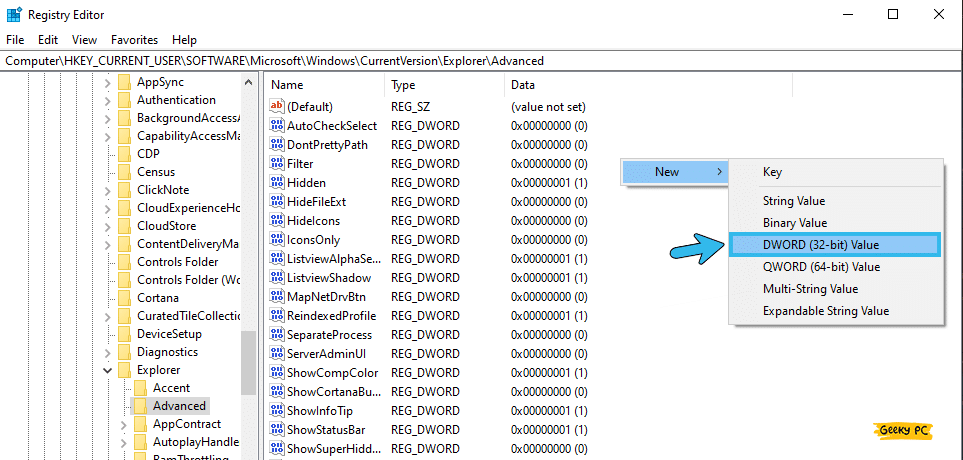
- Step 6: Now, right-click in the empty space on the right panel and select the “New” option.
- Step 7: Select the “DWORD (32-bit) Value” from the list and name it “EnableXAMLStartMenu” if it doesn’t exist already.
- Step 8: Double-click on the newly created registry file and change the base to the “Hexadecimal” format.
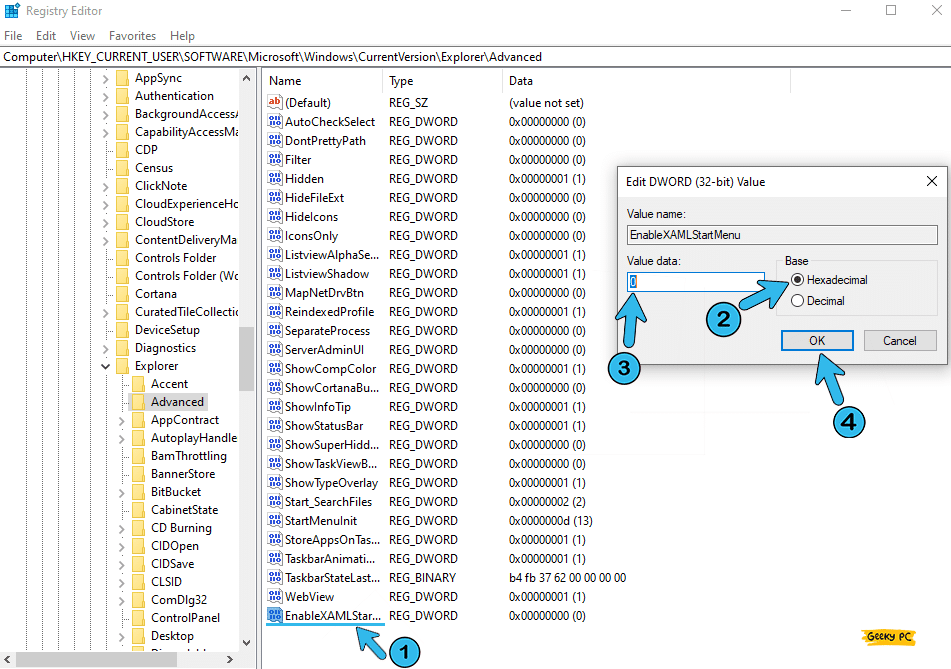
- Step 9: Enter “0” in the Value field and click “OK” to save the settings.
- Step 10: Exit from the registry editor app and reboot your system.
You need to put the correct value while creating any registry file. Otherwise, a wrong value can trigger several problems in the future.
If you restart your computer with a registry file having an incorrect value, it can cause OS instability and further trigger repeated crashes and bluescreen errors.
16. Rebuild Index Files
An index file is a type of data table that links directly to a broader set of data. So, every time any application or software needs data that connects directly to the index file first.
And to solve the start menu bug in Windows devices, you can rebuild the entire indexing file in a few simple steps.
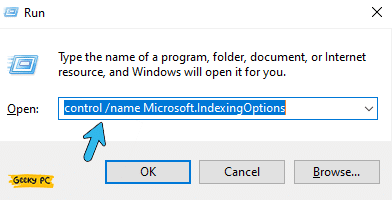
- Step 1: Press the “Windows Key + R” buttons together to initiate the Run command.
- Step 2: Type “control /name Microsoft.IndexingOptions” in the designated field and hit enter.
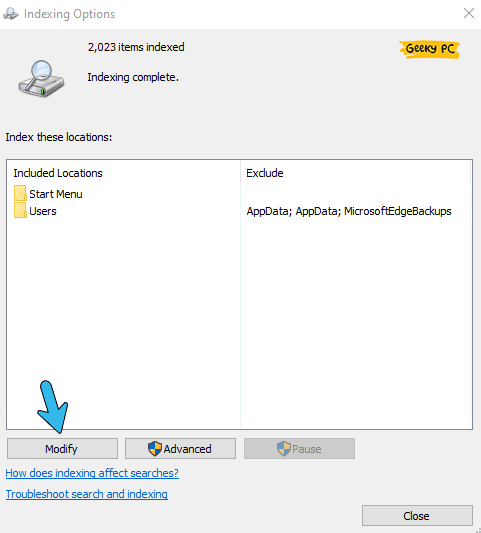
- Step 3: Once the new window appears, click on the “Modify” button located at the bottom.
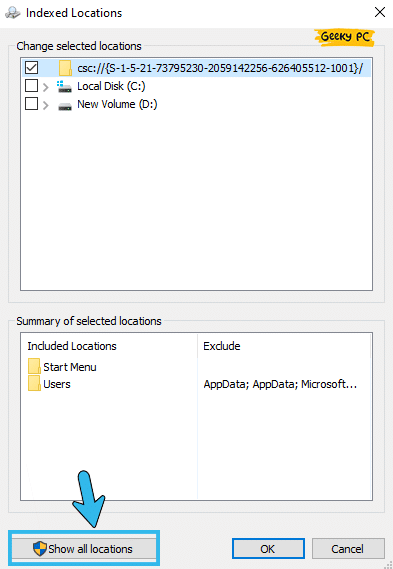
- Step 4: After a new popup box appears, click on the “Show all locations” option.
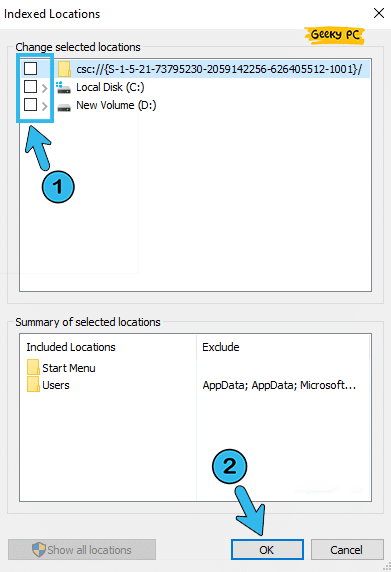
- Step 5: Uncheck all the available directories under the “Indexed Locations” option from the new window and then click “OK” to save the settings.
- Step 6: Come to the main window and click again on the “Advanced” option.
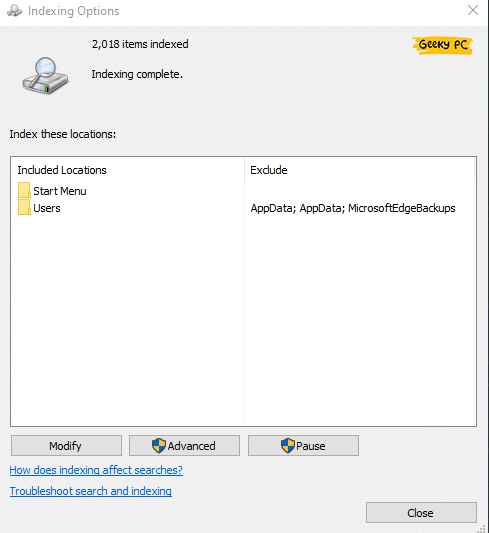
- Step 7: Once the new window appears, click on the “Rebuild” button under the “Troubleshooting” option.

It is not recommended to rebuild the index file over and over again if the same issue persists. So, if the bug is not solved on the first attempt, don’t retry it. Instead, you can take the other pro methods or can resort to a hardware administrator.
FAQs
Q. Why is the Windows 10 start menu not working?
There can be several reasons why the start menu is not working in Windows 10. Most possibly, you are using obsolete windows or driver variants. Besides, you may have an issue with the registry and index files as well. Many people also reported getting this error as the antivirus conflicts with the system itself.
Q. How do I fix the start menu in Windows 10?
Just start by updating your Windows 10 OS and your keyboard driver and installing the auxiliary updates. Besides, you can create a new registry file or just rebuild the entire indexing file to solve it. Many people also reported getting a solution after disabling their filter keys.
Q. How do I restore my start menu?
You can simply restore the start menu just by ending and relaunching the “explorer.exe” process from the task manager. Besides, you can also make a new registry entry or can even rebuild the entire indexing file to restore the menu. Alternatively, you can also restore your entire OS to a previous time to do that!
Q. What to do when the start button is not working?
Start by restarting your system in a safe mode and then updating the OS and all the available drivers that are outdated. You can also disable the filter keys and check the keyboard hardware manually. It is also better to create a new registry file altogether and rebuild the entire index file to solve this error.
Conclusion
You don’t need to take any precautionary measures while trying the generic fixes we have mentioned above, as they are absolutely safe options, even for newbies. However, you should create a restore point before trying any of the advanced fixes.
So, these are all the possible solutions if the start button is not working in Windows 10. But if you think we have missed any other solution, feel free to let us know about that solution in the comment box below!