
The snipping tool is definitely a very efficient option to capture your screen with the hotkeys. However, things start to get a little fuzzy if the Windows Shift S is not working on your system, isn’t it? However, it can be resolved easily.
Enabling or reinstalling the snipping tool can resolve the hotkey errors. You can also turn on the clipboard history or place a snipping icon on the taskbar to fix it. Moreover, updating your Windows can also fix this glitch. Besides, you should restart your device into safe mode as well.
There are not all the solutions we have to resolve this glitch. But, before we dive deep into the solution part, let’s understand what the primary reasons for the sniping tool glitch in Windows devices are.
What Are The Primary Reasons For “Windows + Shift + S” Not Working?
If the Windows Shift S is not working on your system, it can typically cause a headache to capture the screen, although this glitch is pretty common in Windows devices. However, this particular error can typically occur due to six main reasons.
- You have accidentally disabled or deleted the snipping tool from your system.
- The snipping tool itself can be buggy and needs a fresh install or a complete reset.
- The clipboard history function is disabled on your system.
- You are using an outdated version of the Windows OS that needs an urgent update.
- Any startup application or process is interfering with the snipping tool.
- There are corrupted or buggy files in your root installation directory.
- Some of the group policies are interfering with the snipping tool.
Besides, a wrong value in the registry file of the “Snip & Sketch” tool can also cause this error. Moreover, some users have also faced it once their OneNote and snipping tool starts to interfere with each other.
7+ Easy Fixes For The “Windows + Shift + S” Not Working
Before trying anything advanced or any pro-level tweaks when the Windows Shift S is not working on your system, you should proceed with the generic fixes first. And in most cases, these generic fixes are enough to resolve your issue in no time.
1. Manually Enable Snip & Sketch Function
Sometimes, the snip and sketch function that can be enabled by pressing Windows + Shift + S keys altogether is disabled due to any update.You may have disabled it accidentally as well. So, before trying anything else, enable the snip and sketch function first.
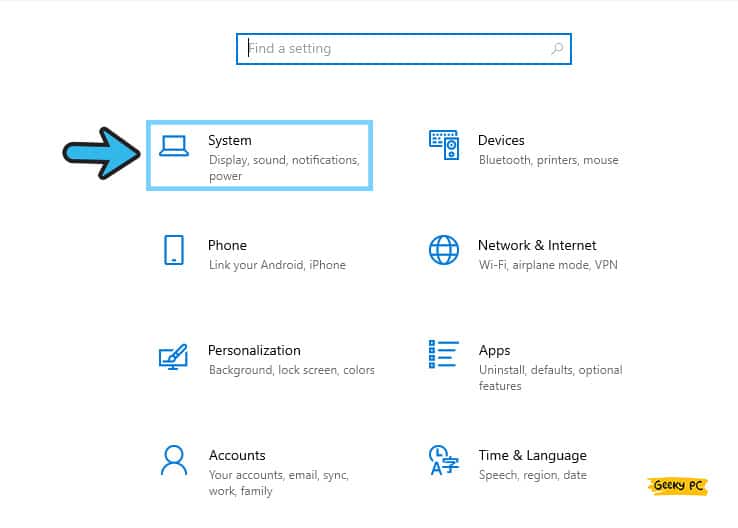
- Step 1: Press the “Windows Key + I” buttons together to open the “Settings” menu.
- Step 2: Once the “Settings” app launches, click on the “System” tab.
- Step 3: After the new window appears, click on the “Notifications & Actions” tab on the left panel.
- Step 4: Now, come to the right panel, and navigate to the “Get notifications from these apps and other senders” option.
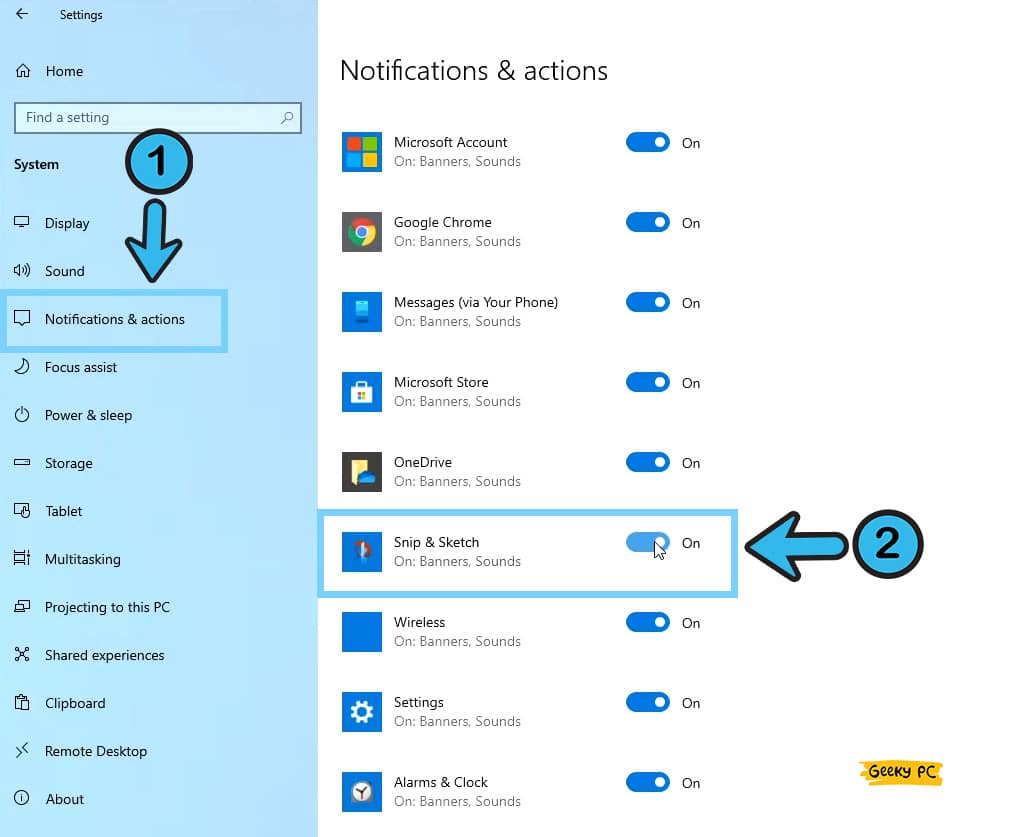
- Step 5: Scroll down and toggle the switch beside the “Snip & Sketch” function.
- Step 6: Exit from the “Settings” app and check whether the issue still arises.
If you are not getting the toggle button beside the “Snip & Sketch” option on the “Settings” app, you can scroll up on the “Notifications & Actions” window and tick the box beside the “Snip & Sketch” function. And this way, you can manually enable it.
2. Reset The Snip & Sketch Function
At times, the Snip & Sketch function itself can act buggy due to any corrupted file in the installation directory.Besides, it can even happen if you get an error during the Windows update process. In such cases, you can completely reset the “Snip & Sketch” function to reenable it.
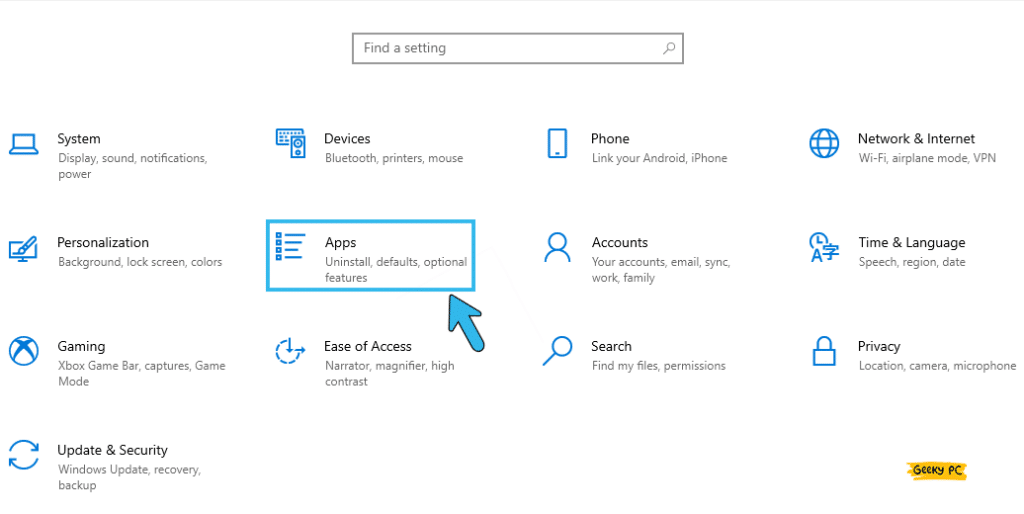
- Step 1: Press the “Windows Key + I” buttons together to initiate the “Settings” App.
- Step 2: After the app launches, scroll down and click on the “Apps” tab.
- Step 3: Navigate to the right panel, scroll down, and locate the “Snip & Sketch” option.
- Step 4: Click on the “Snip & Sketch” tab to expand the menu.
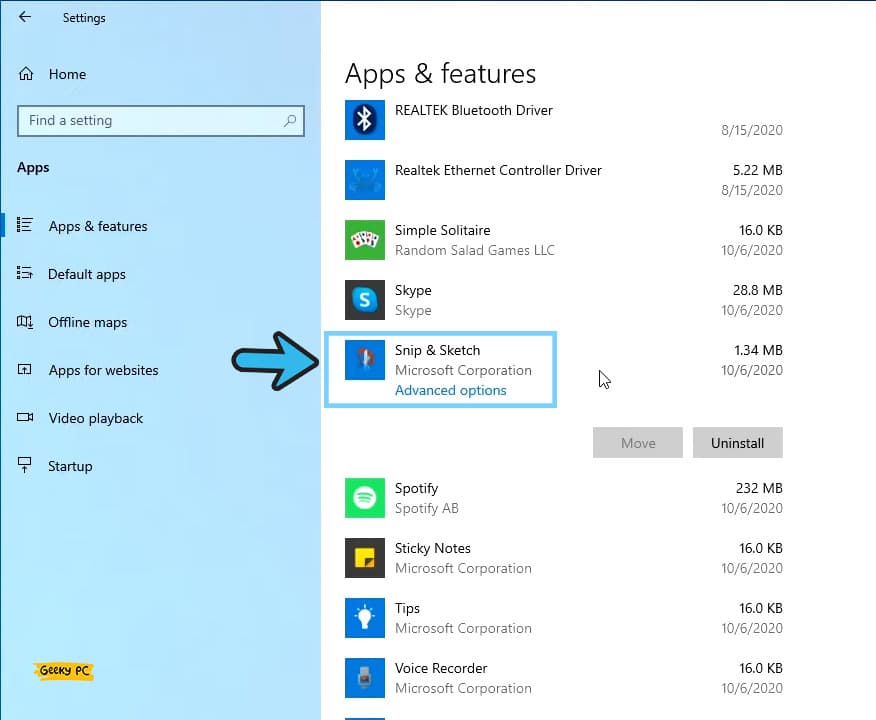
- Step 5: Now, click on the “Advanced option” to fetch the additional menu.
- Step 6: Once the new window appears, scroll down, and click on the “Reset” button.
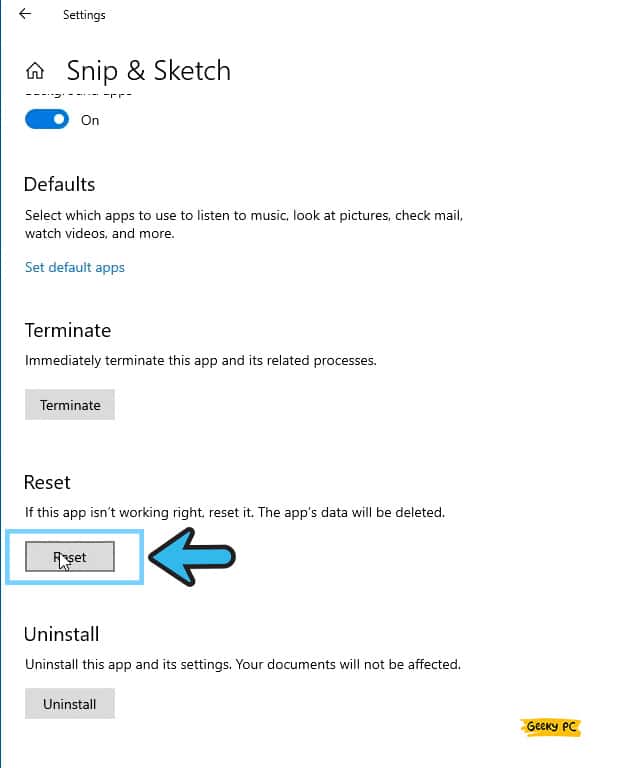
- Step 7: After the new popup message appears, click on the “Reset” button again to confirm it.
- Step 8: Once it is completely reset, exit from the “Setting” app.
You may also need to reboot your Windows device to complete the procedure. But before that, you should close all the applications first and then reboot the device.Besides you can also reboot your system into safe mode to eliminate any interference from other apps. Also, you can follow our comprehensive guide to fixing the Atikmdag.sys BSOD Error in Windows devices.
3. Reinstall Snip & Sketch Tool Completely
You can even get the error after resetting the “Snip & Sketch” function completely if any of the corrupted files in the root installation directory is beyond repair.It mainly happens if it is infected with a virus or malicious third-party apps. In that case, you can manually uninstall and then reinstall it.
- Step 1: Press the “Windows Key + I” buttons together to launch the “Settings” app on your Windows device.
- Step 2: Once the new window appears, navigate to the “Apps” button, and click it.
- Step 3: After the new menu appears, navigate to the left panel and click on the “Apps & Features” option.
- Step 4: Now, navigate to the right panel, scroll down, and locate the “Snip & Sketch” option.
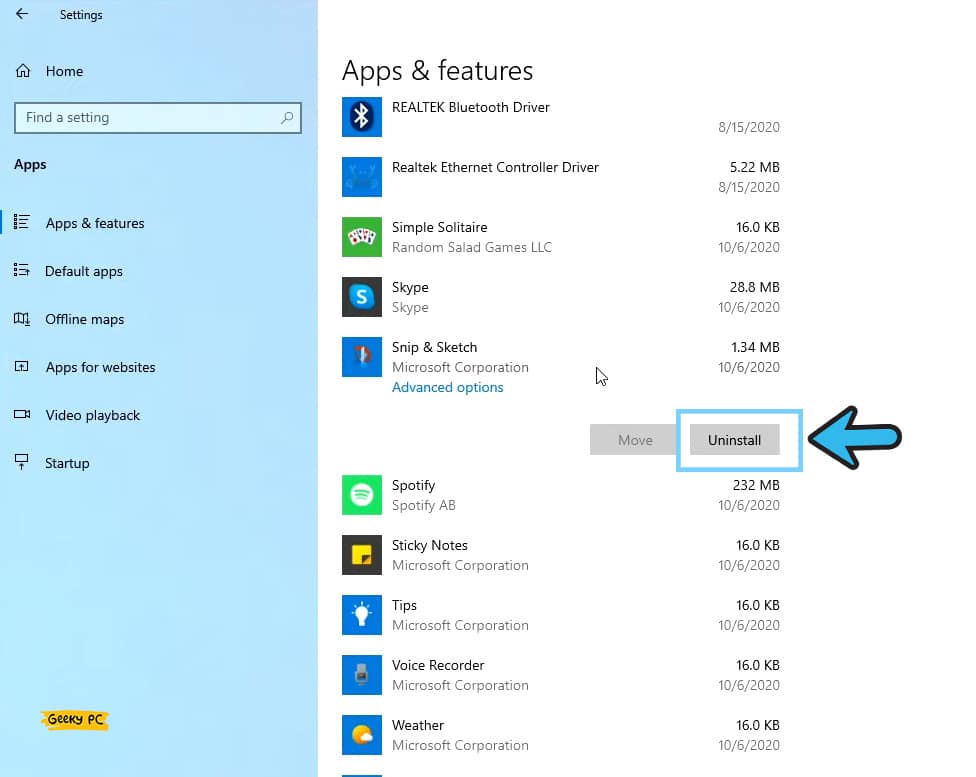
- Step 5: Click on the “Snip & Sketch” option to expand the menu further.
- Step 6: Now, click on the “Uninstall” button to start the procedure.
- Step 7: Once the uninstallation process is over, go to “Microsoft Store” and install it again.
If the “Snip & Sketch” function is not working even after reinstalling it, installing a third-party app that provides the same functionality can be an option.However, you need to download it from a trusted site and then install it to minimize the chance of any phishing attack.
4. Turn The Clipboard History Switch On
Not just the “Snip & Sketch” function but the “Clipboard History” function may have also been disabled on your computer.And if you have unintentionally disabled it, you will face such issues where the Windows key + Shift + S is not working. In such cases, you need to manually enable it first.
- Step 1: Press the “Windows Key + I” buttons altogether to launch the “Settings” app.
- Step 2: Once the new window appears, click on the “System” tab to open it.
- Step 3: After the new menu launches, navigate to the left panel, and click on the “Clipboard” tab.

- Step 4: Now, navigate to the right panel, and toggle the switch beside the “Clipboard History” option.
- Step 5: Once it is enabled, exit from the “Settings” app.
- Step 6: Now, reboot your system and check whether you are getting the same issue.
After enabling the “Clipboard History” function, you need to press the “Windows + Shift + S” hotkeys to check whether it captures the screen or not.If that doesn’t work, you may need to proceed with the complete uninstallation and then reinstall it.
5. Use System Tray Icon For Screen Clipping
If the “Snip & Sketch” function is still not functioning properly after enabling it from the “Settings” app, you can alternatively place the icon on your taskbar.So, even if the hotkeys are not working, you can just manually click the icon on the taskbar to capture your screen.
- Step 1: Right-click on your taskbar to fetch the additional menu.

- Step 2: Click on the “Taskbar Settings” option from the menu (the “gear” icon).
- Step 3: Once the new “Taskbar Settings” window appears, navigate to the right panel.
- Step 4: Now, scroll down and locate the “Notification area” header.
- Step 5: Click on the “Select which icons appear on the taskbar” option.
- Step 6: After the new window launches, find the “Snip & Sketch” function and toggle the switch beside it.
- Step 7: Exit from the “Taskbar Settings” app and check whether the function is now working or not.
Don’t make too many icons appear on the taskbar. Because, at times, all the icons can stop responding if the taskbar faces multiple requests at once.It is better to keep your taskbar clean. So, before enabling the screen clipping function, you need to manually disable other functions that you don’t commonly use.
6. Update Your Windows OS
If none of the above methods are working to resolve the issue, you need to update your Windows OS first.Updating your OS in timely intervals not only fix all the minor glitches and bugs but will also let you enjoy a smooth computing experience. Alternatively, you can also keep the “Automatic Update” on.
- Step 1: Click on the “Magnifying Glass” icon on the bottom-left corner of your Windows taskbar.
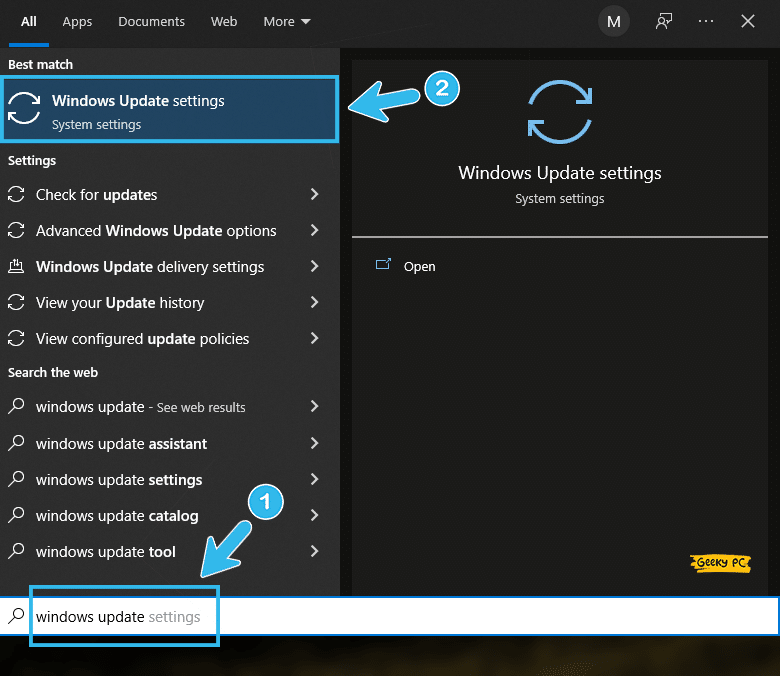
- Step 2: Once the search field appears, type “Windows Update” and click on the very first result that appears.
- Step 3: After the new “Update” menu launches, navigate to the left panel, and click on the “Windows Update” tab.
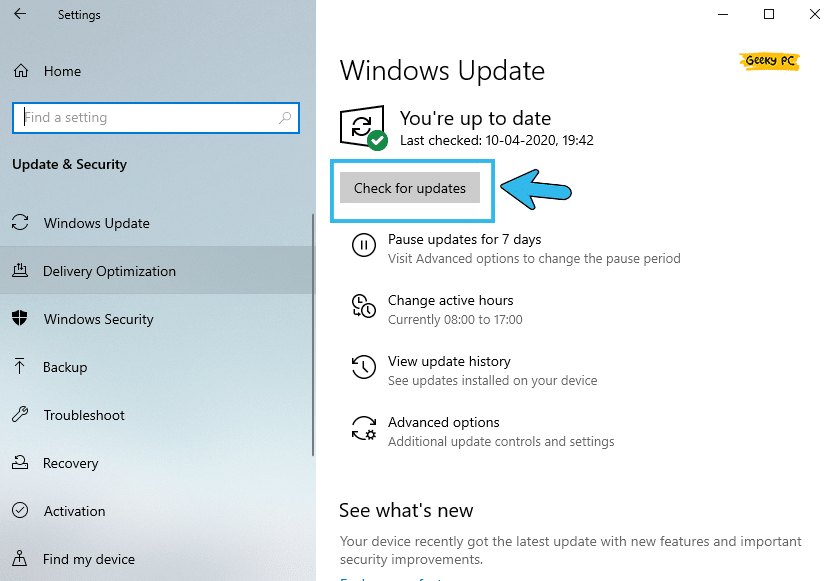
- Step 4: Now, navigate to the right panel, scroll down, and click on the “Check for updates” option.
- Step 5: Let Windows automatically find the latest update from the Microsoft server and install it.
- Step 6: Once your OS is fully updated, reboot your device.
You may get an unresponsive taskbar, especially after enabling the “Snip & Sketch” icon to appear there once you update your system.
7. Restart Windows In Safe Mode
At times, a few of the startup processes can interfere with the Windows function, triggering various glitches and errors on your system.And to fix Win + Shift + S function, you may need to reboot your system into safe mode to eliminate any chance of interference from startup and third-party apps.
- Step 1: Press the “Windows Key + I” buttons together to initiate the “Settings” app.
- Step 2: Once the “Settings” app launches, scroll down and click on the “Update & Security” tab.

- Step 3: After the new menu appears, navigate to the left panel and click on the “Recovery” option.
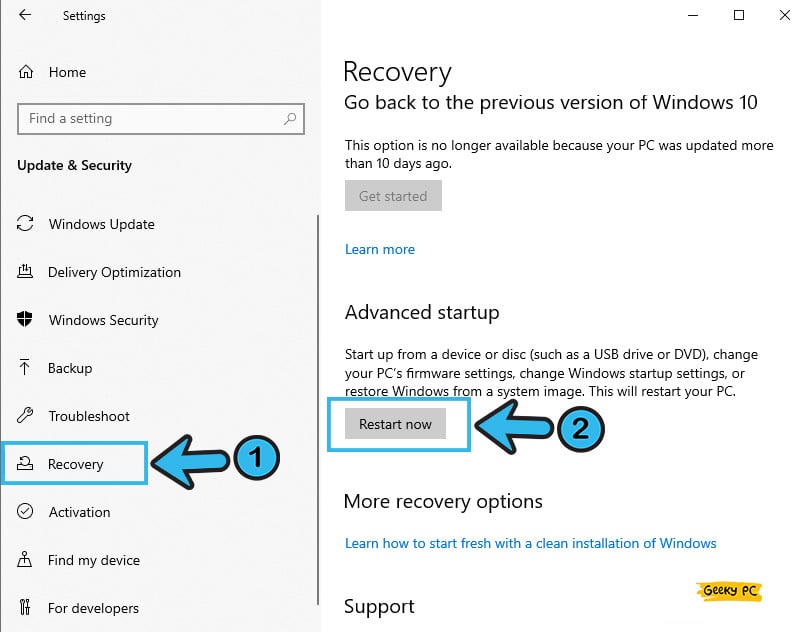
- Step 4: Now, come back to the right panel, locate the “Advanced Startup” header, and click on the “Restart” button.
- Step 5: Your Windows will automatically reboot, and select the “Safe Mode” option when you get a new prompt in the startup window.
- Step 6: Once your Windows OS is fully loaded, press the “Windows Key + Shit Key + S” buttons altogether to check whether the function is now working or not.
Many users have reported getting a completely unresponsive taskbar once they have turned their system into safe mode. If you are also facing similar issues on your system, follow our comprehensive guide to fixing the unresponsive start button in Windows devices.
7+ Advanced Fixes If The “Windows + Shift + S” Is Not Working
If none of the generic methods we have listed above are not working to resolve the issue when the Windows Shift S is not working on your system, there is no other way than resorting to the advanced tweaks.However, you should try these advanced fixes with extreme precautions.
8. Clean Boot Your OS
The latest Windows OS always starts with several startup functions to let you experience a smooth computing experience.But, at times, those bulky startup apps can directly interfere with other Windows functions. So, to eliminate the interference, you need to give your system a clean reboot.
- Step 1: Press the “Windows Key + R” buttons together to launch the “Run” command.

- Step 2: Once the new field appears, type “msconfig” and click on the “OK” button.
- Step 3: Once the “Configuration” window launches, navigate to the header menu and click on the “General” tab.
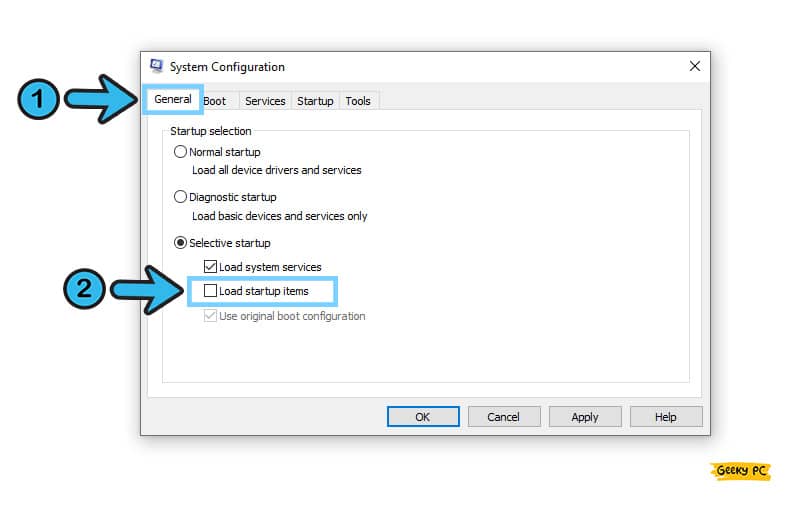
- Step 4: Locate the “Selective Startup” header and uncheck the box adjacent to the “Load startup items” option.
- Step 5: Navigate to the header selection menu and click on the “Service” tab.
- Step 6: Now, tick the adjacent box of the “Hide All Microsoft Services” option.
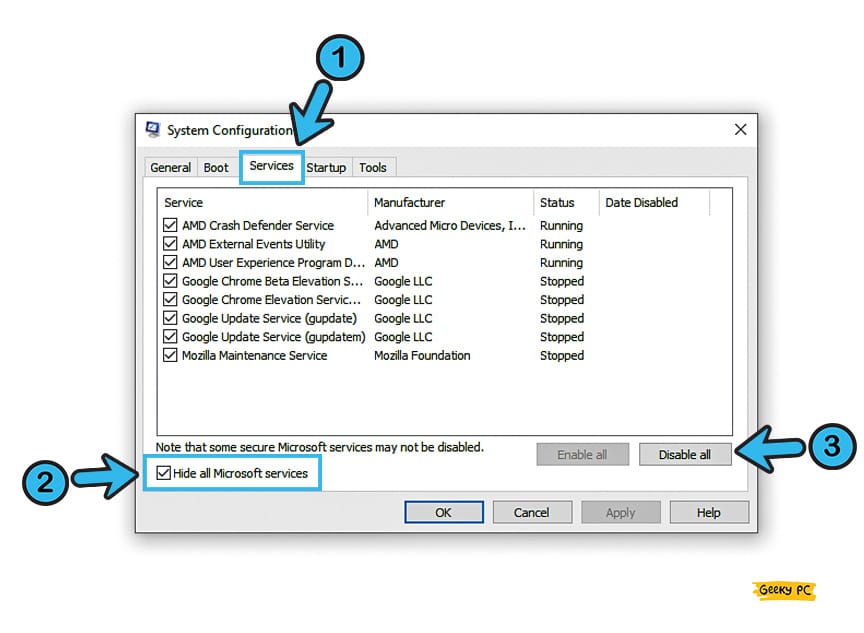
- Step 7: Once the complete list of startup applications appears, click on the “Disable All” option.
- Step 8: Click on the “Apply” button and then “OK” to exit from the configuration app.
- Step 9: Now, restart your device and check whether you are still getting the same error.
Several users have noticed that their gateway started malfunctioning once they have clean-booted their systems after disabling all the startup applications.If you are also facing a similar situation, you can follow our detailed guide to fix the “ Error Code 0xe0434352” in Windows devices.
9. Execute SFC Scan
SFC or System File Checker is an effective troubleshooting tool that now comes preinstalled with the latest Windows 10 and 11.It can efficiently resolve all the minor glitches and errors on your system. So, if the Snip and Sketch are not working on your devices, you should run the SFC scan.
- Step 1: To launch the “Run” command, press the “Windows Key + R” buttons together.
- Step 2: Once the “Run” field appears, type “CMD” and click on the “OK” button.
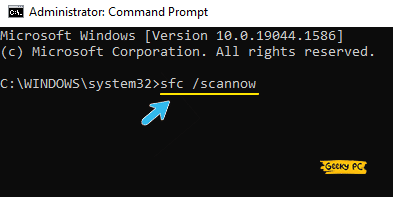
- Step 3: After the black “Command Prompt” window launches, type “sfc /scannow” and hit the “Enter” button.
- Step 4: Let the SFC tool find and resolve the error on the root directories.
- Step 5: Once the SFC tool finishes its operation, type “Exit” to close the “Command Prompt” window.
- Step 6: Now reboot your system and check whether you are still getting the same issue.
10. Run DISM Command
If, even after executing the SFC scan, the Windows Shift S function is still not working; there is another tool you can try to resolve it.And it is called the DISM tool that now comes with the latest version of the Windows OS. And this tool can effectively resolve minor glitches in your system.
- Step 1: Hit the “Windows Key + R” buttons together to initiate the “Run” command on your system.
- Step 2: Now, type “CMD” in the designated field and click on the “OK” button.
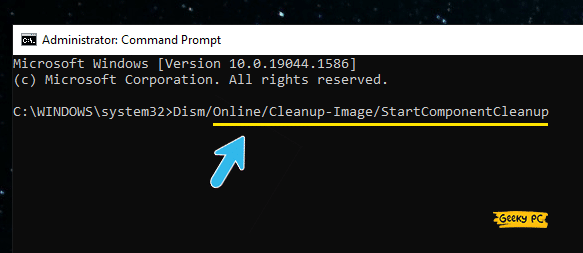
- Step 3: Once the black “Command Prompt” window appears, type “DISM /Online /Cleanup-Image /StartComponentCleanup” and hit the “Enter” button.
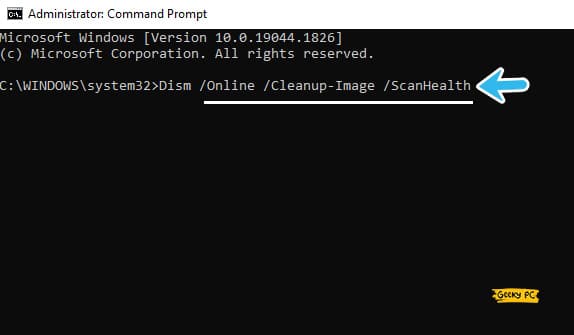
- Step 4: Once the operation is done, type “Dism /Online /Cleanup-Image /ScanHealth” and hit the “Enter” button again.
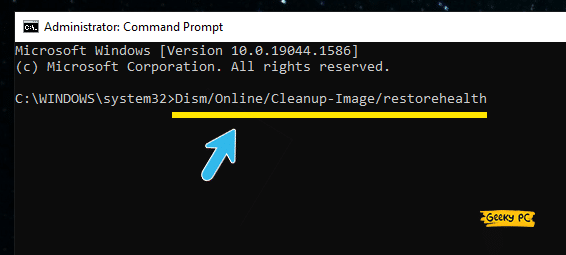
- Step 5: Finally, type “DISM.exe /Online /Cleanup-image /Restorehealth” and hit the “Enter” button.
- Step 6: Once all the operations are done, type “Exit” to close the “Command Prompt” window.
- Step 7: Now, reboot your device and check if the “Snip & Sketch” function is now working or not.
You should disable your antivirus (Windows Defender) first before running the DISM commands through CMD. Otherwise, the antivirus itself can block the tool from accessing the root directories.Besides you should also disable your Windows Firewall temporarily before running this command.
11. Change OneNote Hotkey Function Via Regedit
Not just the “Snip & Sketch” function itself, but you can still get the error if you have any glitch in the “OneNote” function of Windows.However, this function doesn’t support any hotkeys alteration. So, you can manually tweak the “OneNote” functionality through the registry editor.
- Step 1: Press the “Windows Key + R” buttons together to launch the “Run” command.
- Step 2: Once it appears, type “regedit” in the designated field and click on the “OK” button.
- Step 3: After the “Registry Editor” app launches, navigate to the “HKEY_CURRENT_USER\Software\Microsoft\Office.0\OneNote\Options\Other” path.
- Step 4: Now, navigate to the right panel and right-click on the empty space to fetch the options menu.
- Step 5: Click on the “New” option to further expand it, and then click on the “DWORD (32-bit) Value” option.
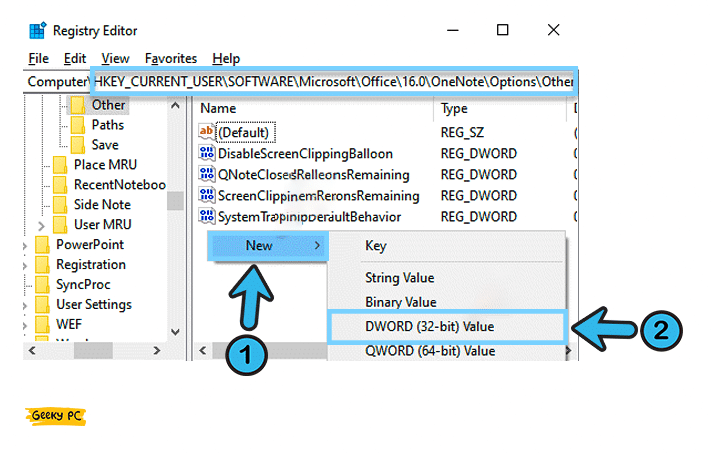
- Step 6: Once the new “DWORD” file appears, right-click on it, and rename the file to “ScreenClippingShortcutKey.”
- Step 7: Now, double-click on the renamed file and let the “Edit DWORD (32-bit) Value” dialog box appears.
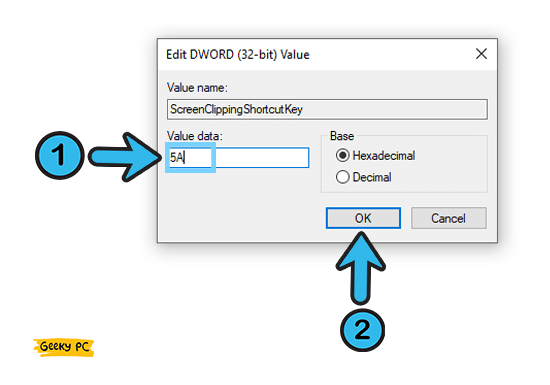
- Step 8: Change the “Value Field” to “5A” and change the hotkey to the “Windows Key + Shift + Z” option.
- Step 9: Now, click “OK” to save the settings and exit from the “Registry Editor” app.
- Step 10: Reboot your device and check whether you are still getting the same issue by pressing the “Windows Key + Shift + Z” buttons altogether.
Tweaking any registry files with improper knowledge can cause additional issues. If you wrongly put a mismatched value in the field, that can also trigger various other glitches in a cycle.So, try this method with extreme caution or perform this only under expert supervision.
12. Disable Global Hotkey Trough Registry Editor
If the snipping tool is still not working even after creating a hotkey function through the registry editor, you may need to disable the hotkey functionalities altogether to resolve it.However, there is no way to do it other than tweaking your registry editor again.
- Step 1: To initiate the “Run” command, press the “Windows Key + R” buttons together.
- Step 2: Type “regedit” in the designated field and click on the “OK” button.
- Step 3: Once the “Registry Editor” window appears, navigate to the “HKEY_CURRENT_USER\Software\Microsoft\Windows\CurrentVersion\Explorer\Advanced” path.
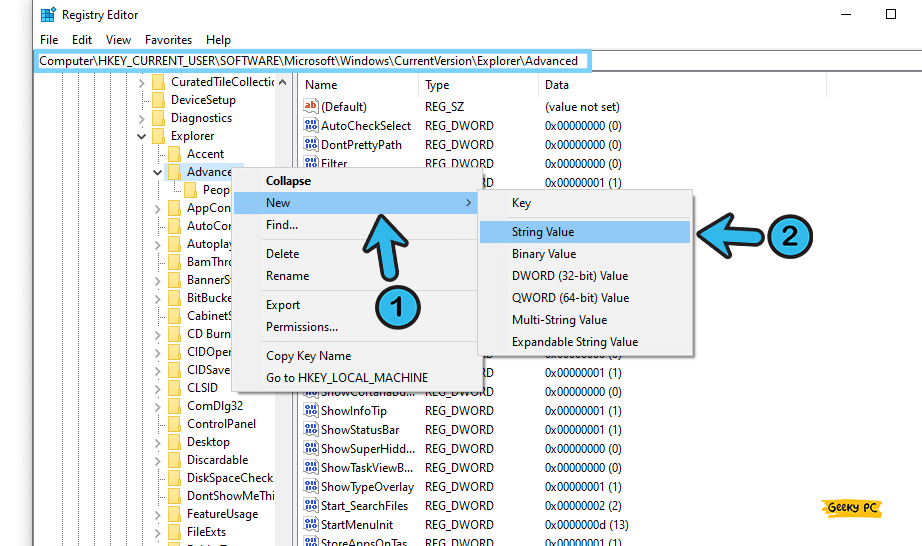
- Step 4: Now, navigate to the right panel, and click on the “Advanced” key.
- Step 5: Right-click on the key, select the “New” option, and then the “String Value” option.
- Step 6: Once the new “String Value” file appears, right-click on it, and rename the file to “DisabledHotkeys.”

- Step 7: Now, double-click on the “DisabledHotkeys” file again.
- Step 8: Navigate to the “Edit String” dialog box and click on the “Value Data” field.
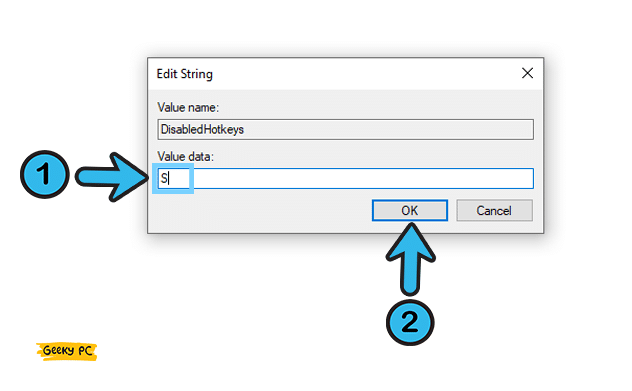
- Step 9: Put the value “S” in the field and click on the “OK” button to save it.
- Step 10: Now, reboot your device and check it by pressing the hotkeys again.
It is always an excellent option to create a new “System Restore Point” before disabling the hotkey functionality through the registry editor.So, if anything goes wrong after disabling the hotkeys, you can roll back to the previous function to resolve the additional glitches on your system.
13. Tweak Your Group Policy
Sometimes the group policy tool can interfere with the “Snip & Sketch” tool, especially if you are using your system under a network administrator.In such cases, you can manually tweak your group policy to resolve it. However, try it with utmost caution or only under expert supervision.
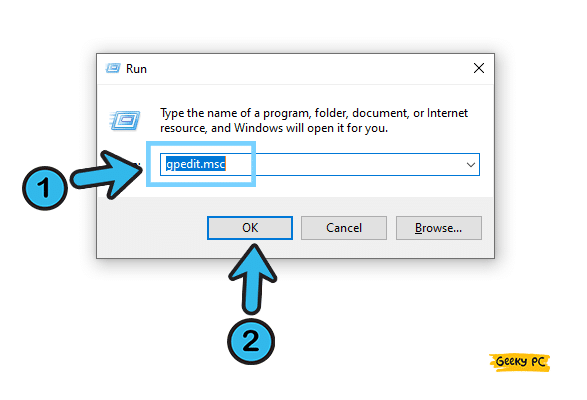
- Step 1: Press the “Windows Key + R” buttons together to initiate the “Run” field.
- Step 2: Type “gpedit.msc” in the designated field and click on the “OK” button.
- Step 3: Once the “Group Policy Editor” window is launched, navigate to the right panel and click on the “Computer Configuration” to expand it.
- Step 4: Now, click on the “Administrative Template” option to expand it and click on the “System” folder.
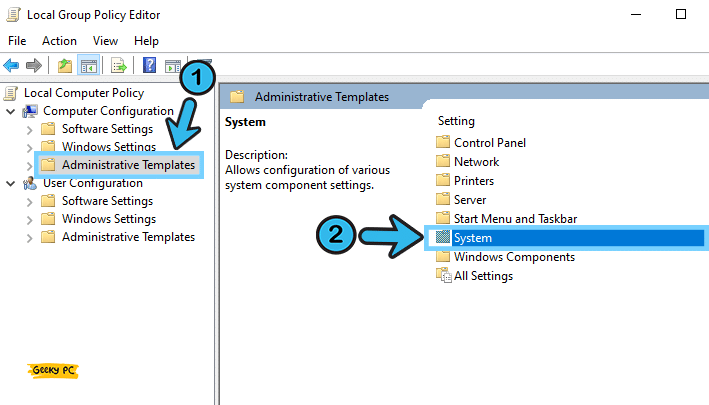
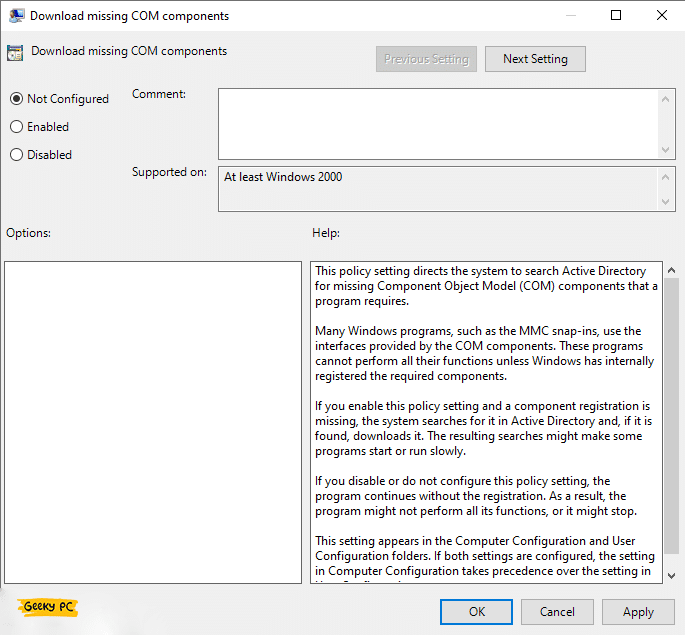
- Step 5: Navigate to the right panel and locate the “Download missing COM components” policy file.

- Step 6: Double-click on the file and select the “Not Configured” option.
- Step 7: Hit the “OK” button to save the settings and exit from the “Group Policy Editor” window.
- Step 8: Now, restart your device and check the “Snip and Sketch” function again.
Many users have reported getting an unexpected group policy error once they have tweaked it through the editor.If you are also facing similar situations, you can follow our detailed guide to the “This program is blocked by group policy” error in windows devices.
14. Restore Your Windows OS To A Previous Point
If none of the above methods are working to fix the “Snip & Sketch” function on your Windows device, you may need to restore your OS entirely to a previous point when everything was running smoothly.However, you should take the backup of all your data first. Otherwise, restoring the OS to a previous point will erase all the new data stored on your system.
- Step 1: Right-click on either the “This PC” or “My Computer” icon on your home screen (depending on your Windows variant).
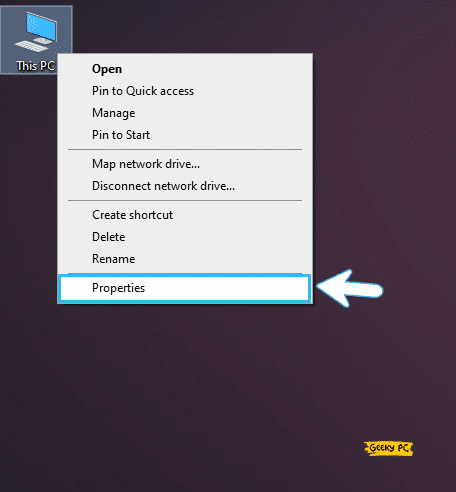
- Step 2: Once you get the new menu, click on the “Advanced System Settings” option.
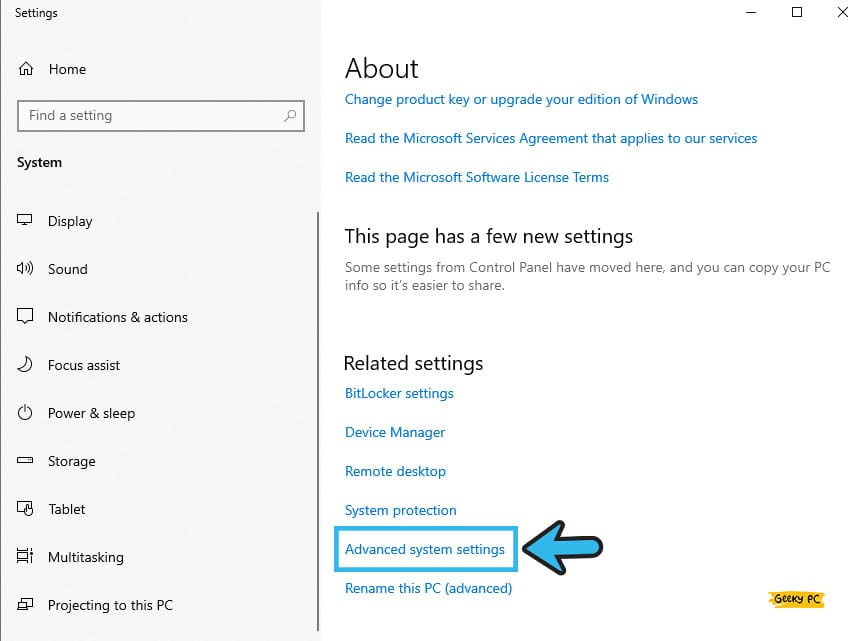
- Step 3: After the “System Properties” window appears, navigate to the header menu and click on the “System Protection” tab.
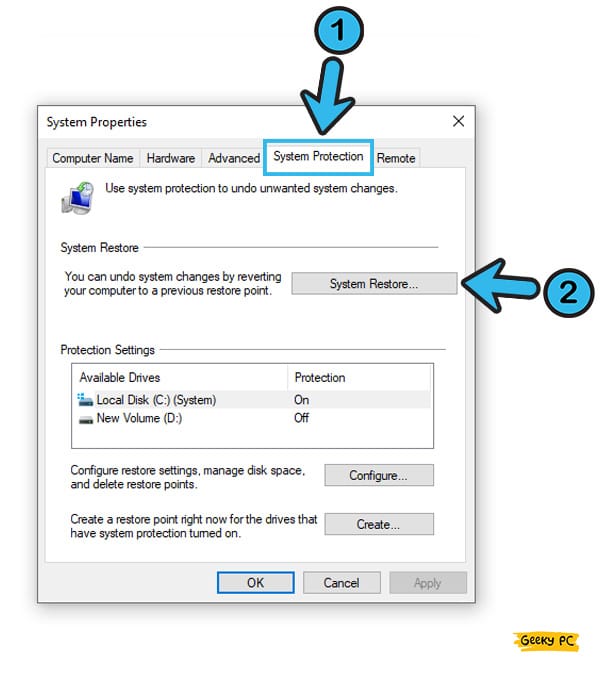
- Step 4: Now, click on the “System Restore” option again.
- Step 5: Once the new prompt appears, click on the “Next” button to proceed further.
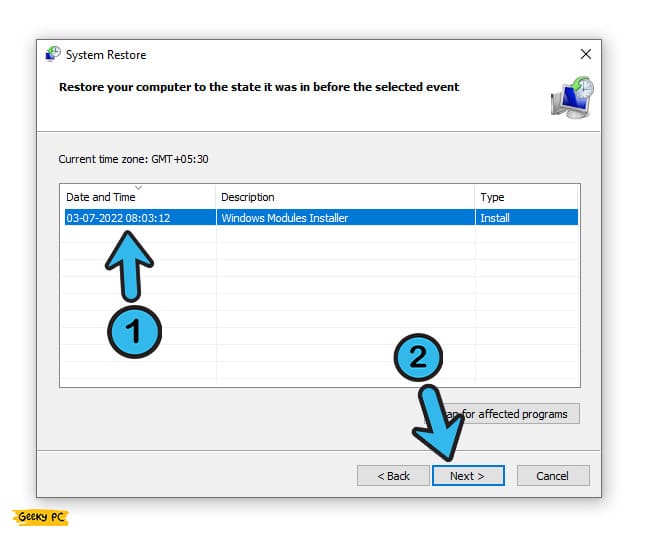
- Step 6: Now, click on the “Show more restore points” option to open the new menu.
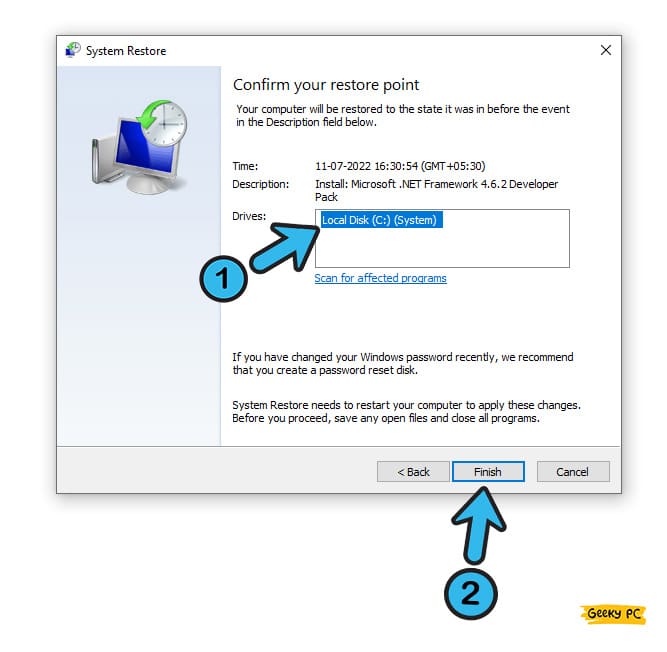
- Step 7: Select any of the previous restore points from the menu and click on the “Finish” button.
- Step 8: Let Windows restore to a previous point and check the “Snip & Sketch” function once it is done.
A few people have started getting a generic PnP monitor error after restoring their system to a previous point, especially if they are not using any driver for their display unit.If you are also facing the same, follow our comprehensive guide to fixing the generic PnP monitor error in Windows systems.
Conclusion
In almost 90% of cases, the seven generic fixes we have mentioned above are sufficient to resolve the issue when the Windows Shift S is not working on your system.However, if that doesn’t work, you can proceed with the advanced fixes. However, it is better to create a system restore point beforehand.
So, these are all the solutions we have for the “Snip & Sketch” error. If you think we have missed any or if you have any other effective solutions in mind, feel free to share them with us by giving us your suggestions and feedback in the comment box below.
FAQs
Q. Why is my Windows + Shift + S not working?
Most of the time, the “Windows Key + Shift + S” function doesn’t work, as the snipping tool and OneNote functionality interfere with each other. Besides, this issue can even trigger if any of the startup applications or third-party apps interfere directly with the “Snip & Sketch” function.
Q. Why is the snip and sketch function not working?
There can be several reasons why the snipping tool is not working on your system. Firstly, any startup application may have been interfering with the tool. And secondly, the OneNote function and the tool itself can interfere with each other to trigger this issue. Using an obsolete variant of the Windows OS can trigger this error as well.
Q. How do I get the snip and sketch function back?
Check your recycle bin first to know if you have accidentally deleted the snipping too. If you have done it, you can simply click on the app on the recycle bin and then click on the restore button. You can also enable the snip and sketch function from the settings app.
Q. How do I enable The Windows + Shift + S function?
You need to open the settings app first to enable the snipping function. And then, you should proceed with the “System” option and then the “Notifications & Actions” tab. You can then manually toggle the switch adjacent to the “Snip & Sketch” option to enable it.