
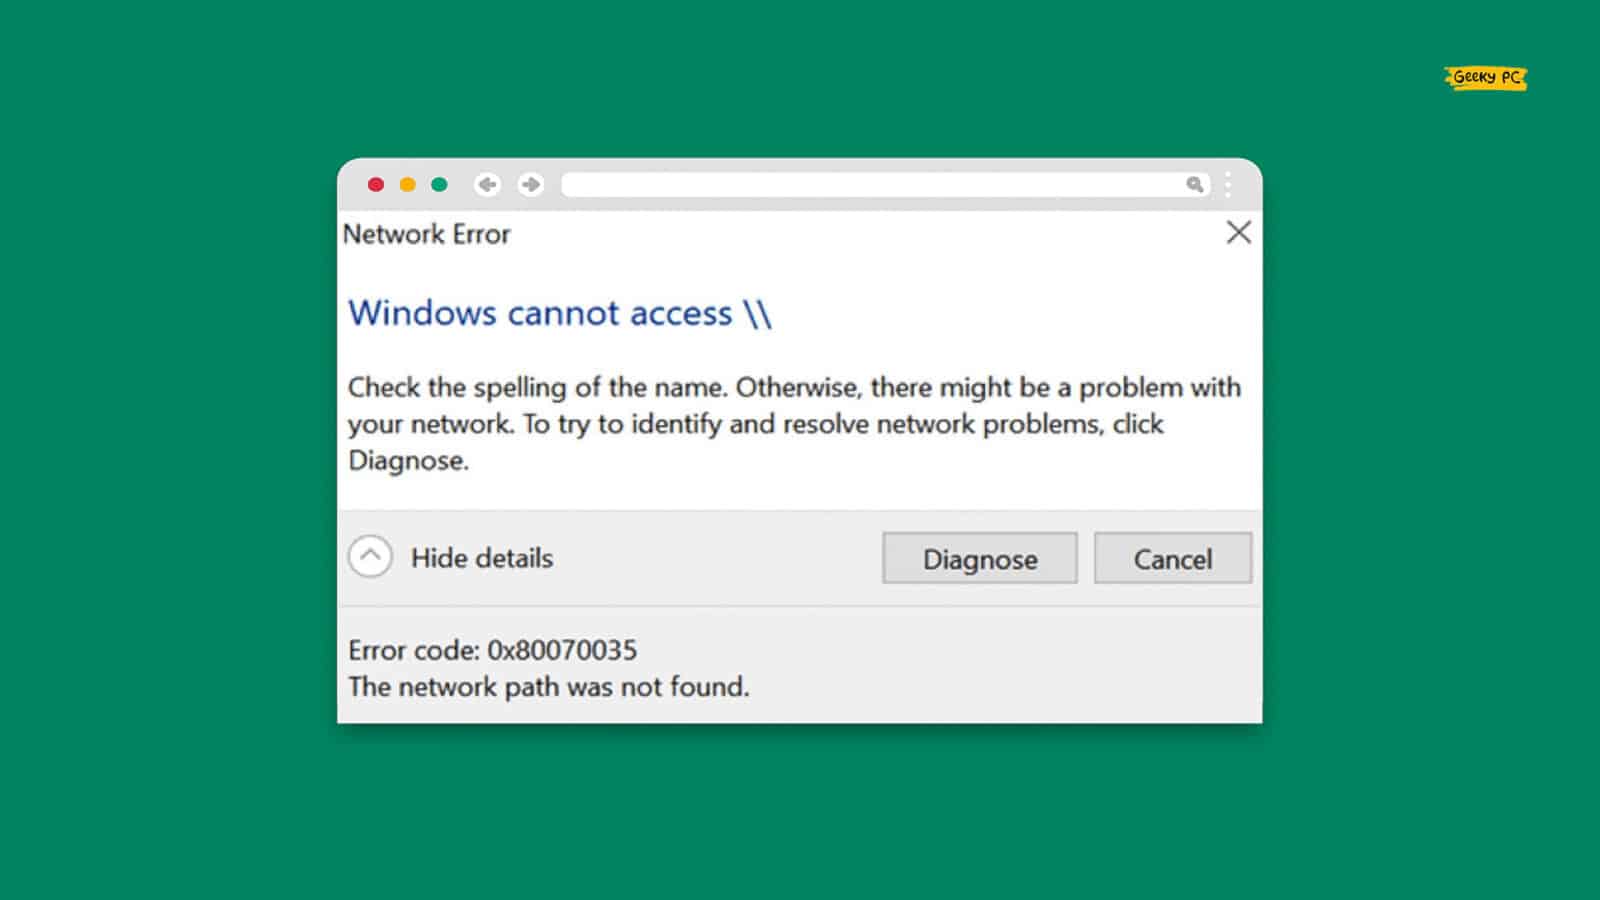
Don’t you get really annoyed when you fail to open a drive on your device or fail to connect to the network drive and the error code 0x80070035 popup? We all do, especially while using our system under a closed LAN network.
The 0x80070035 error can be fixed by resetting the TCP/IP parameter and troubleshooting your network adapters. You can also resolve it by running the SFC and the DISM scan. Besides, it can also be resolved by creating new Windows logon credentials or by enabling the drive-sharing option.
However, these are not all the possible solutions we have for the “network path was not found” issue. But before we dive deep into the solutions, let’s understand what this error code actually is and what are the root causes behind this error.
What “Error Code 0x80070035” Actually Is?
The error code 0x80070035 mainly triggers on any Windows-based device if the device can’t establish a secure connection to the network it is already connected to. Besides, it can also occur if the device is completely disconnected from the original network.
It mainly occurs when you are connected to a LAN network with multiple connections, and your device fails to establish a secure connection with other computers through the network. Although it is pretty common, you can quickly resolve this issue with a few simple tweaks.
What Are The Primary Reasons Behind The Error Code 0x80070035?
As we have said earlier, the 0x80070035 error can be easily resolved. But, before you know how to fix the error code 0x80070035 on your device, you must know about the root causes to resolve the issue from the root. And mainly this error can trigger for seven main reasons.
- You have the wrong TCP/IP parameters on your device that are restricting establishing a secure connection.
- There are bugs or errors on your network adapter or other network settings.
- There are corrupted or missing files on your root directory that are needed to establish a secured connection.
- You may have unintentionally disabled the network sharing or drive sharing option from the windows settings.
- The NetBIOS protocol is disabled on your Windows devices.
- You are using a wrong or corrupted Windows Credential to access your device.
- You have accidentally disabled the Reliable Multicast Protocol on your device.
Besides these seven primary causes, this error can also trigger for several other reasons, such as a faulty Windows update process or an improper tweak through the registry editor. However, this issue can be easily fixed with a few simple methods.
8+ Easy Fixes For The Error Code 0x80070035 In Windows Devices
Before trying any pro-level tweaks on your system that needs advanced controls, you should execute the generic steps that don’t need severe tweaks.
And in most cases, these generic methods are sufficient to resolve the error code 0x80070035 in Windows devices.
1. Reset TCP/IP Parameters
You can start by hard resetting your modem or router first by restarting it after a 2-minute gap. If that doesn’t work, you can proceed with the soft reset that can be done through your TCP/IP settings on your computer.
However, you better note down the IP, gateway, and subnet before trying this step, especially if you are using a static IP connection.
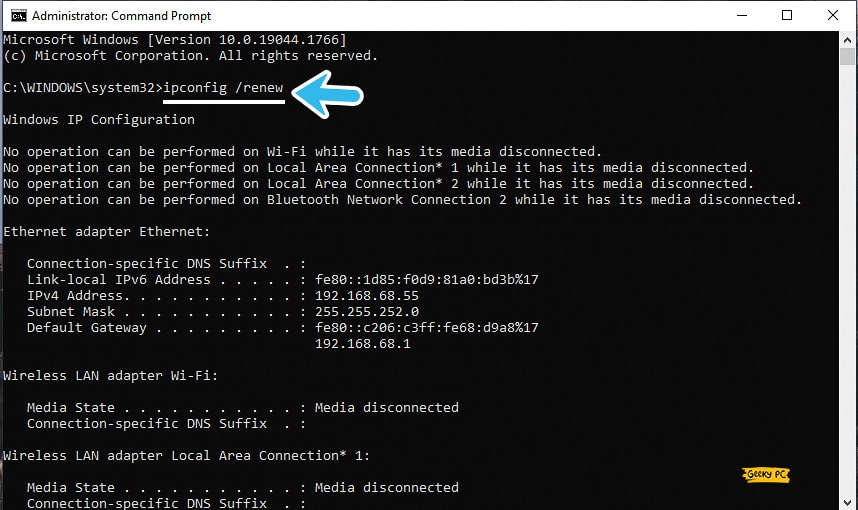
- Step 1: Press the “Windows Key + R” buttons together to launch the “Run” dialog box.
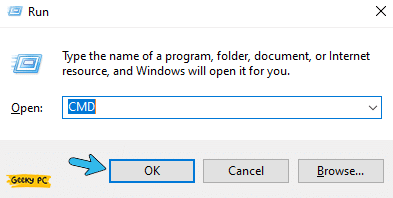
- Step 2: Type “CMD” in the designated field and press the “OK” button to launch the “Command Prompt” app.
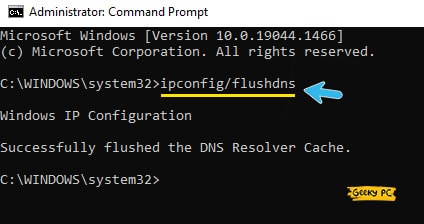
- Step 3: Once you get the black CMD screen, type the following commands in order and hit the enter button after each command: “ipconfig /release,” “ipconfig /flushdns,” “ipconfig /renew,” and “ipconfig settings.”
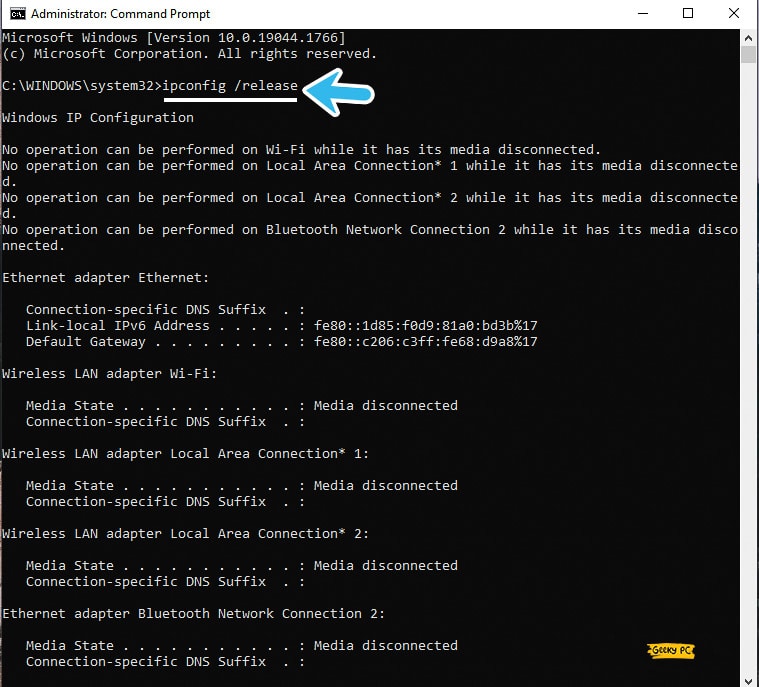
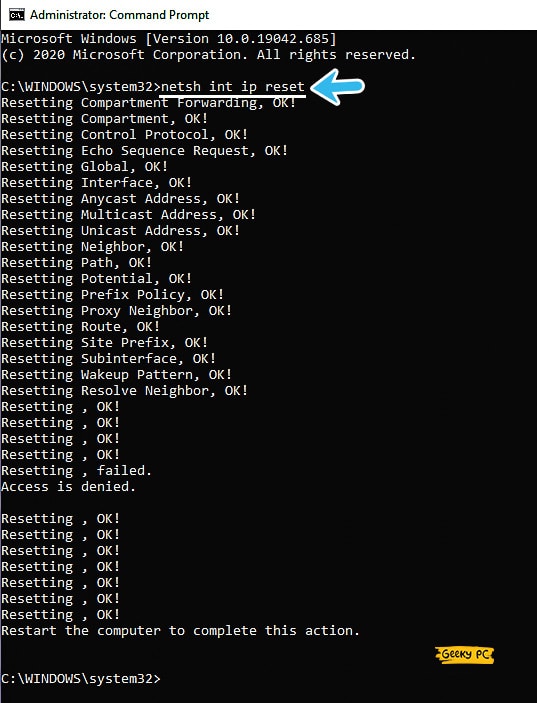
- Step 4: Now, type the following commands and hit the “Enter” button after each command line: “nbtstat –r,” “netsh int ip reset,” “netsh winsock reset,” “netsh winsock reset catalog,” and “netsh int ipv4 reset reset.log”.
- Step 5: Once all the command lines are executed, type the “Exit” command to close the app.
- Step 6: Now, delete all the temporary network files from your system and check whether you are still getting the issue.
Many people have reported to us that they have started getting an undefined network error in their ethernet connection after resetting their TCP/IP parameters.
If you are facing the same issue, you can follow our step-by-step guide to fix the Ethernet Is Not Working in Windows devices.
2. Troubleshoot Your Network
If you are getting the “error code 0x80070035: the network path was not found” on your system too frequently, the problem may lie in the network itself.
However, it is now possible to troubleshoot your network before trying any tweaks. And it will automatically find and fix the glitches in your network parameters.
- Step 1: Press the “Windows Key + I” buttons together to launch the “Settings” app on your system.
- Step 2: Once you get a new window, scroll down, and click on the “Update & Security” option.

- Step 3: Now, navigate to the left panel and click on the “Troubleshoot” button.
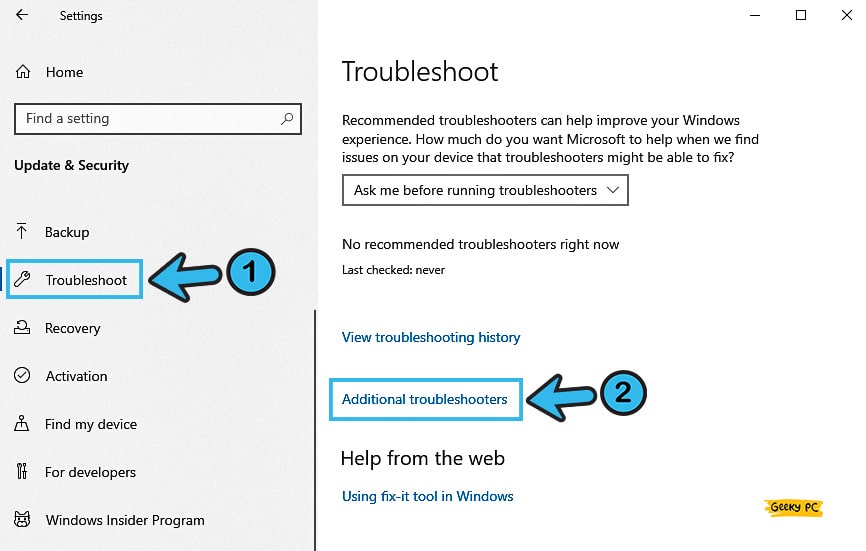
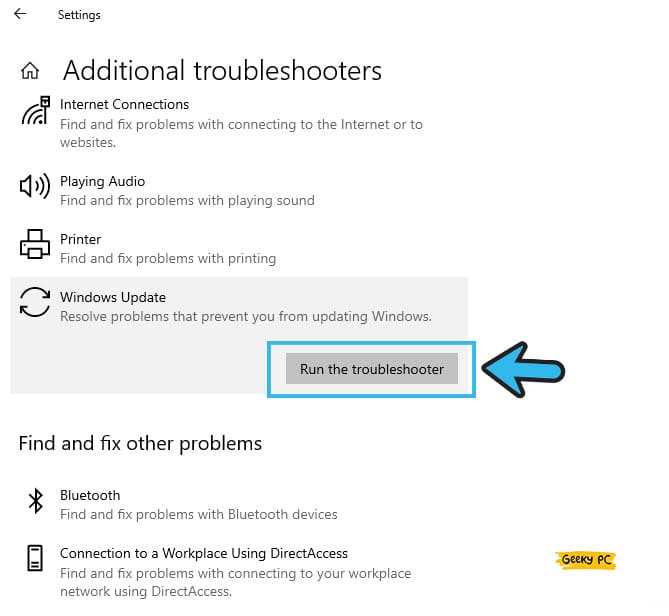
- Step 4: Come back to the right panel and click on the “Additional Troubleshooters” option.
- Step 5: After a new window appears, click on the “Internet Connections” option.
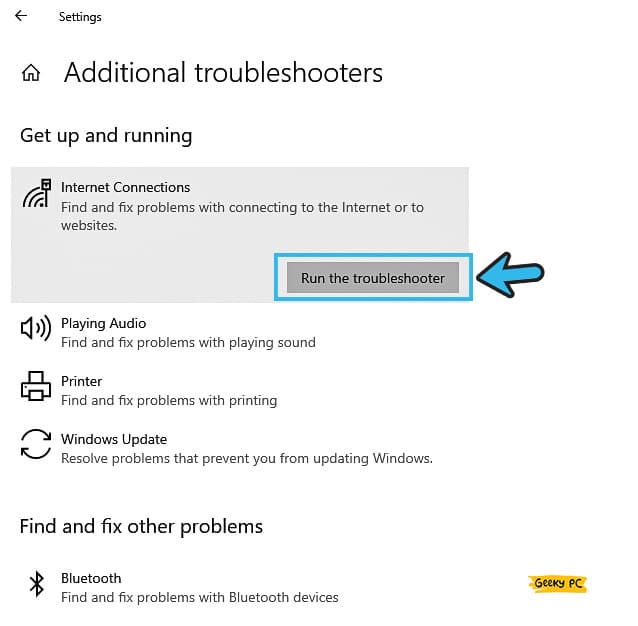
- Step 6: Now, click on the “Run the troubleshooter” option and follow the on-screen prompted instructions to execute the troubleshooting process.
- Step 7: After the process is completed, reboot your device and try to connect to the network again.
If you have recently updated your Windows OS and then ran the troubleshooter, you may get a few OS-related bugs, especially an unresponsive taskbar.
3. Execute The Windows Update troubleshooter
It may not be a TCP/IP issue but a Windows update-related bug that is triggering the 0x80070035 code on your system.
However, a troubleshooter now comes pre-installed with the latest generations of Windows OS, especially with Windows 10/11. So, you better run the troubleshooter to fix it.
- Step 1: Click on the “Windows” or the “Start” button (depending on the variant of your Windows OS).
- Step 2: Now, once you get the full menu, click on the “Gear” icon to launch the “Settings” app.
- Step 3: After the app opens, scroll down, and click on the “Update & Security” button.
- Step 4: Now, navigate to the left panel and click on the “Troubleshoot” button.
- Step 5: Navigate to the right panel and click on the “Additional Troubleshooter” button.
- Step 6: After you get a new window, locate the “Additional Troubleshooter” header and click on the “Windows Update” button under it.
- Step 7: Now, follow the on-screen instruction to complete the troubleshooting and then reboot your device.
You must keep an active internet connection while troubleshooting the Windows update. Otherwise, Windows can’t download additional files needed from the Microsoft server to fix the glitches.
And these additional files are absolutely mandatory to resolve the issues on your Windows device.
4. Execute SFC Scan
System File Checker or SFC is an effective tool that now comes pre-installed with the latest generation of Windows OS, especially with Windows 10/11.
And if you are getting the “error code 0x80070035” on your system too frequently, you must execute the SFC scan before trying any manual methods.
- Step 1: Press the “Windows Key + R” buttons together to initiate the “Run” dialog box on your device.
- Step 2: Once the new field appears, type “CMD” in the designated field and click on the “OK” button.
- Step 3: Once you get the black Command Prompt window, type the “sfc /scannow” command.
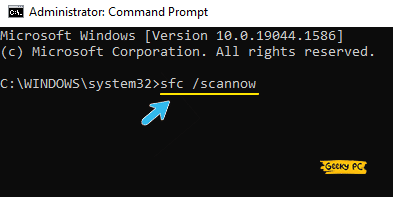
- Step 4: Now, hit the “Enter” button and let the SFC tool find and fix all the related glitches on your device.
- Step 5: Once the system file checking is done, reboot your device and check whether you are still getting the same error.
A few people have reported getting a DLL-related bug, especially the d3dx9.dll, once they have executed the SFC scan on their devices.
5. Run DISM Scan On Your Device
Besides SFC, the DISM (Deployment Image Servicing and Management) tool is also an effective app that now comes pre-installed with the latest generation of Windows OS.
And if the SFC scan can’t be located and fix the “windows cannot access network path” issue, you should proceed with the DISM scan on your device.
- Step 1: Press the “Windows Key + R” buttons together to launch the “Run” dialog box on your device.
- Step 2: Type “CMD” in the designated field and press the “OK” button to launch the Command Prompt app.
- Step 3: After the black window appears, type the “
DISM /Online /Cleanup-Image /StartComponentCleanup” command.
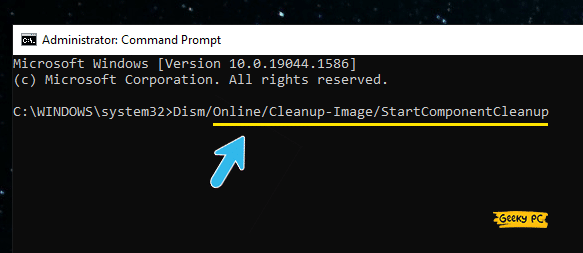
- Step 4: Now, press the “Enter” button and initiate the image cleaning program.
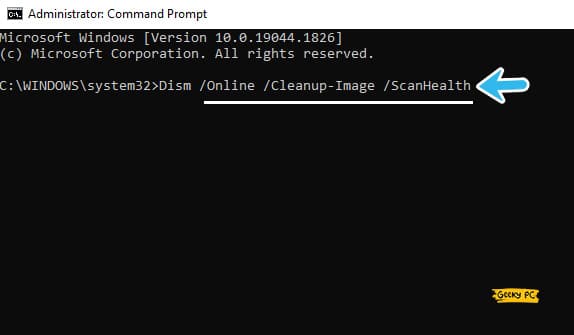
- Step 5: Once the operation is over, type the “
Dism /Online /Cleanup-Image /ScanHealth” command, and press the “Enter” button again.
- Step 6: Now, type the “
DISM.exe /Online /Cleanup-image /Restorehealth” command and hit the “Enter” key again.
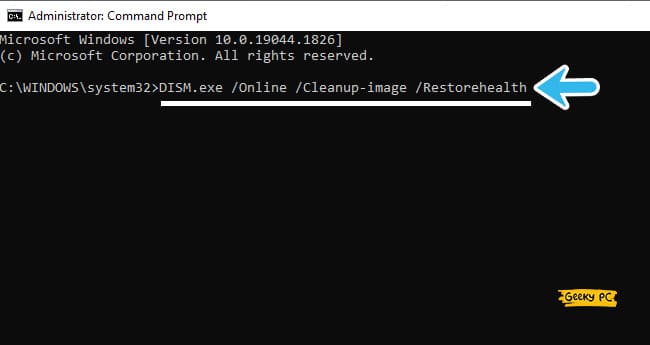
- Step 7: Once all these operations are done, type “Exit” and press the “Enter” button to close the “Command Prompt” app.
- Step 8: Now, reboot your system and try to connect to the network again.
Many of our users have reported getting a DISM error, especially the error code 87, on their system once they have executed the DISM scan.
6. Enable The Drive Sharing Option
Windows now have a drive-sharing option to access your files from remote locations or through a LAN connection.
But, if you have accidentally disabled it, Windows may trigger some network issues due to connection failed errors. And to solve it, you need to enable it again manually.
- Step 1: Click on the “C://” drive on your “My Computer” app (if that is your default system driver).
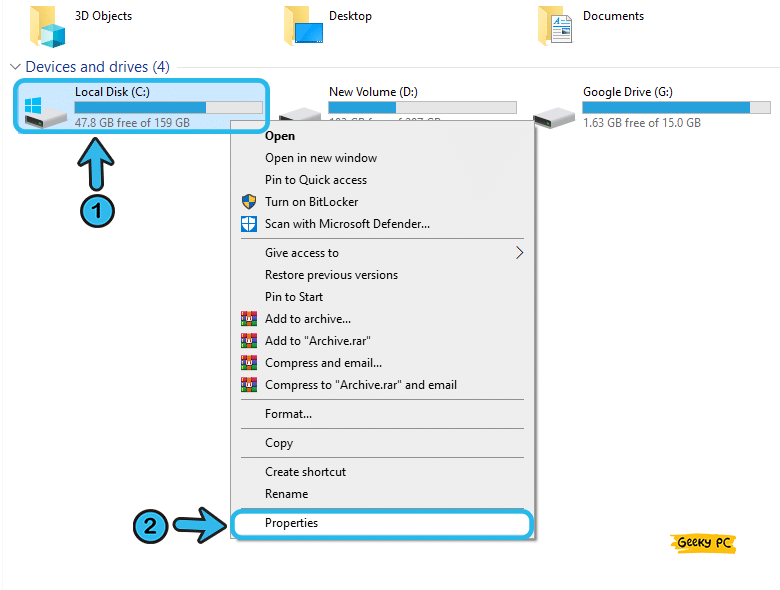
- Step 2: Now, right-click on it to fetch the contextual menu and select the “Properties” tab.
- Step 3: Once the new properties window appears, click on the “Sharing” option from the header selection menu.
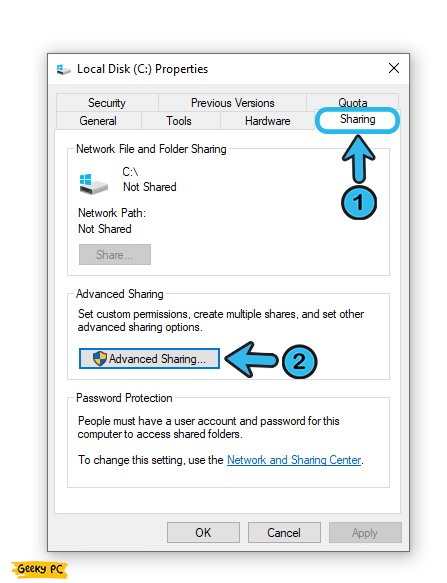
- Step 4: Click on the “Advanced Sharing” button located under the header with the same name.
- Step 5: Locate and tick the adjacent box to the “Share this folder” option.
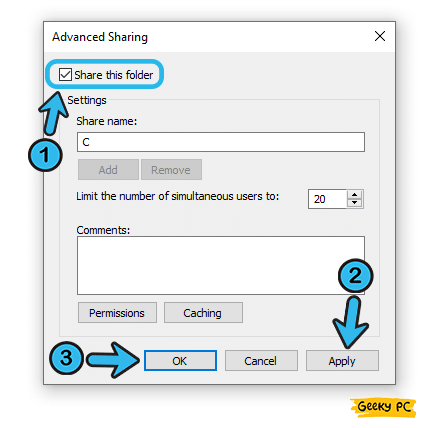
- Step 6: Now, press the “Apply” button to save the settings and then “OK” to exit the app.
- Step 7: Lastly, reboot your device and check whether you can establish a secure connection now.
7. Enable NetBIOS
Network Basic Input/Output System or NetBIOS is actually a network service from the house of Microsoft that lets apps and software installed on different computers communicate with each other through a LAN connection.
And if you are getting the 0x80070035 error, you should manually enable it.
- Step 1: Press the “Windows Key + R” buttons together to launch the “Run” dialog box.
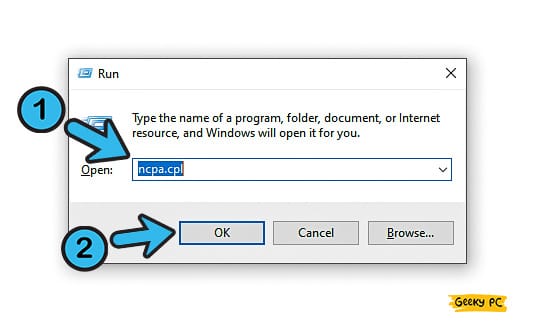
- Step 2: Type “NCPA.CPL” in the designated field and click on the “OK” button to launch it.
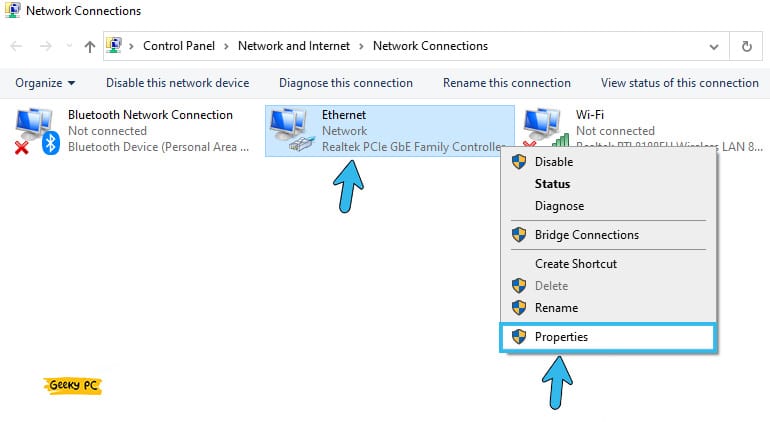
- Step 3: Once you get a new window, navigate to your network, right-click on it, and select the “Properties” option.
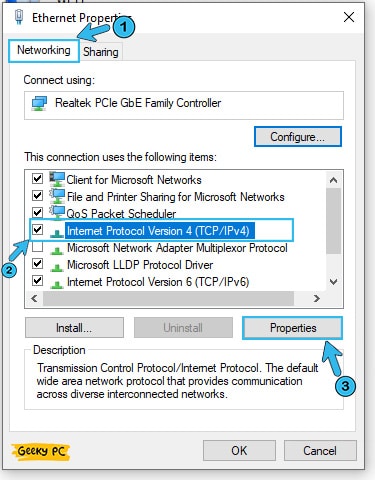
- Step 4: Now, click on the “Internet Protocol Version 4 (TCP/IPv4)” option from the list and then click on the “Properties” button.
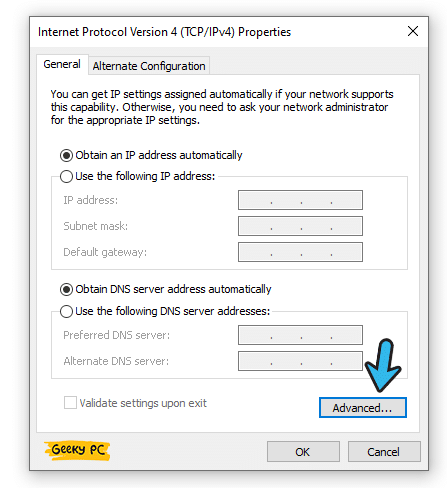
- Step 5: After a new window appears, click on the “Advanced” button to launch additional options.
- Step 6: Now, click on the “WINS” tab from the header selection menu.
- Step 7: Navigate to the bottom of the page and click on the “Enable NetBIOS over TCP/IP” option.
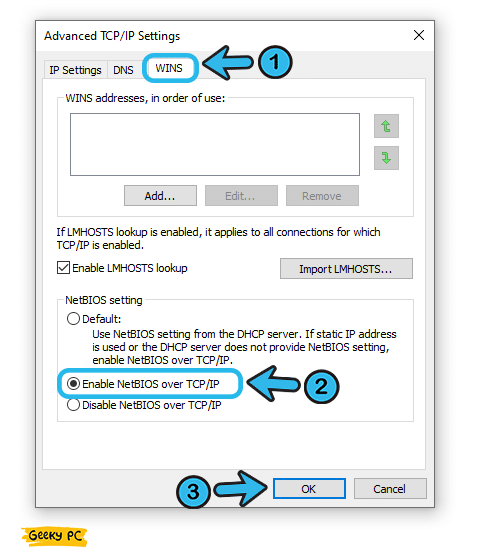
- Step 8: Click “Apply” to save the settings and then “OK” to exit from the page.
- Step 9: Once the settings are successfully saved, reboot your system.
It is not recommended to enable the NetBIOS if you are using your system under an unsecured LAN network.
If you enable it, other computers on that network may access certain apps and files on your system, making it vulnerable to phishing attacks.
So, you should only enable it if you are running your system under a secured LAN connection.
8. Whitelist Windows Update Servers From Internet Settings
It is possible that you have accidentally blacklisted the Windows Update service from your Internet settings, or it is already disabled by default.
However, you need to whitelist it from the settings to let your device establish a secure connection with the Microsoft update servers.
- Step 1: Click on the “Magnifying Glass” icon located at the bottom-left corner of your taskbar.
- Step 2: Type “Control” in the designated search field and click on the very first result that appears.
- Step 3: Select the “Category” view from the drop-down menu under the “View By:” header located at the top-right corner of the newly opened page.
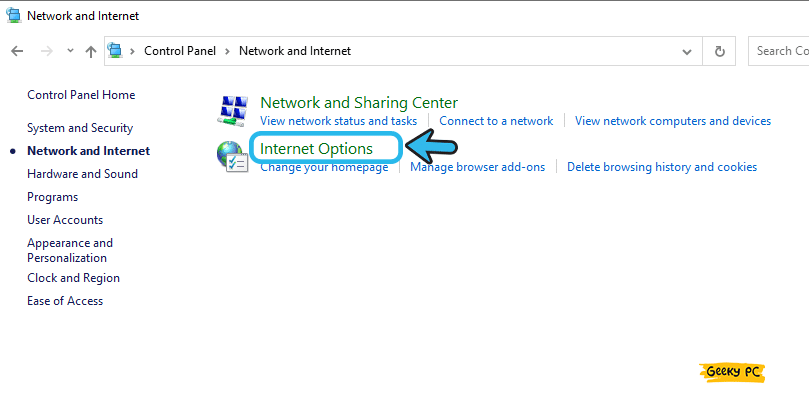
- Step 4: Now, click on the “Network & Internet” option.

- Step 5: Once a new window opens, click on the “Internet Options” button.
- Step 6: Select the “Security” tab from the header selection menu to proceed further.
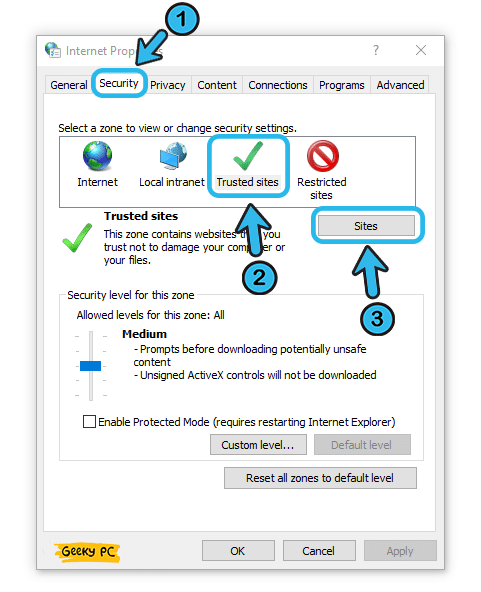
- Step 7: Click on the “Trusted Sites” option with a green tick mark.
- Step 8: Now, click on the “Sites” button and uncheck the box beside the “Require server verification (https:) for all sites in this zone” option.

- Step 9: Locate the “Add this website to the zone” box and enter the following websites: https://windowsupdate.microsoft.com and https://update.microsoft.com.
- Step 10: Click on the “Add” button and then on the “Apply” button to save the settings.
- Step 11: Now, reboot your device and try to connect to the Windows update server again.
Many of our users have reported getting a start button bug once they have whitelisted the Windows Update service and rolled to the newest update.
If you are also facing similar conditions on your system, follow our comprehensive guide to fixing the “Start button not working” error in Windows devices.
8+ Advanced Fixes For The Error Code 0x80070035 In Windows OS
If the generic fixes mentioned above are sufficient to resolve the error code 0x80070035 on your device, the problem may lie in the root directories or system settings.
And in that case, resorting to the pro-level tweaks is the only option left to resolve this issue in no time.
9. Open The Drive Through The IP Address
If you can’t access a particular drive on your system, or if the error 0x80070035 popup whenever you try to access a specific drive, the problem may lie in the directories.
However, there is an alternative way to fix this issue, and you can manually access the drive through the IP address of your device.
- Step 1: Press the “Windows Key + R” buttons together to launch the “Run” dialog box on your system.
- Step 2: Type “CMD” in the designated field and click on the “OK” button to launch the Command Prompt app.
- Step 3: Once you get the black window, type the “ipconfig /all” command, and hit the “Enter” button.
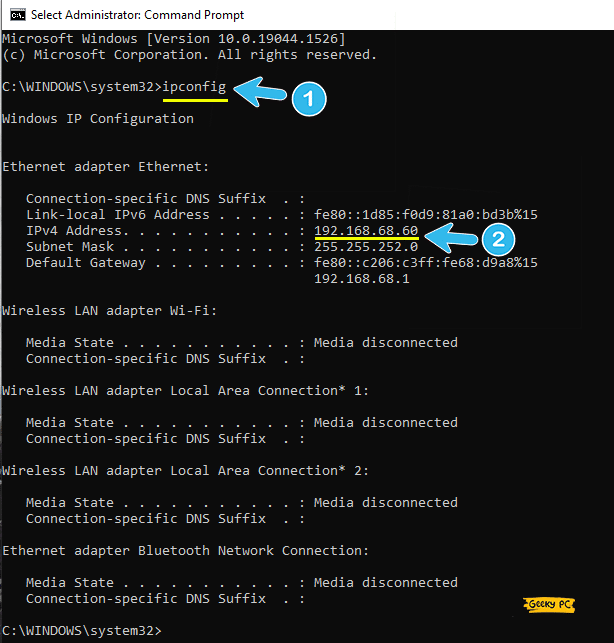
- Step 4: Note down the IP listed under the “IPv4 Address” category.
- Step 5: Type “Exit” to close the “Command Prompt” window.
- Step 6: Now, press the “Windows Key + R” buttons again to launch the “Run” dialog box.
- Step 7: Type “\\IPv4 Address\your drive” on the “Run” field and click on the “OK” button. (Example – \\192.168.0.1\c)
- Step 8: Check whether you can now access the desired drive on your device.
A few of our users have reported getting a default gateway error when they try to access a folder through IP, especially while using a static IP connection.
10. Create A New Windows Credential Altogether
If you are getting the error code 0x80070035 too frequently on the device, the problem may lie in the Windows credentials. And you may have been using the wrong credential that is triggering this issue.
So, to fix it, you need to manually create a new user on the Windows Credential Manager.
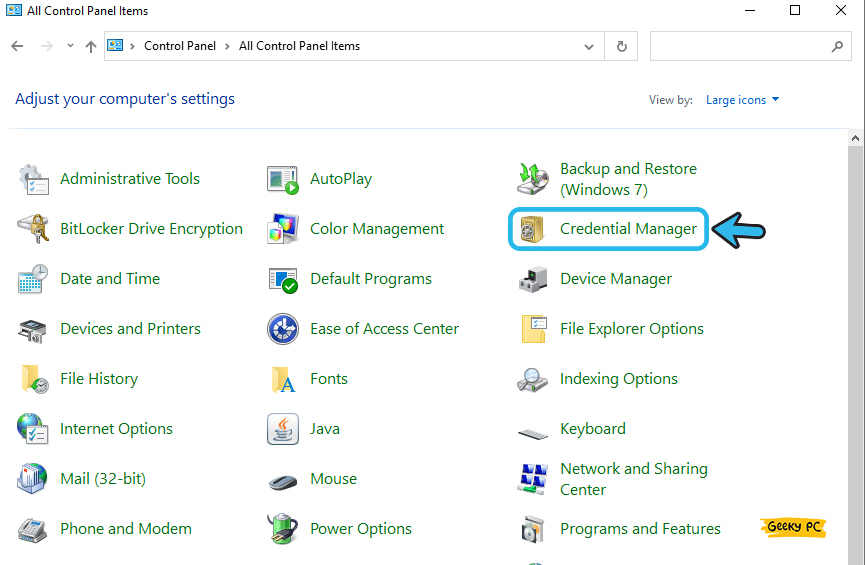
- Step 1: Click on the “Magnifying Glass” icon located at the bottom-left corner of your taskbar.
- Step 2: Now, type “Control” in the designated field and click on the very first result that appears.
- Step 3: Once the “Control Panel” app launches, navigate to the “View By:” option on the top-right corner and select the “Large Icons” view from the drop-down list.
- Step 4: Click on the “Credential Manager” option from the list.
- Step 5: Once a new page appears, click on the “Windows Credentials” option.
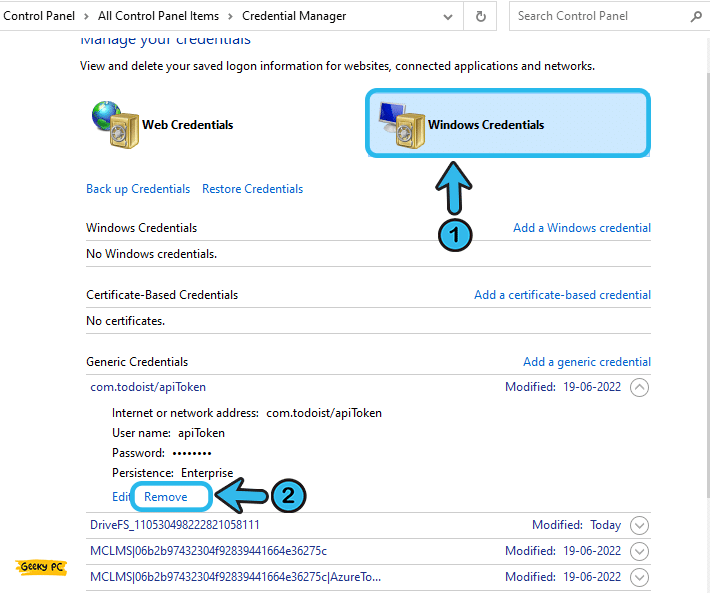
- Step 6: Now, remove all the available credentials one by one, and reboot your device once you have deleted everything.
- Step 7: Go back to the “Windows Credential” app the way we mentioned above and click on the “Add a Windows credential” option.
- Step 8: Put the right parameters on the designated field to create a new credential and click on the “OK” button to save the settings.
- Step 9: Now, reboot your device again and log in with the newly created credential.
You shouldn’t make too many new users from the Windows Credential Manager. Because the entire setup and parameters will be different in all your user accounts.
So, it is better to stick to just one. And if you are getting access errors, you should also delete the older account once you have created a new one.
11. Enable Reliable Multicast Protocol
The multicast protocol is a tool that now comes pre-installed with the latest generation of Windows OS, such as Windows 10 and 11.
And this particular tool lets any user access and cast the same app or tool on different computers at the same time. So, you must enable it beforehand.
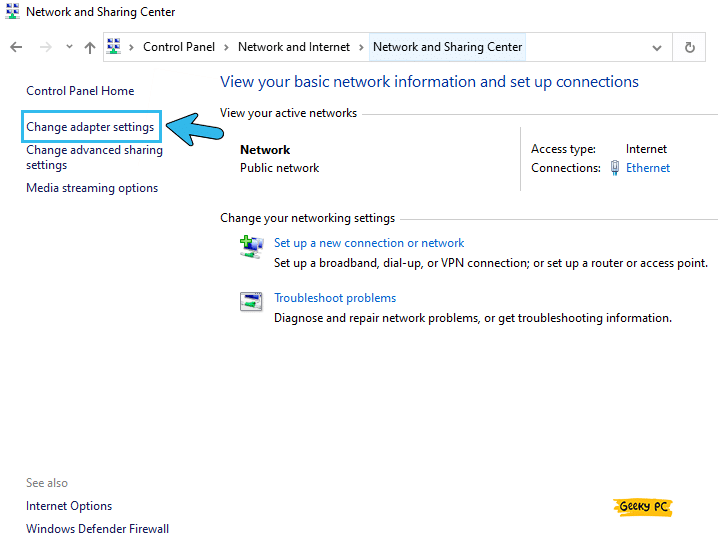
- Step 1: Right-click on the network connection icon located at the bottom-right corner of your taskbar.
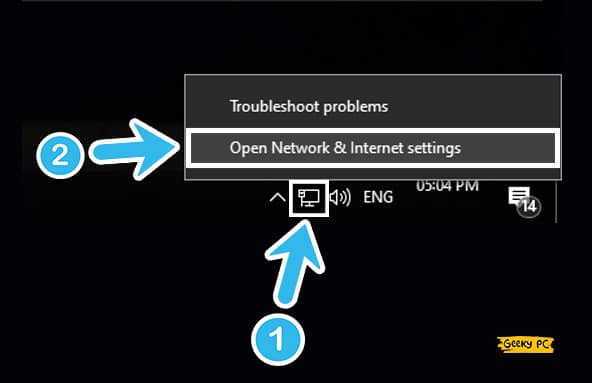
- Step 2: Click on the “Open Network & Internet Settings” option from the contextual menu.
- Step 3: After the new window appears, navigate to the right panel, and click on the “Network and Sharing Center” option.
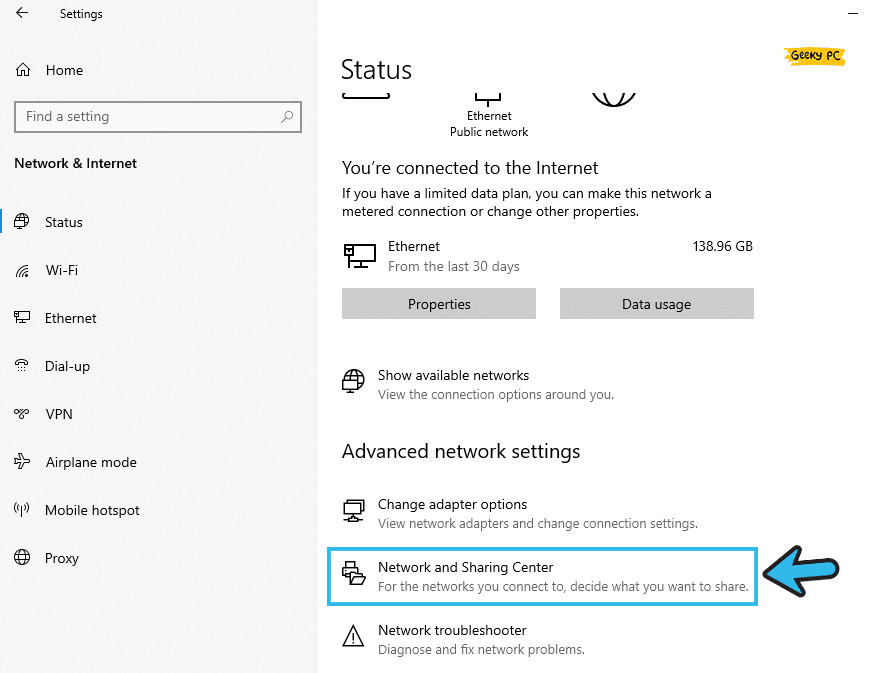
- Step 4: Now, navigate to the left panel, and click on the “Change adapter settings” option.
- Step 5: Navigate to the network you are currently using, right-click on it, and select the “Properties” option from the menu.
- Step 6: After the new window launches, click on the “Install…” button.
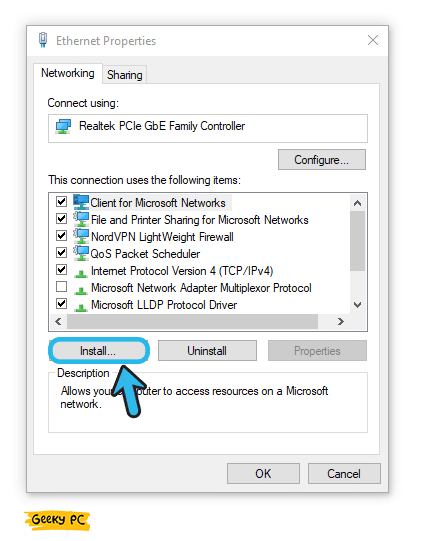
- Step 7: Click on the “Protocol” option and then click on the “Add…” button.
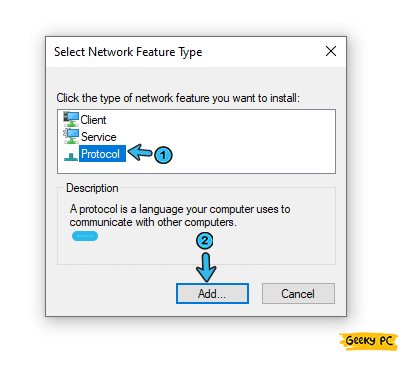
- Step 8: Now, select the “Reliable Multicast Protocol” option from the menu and click on the “OK” button to install it.
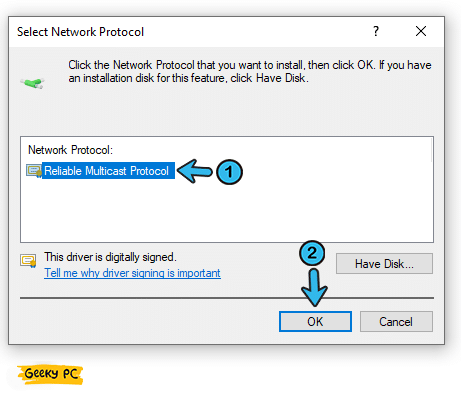
- Step 9: Once it is done, reboot your device and check whether you are still getting the same issue.
Several of our existing users have reported getting a service host delivery error once they have enabled the multicast protocol on their devices.
If you are also facing the same on your system, follow our quick guide to fix the “Service host delivery optimization” error in Windows devices.
12. Enable SMB V1.0
A Server Message Block or SMB is a network protocol application layer that is an integral part of the Windows OS. And this protocol allows shared access to all the files and printers located on the same network without any external interference.
And if you are getting error code 0x80070035 on Windows 10 devices, you must enable it.
- Step 1: Click on the “Magnifying Glass” icon located at the bottom-left corner of your taskbar.
- Step 2: Type “Windows Features” in the designated search field and click on the very first result that appears.
- Step 3: Once you get a new menu, scroll down, and navigate to the “SMB 1.0/CIFS File Sharing Support” option.
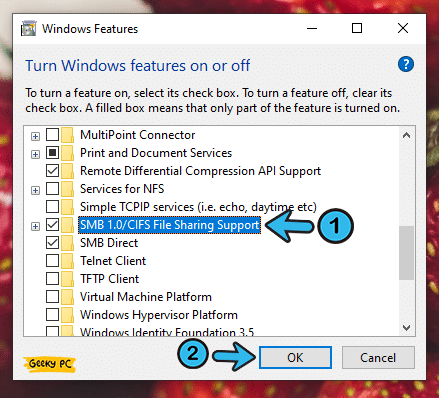
- Step 4: Now, click on the adjacent circle beside the option to enable it.
- Step 5: Click on the “OK” button to save the settings and then exit the app.
- Step 6: Reboot your device and check whether you are still getting the same issue.
You shouldn’t enable SMB if you are using your system under an unsecured network or if you are connected to a public network.
Otherwise, other applications from different computers on the same network may access the files and directories on your system, leaving behind vulnerability issues.
13. Change LAN Manager Authentication
If you want to connect to a computer and access a file through a network, you must have LAN manager access. Otherwise, Windows OS will not let you connect to a different computer and access it.
However, you can easily tweak the LAN manager authentication protocol on your device.
- Step 1: Press the “Windows Key + R” buttons together to launch the “Run” dialog box.
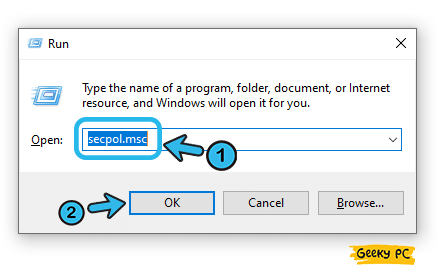
- Step 2: Type “secpol.msc” in the designated field and click on the “OK” button.
- Step 3: Once the “Local Security Policy” window appears, select the “Local Policies” option from the left panel.
- Step 4: Now, navigate to the right panel and double-click on the “Security Options” folder.
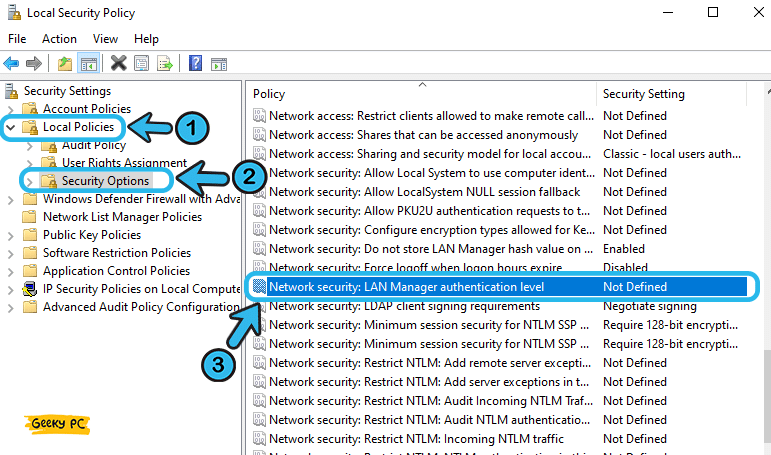
- Step 5: Navigate to the “Network security: LAN Manager authentication level” from the list and double-click on it.
- Step 6: Select the “Send LM & NTLM-use NTLMv2 session security if negotiated” option from the drop-down menu.
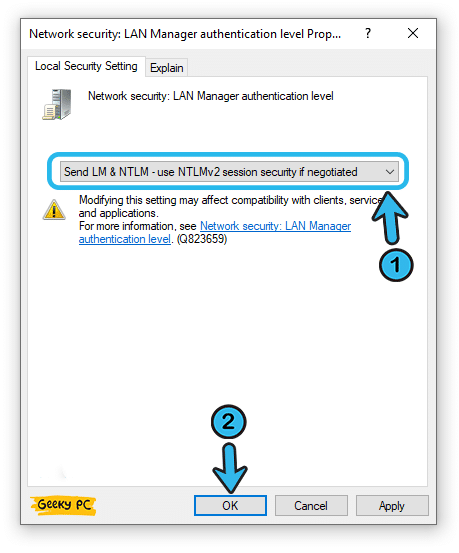
- Step 7: Now, click the “Apply” button to save the settings and then click “OK” to exit the app.
- Step 8: Reboot your device and try to establish a secure network connection.
A few of our users have reported getting a group policy error after tweaking the LAN manager authentication on their system, especially while using it under a network administrator.
If you are also facing the same on your device, follow our step-by-step guide to fix the “This program is blocked by group policy” error in Windows devices.
14. Tweak Through Registry Editor
If there is an incorrect parameter on your root directory or in any core installation file, the error code 0x80070035 can frequently trigger on your system.
However, you can easily tweak the parameters through the registry editor. And that can be done in a few simple steps.
- Step 1: Press the “Windows Key + R” buttons together to launch the “Run” dialog box.

- Step 2: Type “regedit” in the designated field and click on the “OK” button to launch it.
- Step 3: Once the “Registry Editor” window appears, navigate to the “Computer\HKEY_LOCAL_MACHINE\SYSTEM\CurrentControlSet\Services\LanmanWorkstation\Parameters” path.
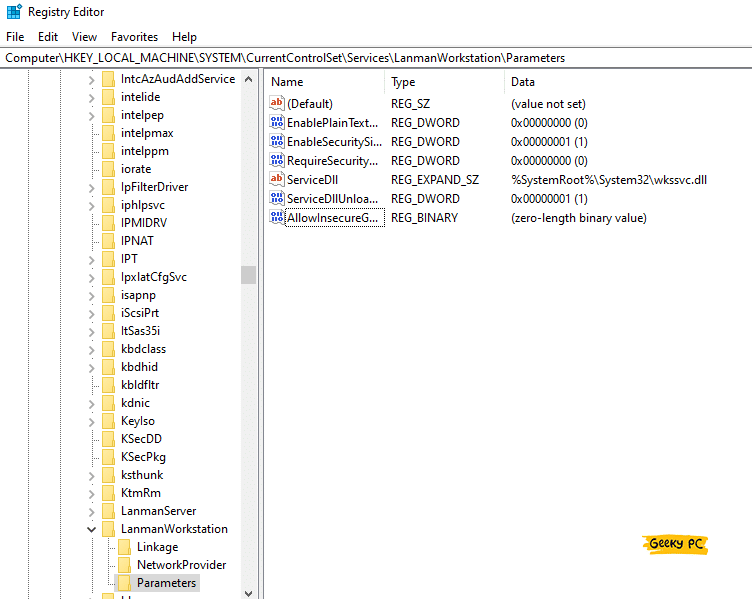
- Step 4: Now, navigate to the right panel and locate the “AllowInsecureGuestAuth” path.
- Step 5: Right-click on it and select the “Modify” option from the contextual menu.
- Step 6: Once you get a new value box, enter “1” in the Value field (the default is “0”).
- Step 7: Now, click “OK” to save the settings and exit the app.
- Step 8: Reboot your device and check whether you are still getting the same issue.
Registry Editor is a very advanced tool that needs expert guidance. If you put any incorrect data through the registry editor, a series of errors can trigger on your device.
So, it is better to cautiously follow the steps we have mentioned above under expert supervision.
15. Enable Insecure Guest Logons
If you are trying to establish a secure connection from a different computer to access a file or app, Windows may block the incoming connection due to suspicion.
And you can get the error code 0x80070035 in the windows server as well. And in that case, you should enable the insecure guest logins on your device.
- Step 1: Click on the “Magnifying Glass” icon located in the bottom-left corner of your taskbar.
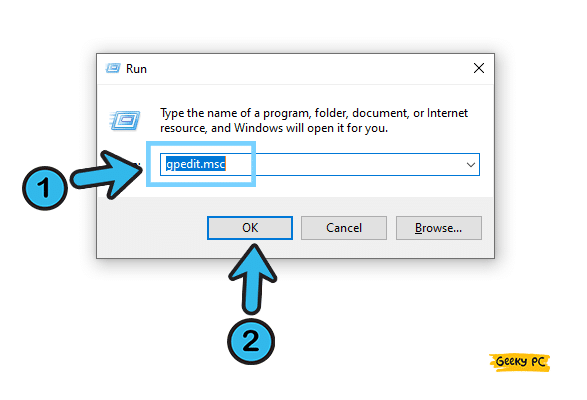
- Step 2: Type “gpedit.msc” in the search field and click on the first result that appears.
- Step 3: Once the “Local Group Policy Editor” window launches, navigate to the left panel and click on the “Local Computer Policy” option.
- Step 4: After the menu has expanded, click on the “Computer Configuration” option.
- Step 5: Now, navigate to the right panel and double-click on the “Administrative Templates” option.
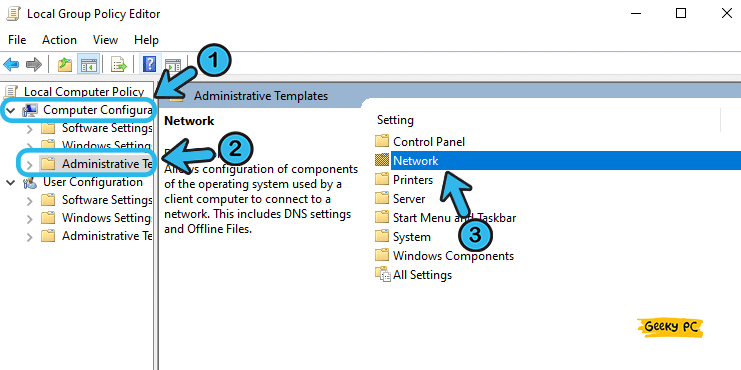
- Step 6: Once a new menu appears, click on the “Network” option.
- Step 7: Navigate to the “Lanman Workstation” option from the menu and click on it.
- Step 8: Now, double-click on the “Enable insecure guest logons” option.
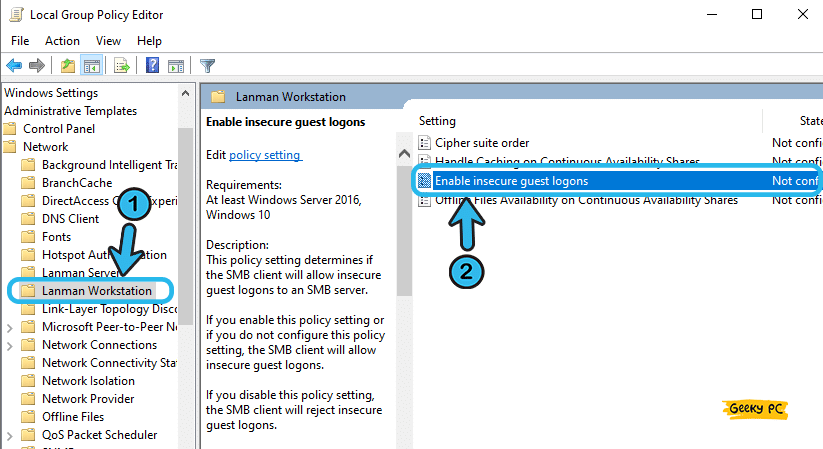
- Step 9: Select the “Enabled” option from the menu to allow all insecure guest login attempts.
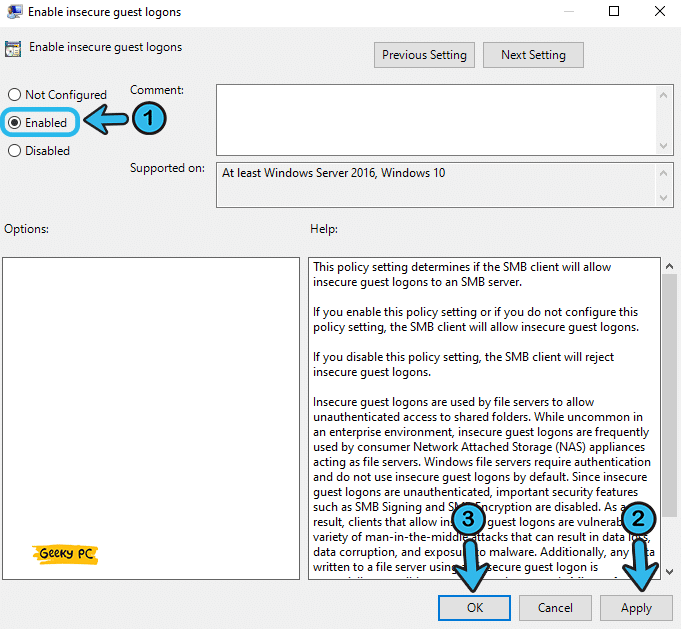
- Step 10: Click on the “Apply” button to save the settings and then the “OK” button to exit the app.
It is not recommended to enable the guest login option if your system is directly connected to an unsecured or public network.
Otherwise, different computers on the same network may gain access to your files and folders on your device. So, you should only enable it if you are connected to your home network.
16. Reset All The Windows Update Components
You may not know, but there are several Windows Update services already running on your device in the background, even if you restart your device in safe mode.
However, if any of those services are corrupt, various network issues can trigger. So, to eliminate it, it is better to give your Windows Update service a fresh restart.
- Step 1: Press the “Windows Key + R” buttons together to launch the “Run” command on your device.
- Step 2: Type “CMD” in the Run dialog box and click on the “OK” button to launch it.
- Step 3: Once the “Command Prompt” window launches, type the following commands in exact order and hit the “Enter” button after each line: “net stop wuauserv,” “net stop cryptSvc,” “net stop bits,” and “net stop msiserver.”
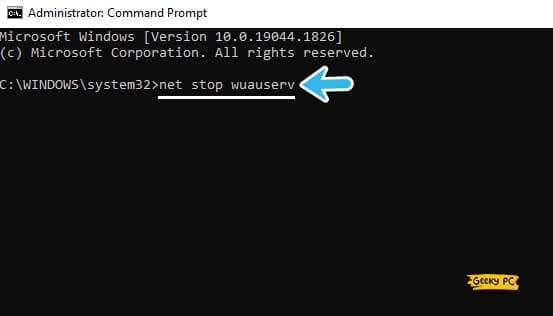
- Step 4: Now, to rename the “SoftwareDistribution” folder, type the “ren C:\Windows\SoftwareDistribution SoftwareDistribution.old” command and hit the “Enter” button.
- Step 5: You should now also rename the “Catroot2” folder by entering the “ren C:WindowsSystem32catroot2 Catroot2.old” command line.
- Step 6: Now, reenable all the services by entering the following command in exact order and hit the “Enter” button after each command line: “net start wuauserv,” “net start cryptSvc,” “net start bits,” and “net start msiserver.”
- Step 7: Once the operation is successfully done, type “Exit” and hit the “Enter” button to exit from the app.
Tweaking any root directory or installation file can leave your computer in a vulnerable position.
Besides, if you wrongly enter any command in the root directories, a series of errors can appear on your system. So, you should strictly follow the methods in exact order.
Conclusion
Before trying any pro methods that need advanced tweaks on your system, you should always try the generic methods first.
However, if those tweaks can’t solve your issue, you don’t have any other way than to resort to advanced fixes. But you must allocate a new “System Restore Point” to roll back to the original settings if any unforeseen circumstances occur.
So, these are all the possible solutions we have to fix the error code 0x80070035 on Windows systems. If you think we have missed any effective methods to fix it, don’t hesitate to drop your suggestion and feedback in the comment box below.
FAQs
Q. What does error code 0x80070035 mean?
You’ll get the error code 0x80070035 on your system when the device fails to establish a connection to access the network path it is already connected to. It can instantly restrict all the file-sharing options between the computers located on the same network.
Q. How do I find my network path?
You can easily check your network path using the “File Explorer” app installed on your Windows device. Click on the “File Explorer” icon and then click on the “This PC” option on the left panel. Now, double-click on the mapped drive under the “Network Locations” option. And now, you can see the exact network path on the address bar.
Q. Why are my network drives disconnected?
All the network drives may get disconnected if you have enabled the “Fast Startup” option on your system settings. It may also happen if you give your device a fresh reboot in safe mode. Wrong windows credential or a corrupted one can also force the network drive to disconnect.
Q. How do I force a network drive to reconnect?
Open the “Command Prompt” app by pressing the “Windows Key + R” buttons together and then type the “CMD” command. Once the black window appears, type the “ipconfig /release” command, and hit the “Enter” button. You can now reconnect the drive by entering the “ipconfig /renew” command line.