

We all need an active internet connection to use our laptops, isn’t it? The whole of computing remains incomplete nowadays without an internet connection. However, things start to become fuzzy if the Wi-Fi keeps disconnecting in Windows 10, isn’t it?
The wireless disconnection issue can be solved by updating the wireless driver and the Windows OS. You can fix this by enabling the high-performance mode and disabling the 802.11n mode. Besides you can also solve it by using a public DNS address and using a less-crowded Wi-Fi channel.
However, these are not all the possible solutions we have to resolve this issue. But, before we dive into the solution part, let’s understand what the primary reasons for this error are triggered on Windows 10 and 11 devices.
What Are The Primary Reasons Behind The Wi-Fi Disconnection Issue In Windows 10/11?
Although it is pretty common nowadays to encounter wireless disconnection issues, there can be many reasons why your Wi-Fi keeps disconnecting in Windows 10 or 11 devices. However, this issue mainly occurs for seven main reasons, which are as follows.
- Your wireless adapter or the Wi-Fi hardware is faulty or damaged.
- The power management option on your device is mismatched with the power requirement of the wireless adapter.
- You are using an outdated variant of the wireless adapter that needs an urgent update.
- You are probably using an obsolete variant of Windows OS or a cracked one.
- There are wrong configurations and parameters in the wireless adapter settings.
- You have disabled the “High Performance” mode in your system that is required for high-end wireless adapters.
- You have entered the wrong network parameters in your wireless settings.
Besides these seven primary reasons, this issue can even arise if you are using the wrong DNS on your network settings. This issue can also trigger if any of the startup applications or background processes directly interfere with the wireless adapter.
7+ Generic Fixes If Your Wi-Fi Keeps Disconnecting In Windows 10
If the Wi-Fi keeps disconnecting in Windows 10, you should try the generic fixes first before you resort to any pro fixes that need advanced tweaks.
And in almost 90% of the cases, these generic fixes alone are sufficient to resolve the wireless connection issues on your Windows devices.
1. Toggle Your Home Network From Public To Private
The main reason behind any Wi-Fi issue is undoubtedly the wrong settings. You can even encounter these issues if you have set any incorrect parameters in the Wireless settings.
Besides, a faulty parameter can also leave your Wi-Fi vulnerable to external interference. So, it is better to toggle your network to private mode.
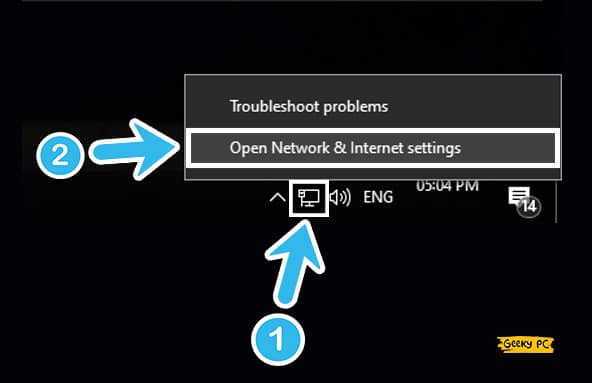
- Step 1: Click on the “Wi-Fi” icon located at the bottom-right corner of your taskbar (beside the system clock).
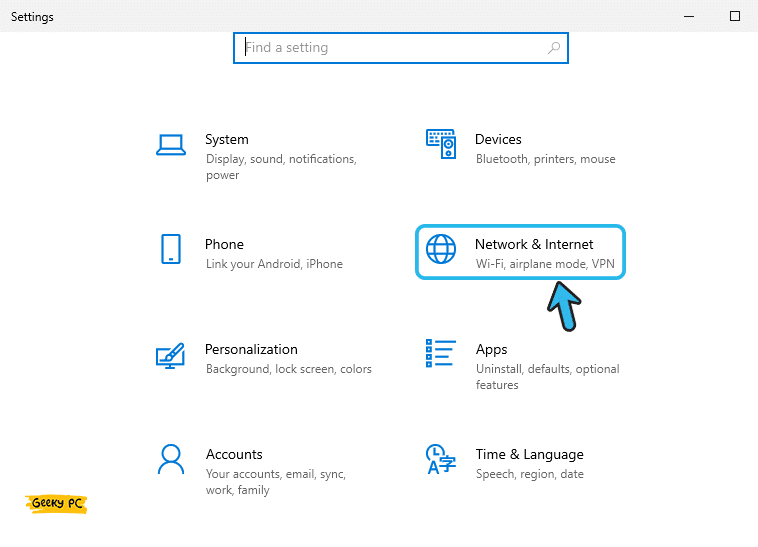
- Step 2: Once the contextual menu launches, click on the “Network & Internet settings” option.
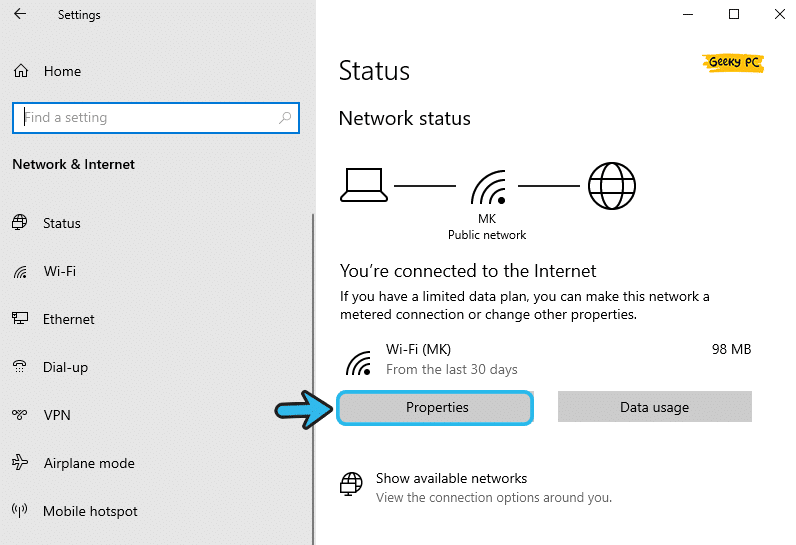
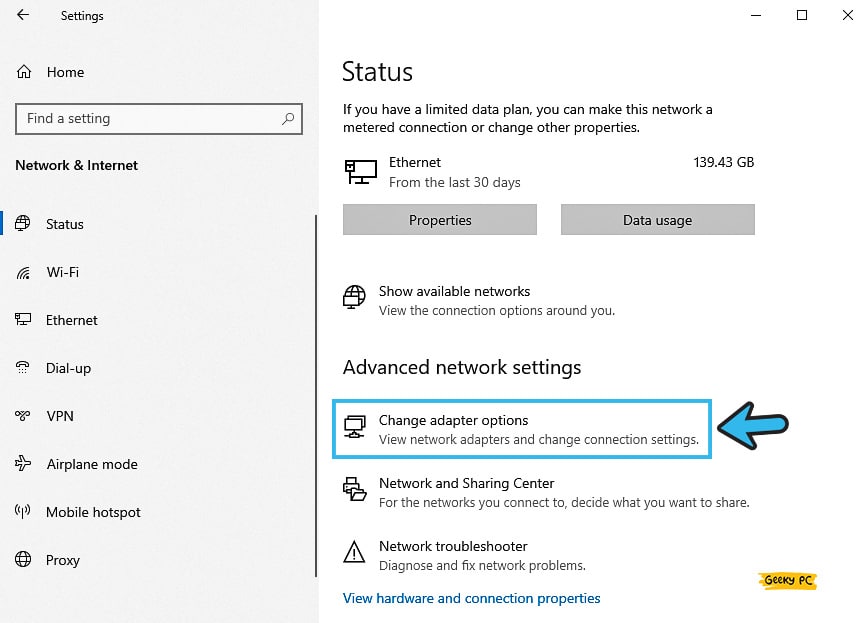
- Step 3: After the new window appears, navigate to the right panel and click on the “Properties” button located under your Wi-Fi header.
- Step 4: From the new window, navigate to the “Network Profile” heading.
- Step 5: Now, click on the small circle beside the “Private” option to select it (the default is “Public”).
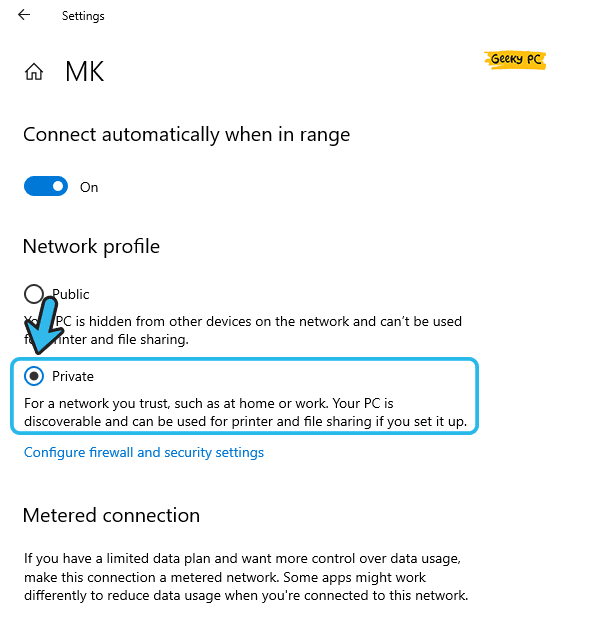
- Step 6: Close the window and reboot your system with the new settings.
You may get difficulty connecting with a public network (free Wi-Fi) if you have toggled the settings to the “Private” mode.
If you really want to connect with an open network, you may temporarily reset the Wi-Fi network to public and then revert back when you stop using it.
2. Change The Power Management Settings
Power management is an inbuilt feature that now comes preinstalled with the latest generation of Windows OS, especially Windows 10 and 11.
It not only regulates the overall power consumption but also maximizes the efficiency of each peripheral and accessory installed on your device.
- Step 1: Click the “Windows Key + X” buttons together to launch the contextual menu on your device.
- Step 2: Click on the “Device Manager” option from the list to launch the app.
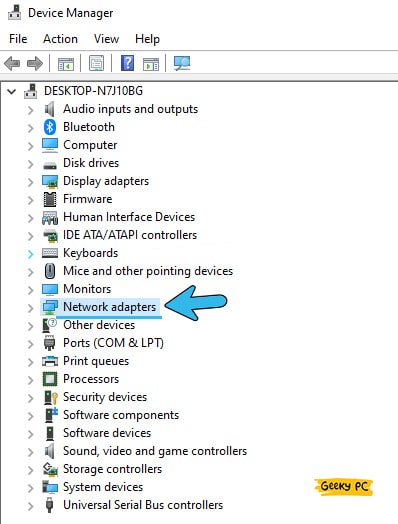
- Step 3: Once you get a new window, navigate to the left panel, and click on the “Network Adapters” option to expand it.
- Step 4: Now, double-click on the Wi-Fi adapter on the list to launch its properties.
- Step 5: After the new window appears, navigate to the “Power Management” tab from the header selection menu.
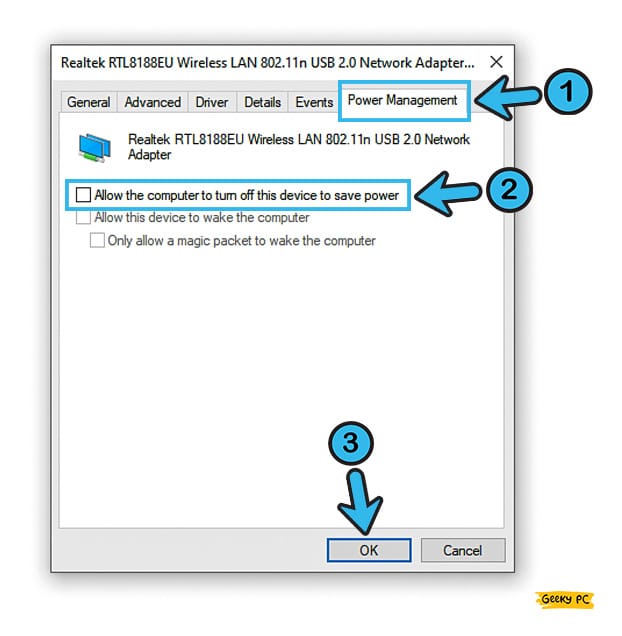
- Step 6: Locate and uncheck the box adjacent to the “Allow the computer to turn off this device to save power” option.
- Step 7: Now, click “OK” to save the settings and exit the app.
- Step 8: Reboot your device and check whether you are still getting the same Wi-Fi error on your system.
A few of our users have started getting an unresponsive start button once they have toggled the power settings on their Windows systems.
If you are also facing the same problem, follow our step-by-step guide to fix the “Start button not working” on Windows devices.
3. Enable High-Performance Mode
If the Wi-Fi keeps disconnecting In Windows 11, the problem may lie in the performance settings on your device.If you haven’t enabled the high-performance mode on your system, your Wi-Fi adapter may not get the priority or the required CPU cores to function properly. However, you can now do it in a few simple steps.
- Step 1: Press the “Windows Key + R” buttons together to launch the “Run” dialog box on your system.
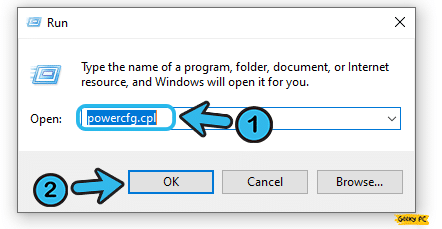
- Step 2: Type “powercfg.cpl” in the designated “Run” field and click on the “OK” button.
- Step 3: Once you get the new “Power Options” window, navigate to the right panel.
- Step 4: Scroll down and click on the “Show additional plans” option.
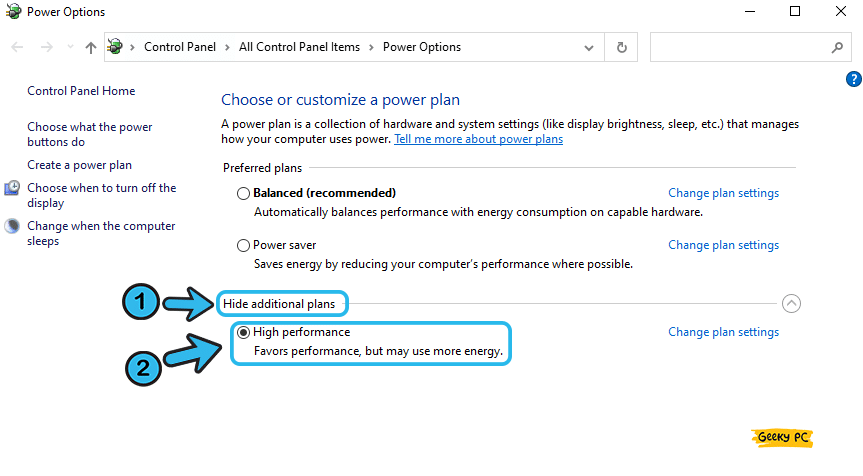
- Step 5: After the new options appear on the window, click on the “High-performance plan” option.
- Step 6: Now, exit the app and reboot your system with the new power management settings.
4. Disable 802.11n Mode In Wi-Fi Settings
The IEEE 802.11n Mode is a wireless network standard that enables windows to use multiple antennas at the same time to enhance the overall performance and coverage of the Wi-Fi adapter.
However, it may start conflicting with the core Wi-Fi settings and can cause 5ghz Wi-Fi keeps disconnecting issue in Windows 10. So, you should disable it beforehand.
- Step 1: Click on the “Magnifying Glass” icon located at the bottom-left corner of your taskbar.
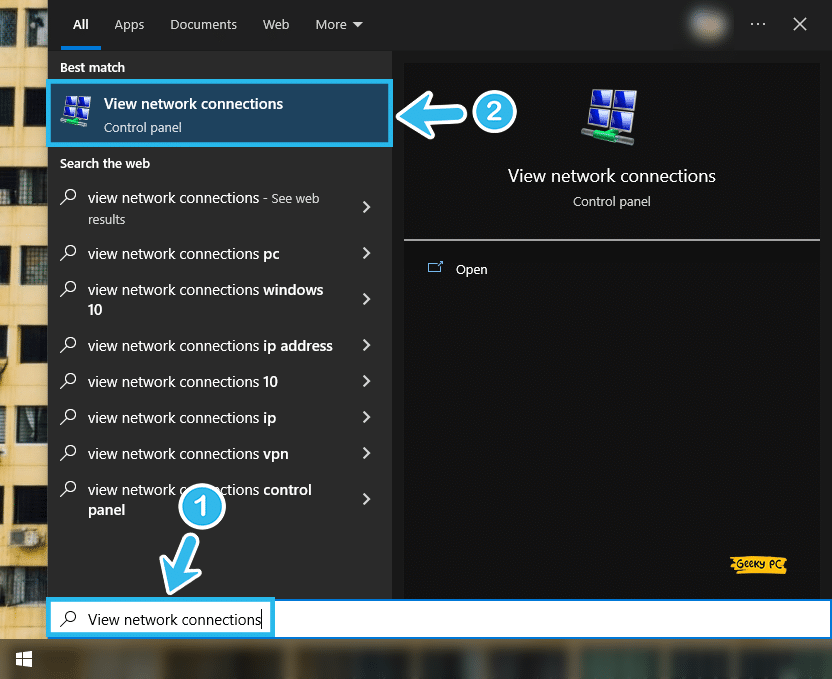
- Step 2: Once the new search field appears, type “Network Connections” in the search box and click on the very first result that appears.
- Step 3: Now, navigate to the Wi-Fi connection already running on your device and right-click on it to fetch the contextual menu.
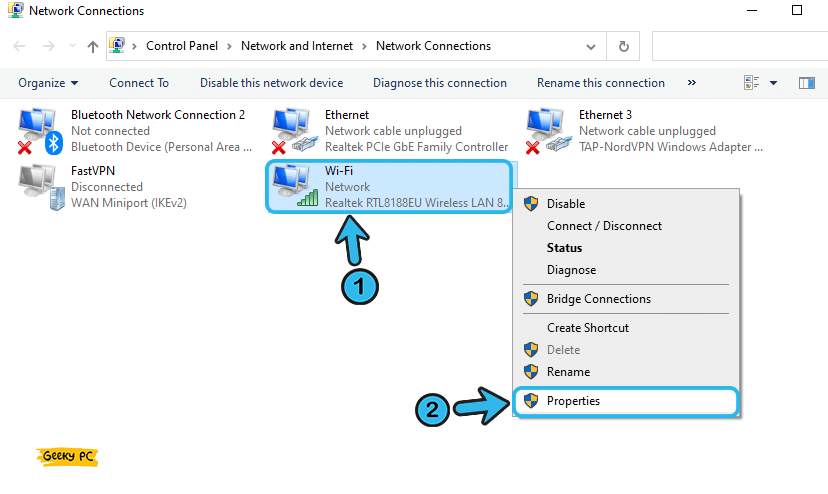
- Step 4: Click on the “Properties” tab from the menu.
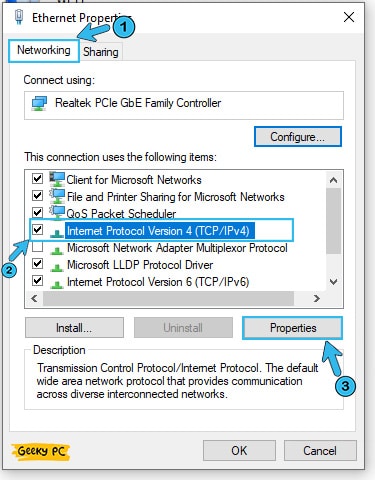
- Step 5: Once you get a new window, navigate to the “Networking” tab from the header selection menu.
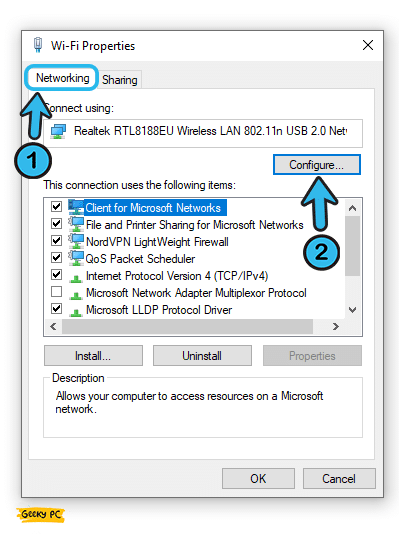
- Step 6: Now, click on the “Configure” button and further navigate to the “Advanced” tab from the header selection menu.
- Step 7: Select the “802.11n mode” option from the list below the “Property” header.
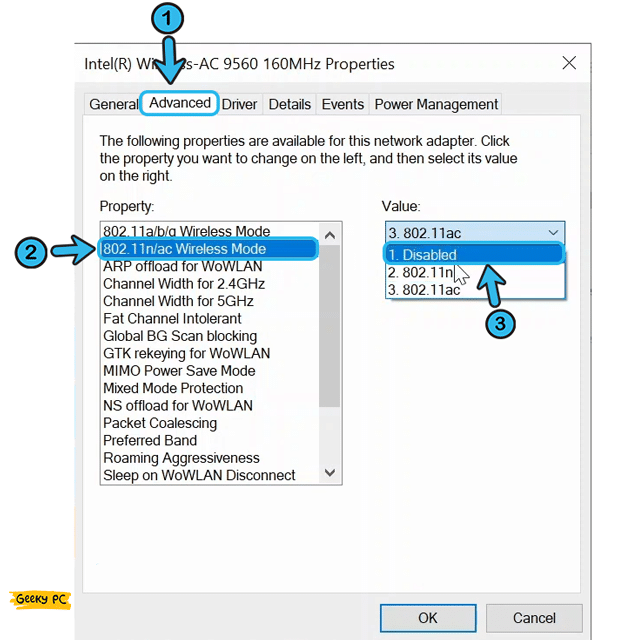
- Step 8: Now, select the “Disabled” option from the drop-down menu in the value field.
- Step 9: Click “OK” to save the settings and then exit the app.
- Step 10: Reboot your device with the new settings and try to reconnect to your Wi-Fi connection.
Many people have started getting an undefined network error once they have disabled the 802.11n mode on their settings, especially while using multi-antenna Wi-Fi hardware.
If you are encountering similar issues, follow our detailed guide to fix the “Ethernet Is Not Working error in Windows devices.
5. Update The Wi-Fi Drivers
If the Wi-Fi keeps disconnecting in Windows 10, the problem may lie in the Wi-Fi driver. And if you are using an outdated network driver, especially the wireless one, you may frequently get this issue on your device.
So, you need to update the Wi-Fi drivers first before trying any other step.
- Step 1: Press the “Windows Key + X” buttons together to launch the contextual menu on your device.
- Step 2: Now, click on the “Device Manager” option from the list to launch the app.
- Step 3: Once you get a new window, navigate to the “Network Adapters” option, and click on the small arrow beside it to expand the menu.
- Step 4: Double-click on the wireless adapter from that list to open the properties.
- Step 5: Now, navigate to the “Driver” tab from the header selection menu.
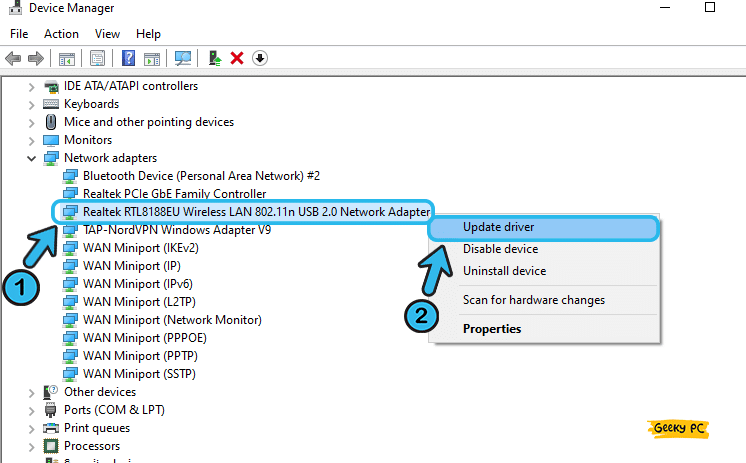
- Step 6: Click on the “Update Driver” button and follow the on-screen instruction to install the newest driver updates.
- Step 7: Once all the wireless adapters are updated, save the settings and exit the app.
If the problem still persists after updating your wireless adapter driver on your system, you may need to update all the network drivers.And to do that, you need to individually update each of the available options under the “Network Adapters” menu in the “Device Manager” app.
6. Update Windows 10
At times, Wi-Fi keeps disconnecting and reconnecting on Windows devices even after updating all the available network adapter drivers.It mainly triggers if you are using an outdated version of the Windows OS. And to resolve it, you need to first update your operating system with the newest windows update.
- Step 1: Click on the “Magnifying Glass” icon located at the bottom-left corner of your taskbar to launch the search field.
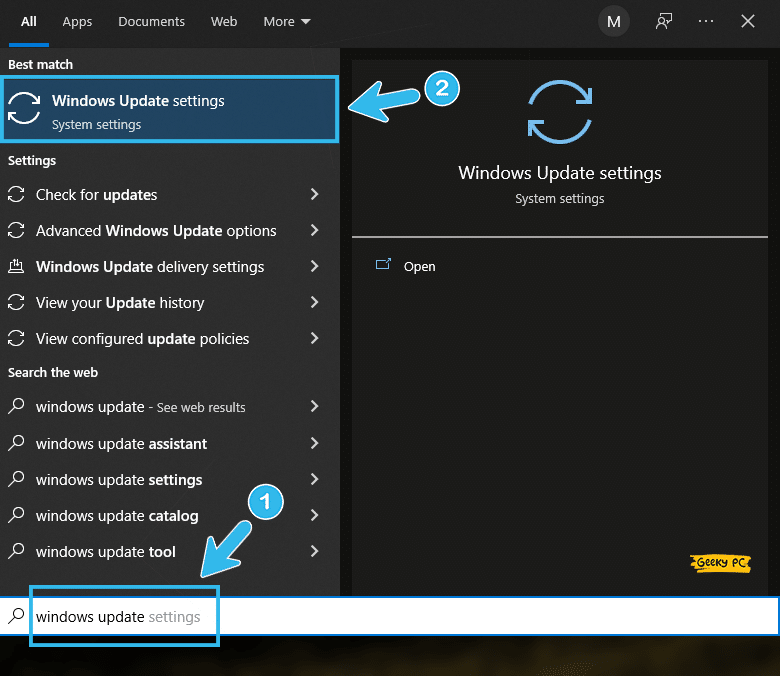
- Step 2: Type “Windows Update” in the designated search field and click on the very first result that appears.
- Step 3: Once the new window launches, navigate to the left panel and select the “Windows Update” option.
- Step 4: Now, navigate to the right panel, and click on the “Check for updates” option.
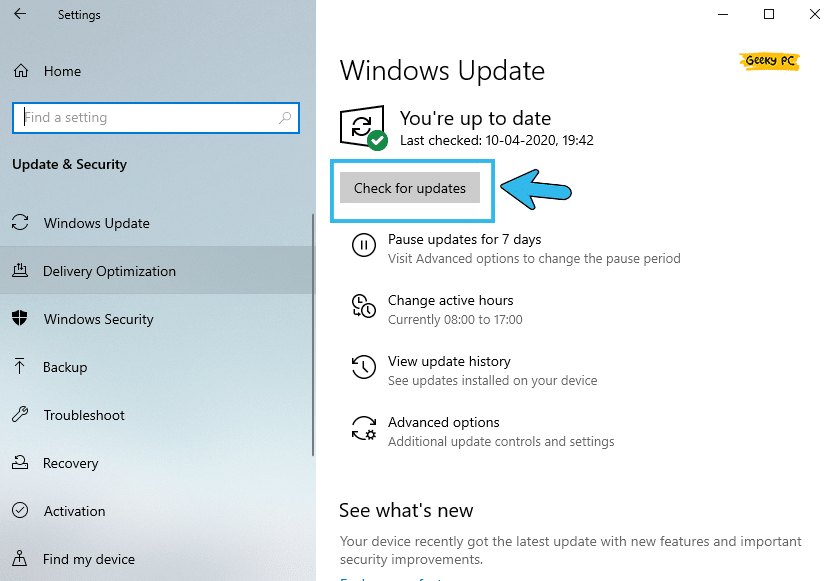
- Step 5: Follow the on-screen instruction when prompted (you must have an active internet connection to complete this step).
- Step 6: Let Windows automatically download and install the newest updates from the Microsoft server.
- Step 7: Once the updating process is done, reboot your device.
A few people have already reported to us that they are getting an unresponsive taskbar once they have updated their Windows OS.
7. Run Network Troubleshooter
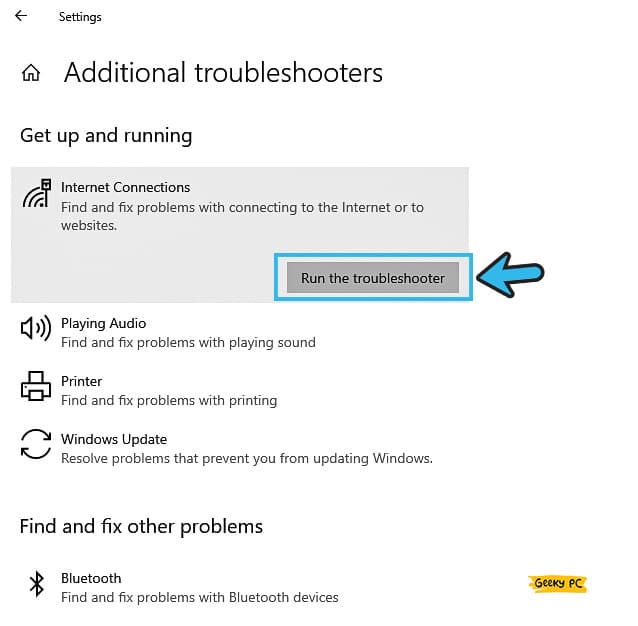
The network troubleshooting tool is an advanced option that now comes preinstalled with the latest variant of Windows OS, especially with Windows 10 and 11.
And this tool can effectively find and fix all the minor errors and glitches on your network to give you a smooth computing experience.
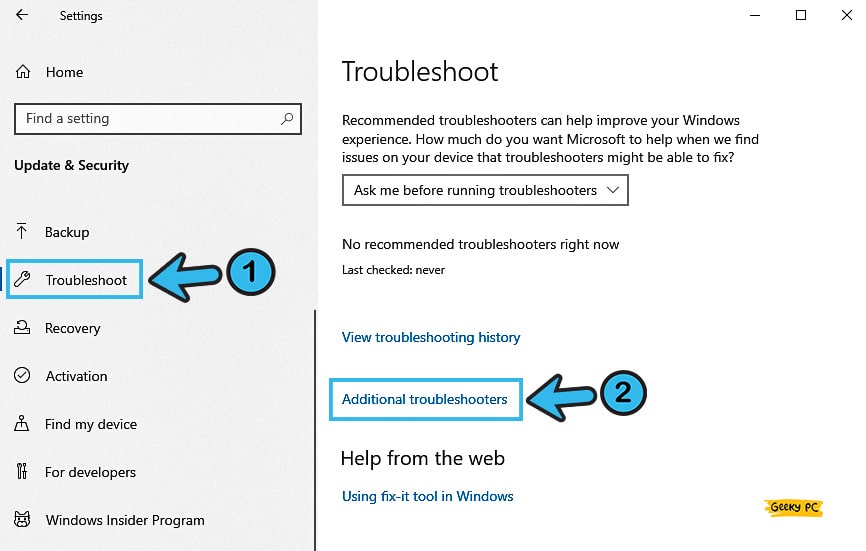
- Step 1: To launch the “Settings” app on your device, press the “Windows Key + I” buttons together.
- Step 2: Once the new window appears, scroll down, and click on the “Update & Security” option.

Many people fail to connect to their Twitch account once they have executed the network troubleshooting on their device.
If you are getting the same issue on your system as well, follow our step-by-step guide to fix the “Twitch 2000 network error code” on Windows devices.
7+ Advanced Fixes If The Wi-Fi Keeps Disconnecting In Windows 10/11
If your Wi-Fi keeps disconnecting in Windows 10 even after trying all the generic fixes we have mentioned above, you don’t have any other way than resorting to the more advanced tweaks.
However, you need to imply these steps carefully or only under expert supervision.
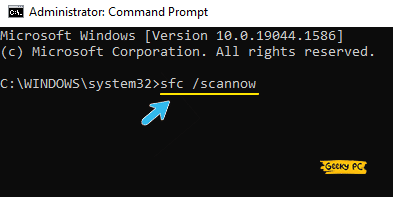
8. Run SFC Scan
System File Checker or SFC is an effective preinstalled tool in the latest generations of Windows OS that actually crosschecks all the system files in the root directories.
And by doing that, it can effectively identify and fix all the minor glitches and errors in the system. So, you should execute it first with the command prompt.
A few of our users have started reporting that they are getting an unknown DLL error on their systems, especially the d3dx9-39, once they have executed the SFC scan.
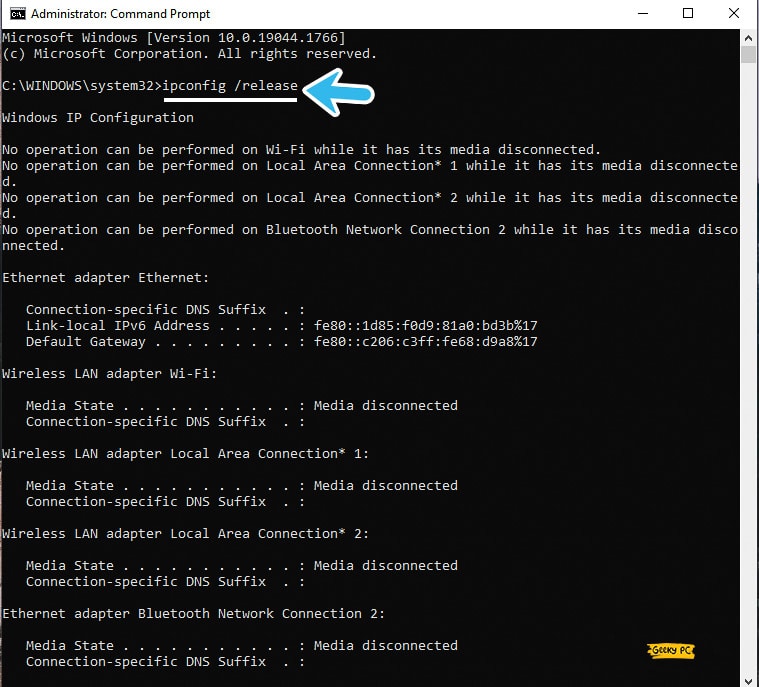
9. Reset Network Parameters
If the Wi-Fi keeps disconnecting on laptops, especially with Windows 10 or 11 installed on it, the problem may lie in the network parameters.
However, you can easily soft reset your entire network parameter through the command prompt in a few simple steps that can effectively resolve this issue in no time.
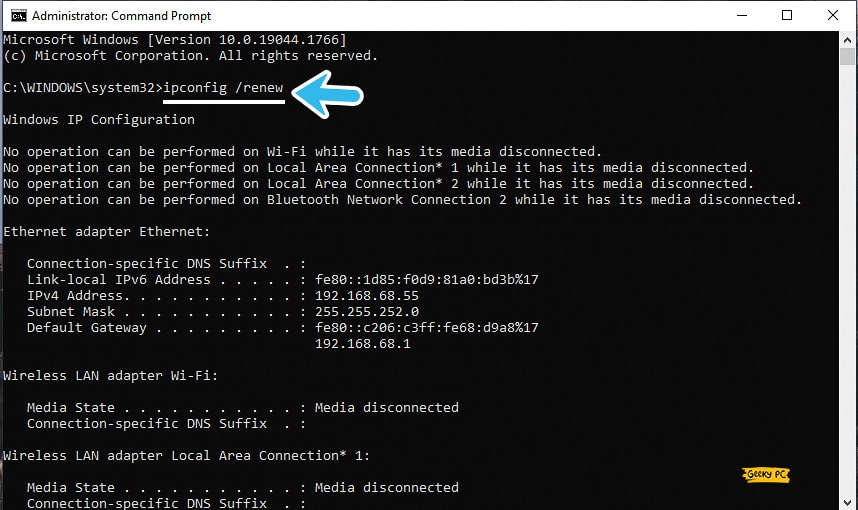
If you are using a static IP connection where the ISP has given you a specific IP and DNS, you should note down those parameters before resetting your network.
And once you are done resetting it, you can manually enter the static IP address, gateway, and DNS through your internet settings on Windows OS.
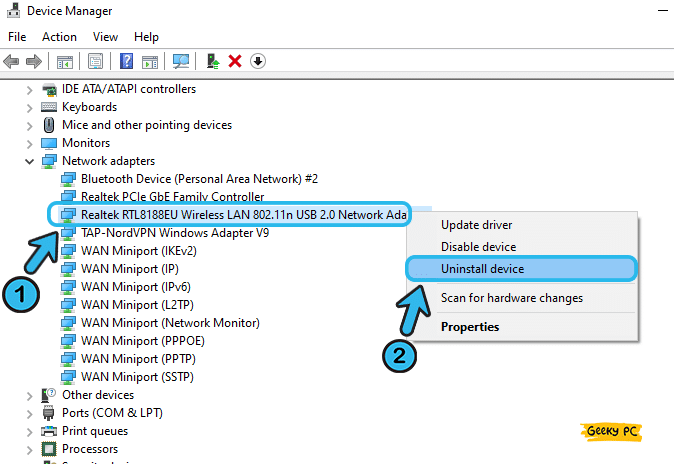
10. Uninstall And Reinstall Wi-Fi Driver
At times, the Wi-Fi driver installed on your Windows device starts to malfunction, especially after it encounters a virus attack that has corrupted the installation files.
In that case, you must completely uninstall the network driver from your system and then reinstall it to give it a fresh restart.
If Windows fails to install the Wi-Fi driver from the Microsoft server, especially if you are using a high-end network card, you must download and install the Wi-Fi adapter driver from the manufacturer’s website.
However, you should only download and install the drivers from a trusted source with HTTPS encryption.
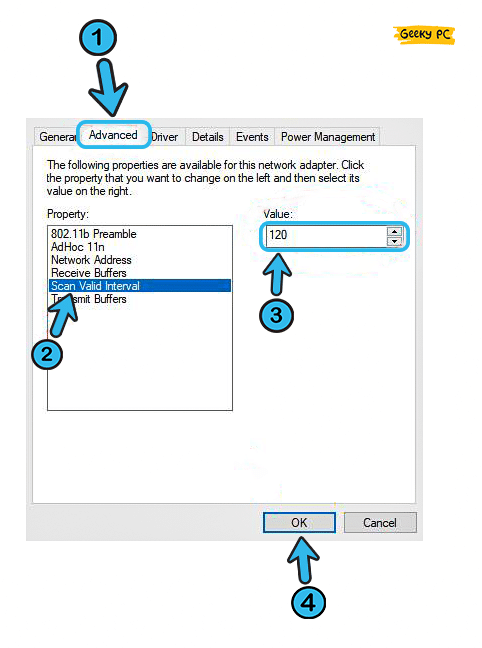
11. Change Scan Valid Interval
There are many times when the Wi-Fi keeps disconnecting in Windows OS. It may be for several reasons that we have already discussed.
However, this particular issue can even arise if you have the wrong scan value set on your device. So, you need to manually change the scan value to fix this issue.
Many people have started getting a group policy error once they have reset their scan interval value, especially while using their systems under a network administrator. If you are also facing the same issue on your system, follow our detailed guide to fix the “This program is blocked by group policy” error in Windows devices.
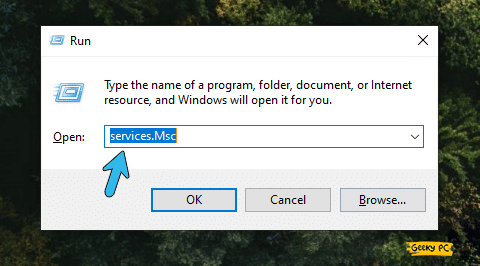
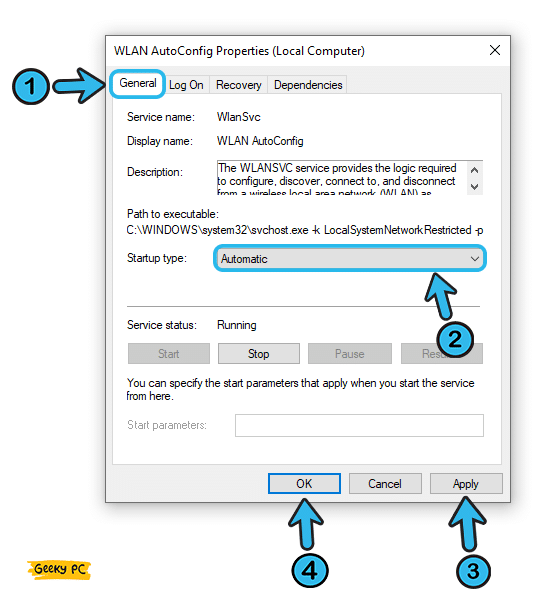
12. Reset Wi-Fi AutoConfig Service
If the Wi-Fi keeps disconnecting in Windows 10 or 11 systems, the problem may even lie in the auto-configuration settings in the Wi-Fi service that continuously run in the background.
And to resolve this issue, you must reset all the parameters in the Wi-Fi AutoConfig Service through the Windows settings.
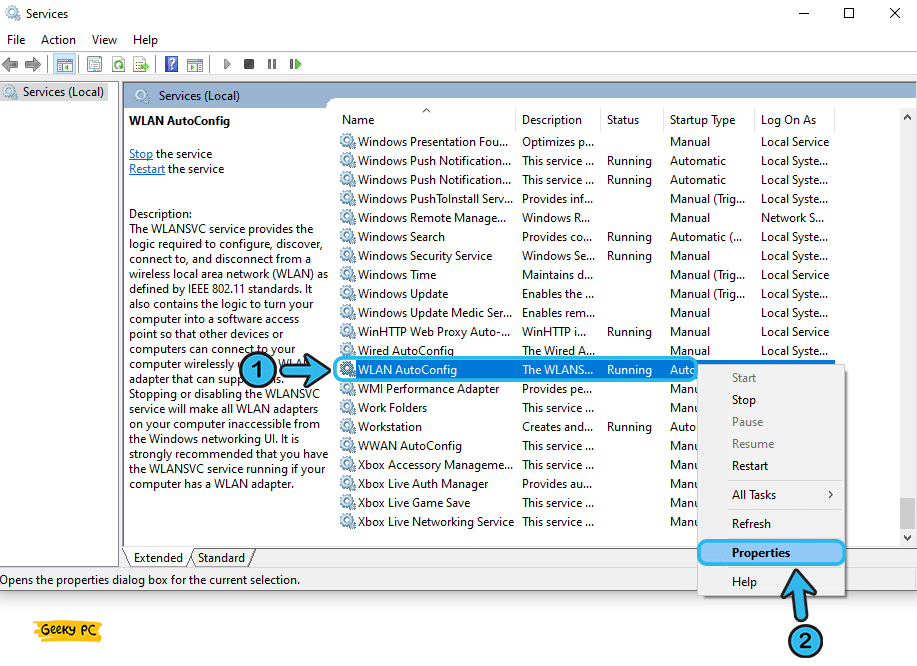
You can face a delayed startup time once you enable the Wi-Fi AutoConfig service on your device, as it needs a lot of resources during the startup operation.
You don’t need to worry about that as it is quite normal, especially if you are using an old computer with less CPU power. However, you can disable other nonessential startup services to minimize the load from your system.
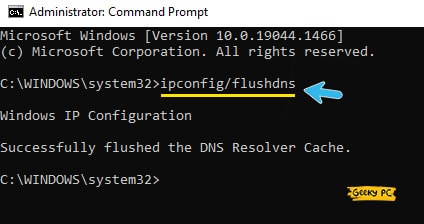
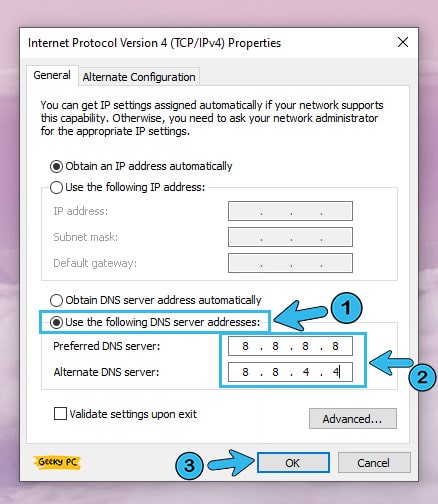
13. Use Google DNS
It is quite common that your ISP has already given you a specific DNS address to use on your system. Besides, you may have also enabled the automatic option on the DNS selection menu.
However, if the Wi-Fi connection issue triggers from the DNS settings, you must use a public DNS to bypass other settings.
A few of our users have reported to us that they are getting a gateway error once they have started using public DNS, especially if they are provided with a specific DNS from their ISP.
If you are also facing the same issue on your system, follow our detailed guide to solve the Error Code 0xe0434352 in Windows 10 devices.
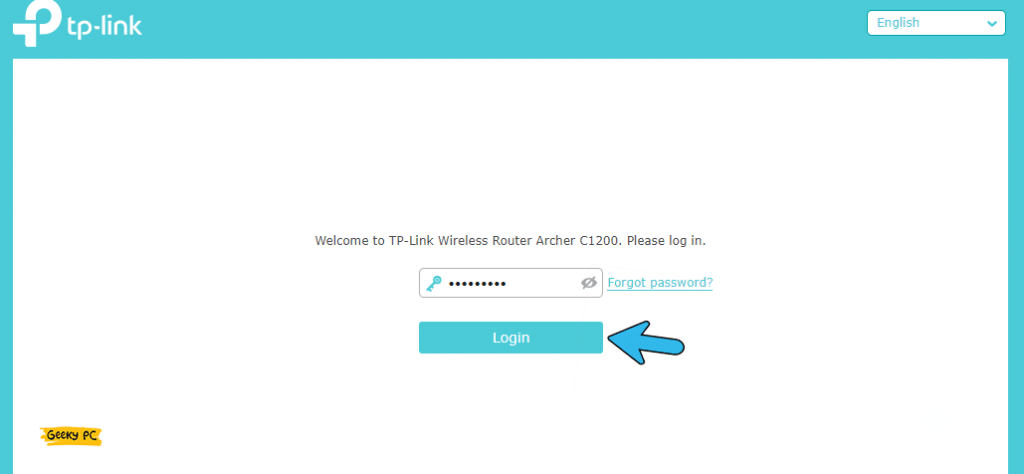
14. Change Your Wi-Fi Channel
If your laptop keeps disconnecting from Wi-Fi frequently, the issue may be on the Wi-Fi channel, as it can be too crowded to handle the connection load.
In such cases, you can manually change the Wi-Fi channel from your wireless router settings to effectively resolve the issue in no time.
A few of our users have started getting a service host delivery error once they have changed the Wi-Fi channel on your windows systems, especially while using a static IP connection.
If you are also facing similar issues, follow our comprehensive guide to fixing the “No Operation Can Be Performed On Local Area Connection” error in Windows devices.
Conclusion
Before you try any pro methods we have listed above, you must try all the generic methods as discussed. However, if you really need to resort to any advanced fixes, you must create a new “System restore point” beforehand to roll back if any unforeseen circumstances occur.
So, that’s all the possible solutions we have if your Wi-Fi keeps disconnecting in Windows 10. If you think we have missed any, or if you have any practical solution to resolve this issue, feel free to drop your suggestion and feedback in the comment box below.
FAQs
Q. Why does my Wi-Fi keep disconnecting on Windows 10?
There can be various reasons why your Wi-Fi keeps on disconnecting from your Windows-based devices. However, the primary reason is using an outdated network driver. Besides, this issue can even trigger if you are using an obsolete variant of Windows OS. Moreover, it may happen due to faulty Wi-Fi settings as well.
Q. Why does my computer keep disconnecting from the Wi-Fi?
If you are using a wrong or outdated network driver, your computer may keep on disconnecting from the network. And to fix it, you must update all the network drivers installed on your system. Besides, you must also update your Windows OS at timely intervals to minimize these errors.
Q. Why does my windows laptop keep disconnecting from Wi-Fi?
A lot of things can directly influence the Wi-Fi connection on your laptop. However, the primary reason could be a mismatched power setting on your device. You must enable the “High Performance” mode from the Windows settings to enable the Wi-Fi adapter to use sufficient resources.
Q. Why won’t my computer connect to Wi-Fi, but others will?
Most probably, you have issues with your wireless network adapter that allows the computer to connect to any open networks. And to fix it, you must update all the available network drivers installed on your system. Besides, you must also update your Windows OS to the newest update patch to eliminate this issue.