
VPN is necessary these days, as it can safeguard your IP address and location behind a curtain to save you from phishing attacks and security loopholes. However, you definitely felt annoyed when the L2TP connection attempt failed while establishing a connection with the VPN server, isn’t it?
You can resolve the L2TP connection error by updating your Windows OS and disabling the antivirus. It can also be fixed by deleting the latest security updates and reinstalling the VPN network adapter. Besides, you can fix it by tweaking the Microsoft CHAP V2 Protocol and IKE protocols.
However, these are not all, as we have twelve such ways that can effectively fix this error. But, before we dive deep into the solution part, let’s understand what the LT2P connection actually is and what are the primary reasons for it to malfunction on your system.
What Are The Primary Reasons Behind The L2TP Connection Attempt Failed Error?
The L2TP connection attempt failed error is pretty common these days, especially if you use popular VPN services like Nord, ExpressVPN, Cyber Ghost, and Norton. However, this issue is mainly triggered for eight main reasons.

- Your antivirus (especially Windows Defender) or firewall is blocking the VPN connection.
- You are using an outdated variant of the Windows OS, or any of the recent security updates is malfunctioning.
- Your computer is establishing the VPN connection behind NAT (Network address translation).
- The Microsoft CHAP V2 protocol is disabled on your system.
- There are some bugs or errors in your Point-to-Point Protocol in your connection.
- Any of the Policy Agent services or IPsec Keying Modules are not functioning properly.
- There are wrong values in the AssumeUDPEncapsulationContextOnSendRule registry file.
- You have placed any already used or duplicate keys while connecting with the VPN server.
Besides these eight reasons, this L2TP connection error can also trigger if the Machine Certificate doesn’t have the server authentication extended key usage.
Moreover, this issue can even trigger if the security certificates of your device and the VPN server mismatch with each other.
6+ Easy Fixes For The L2TP Connection Attempt Failed Error
Before you resort to any pro methods that need some serious tweaks on your system, you should try the generic methods first to resolve the L2TP connection attempt failed error.
And in most scenarios, these generic methods are sufficient to fix this issue in no time.
1. Update Your Windows OS
Not just the L2TP connection but any incoming or outgoing connection from your system may experience errors if you are using an obsolete variant of Windows OS.
So, before you try anything else to resolve this issue, update your OS first. And updating it will not only fix minor glitches but also enables a smooth Windows experience.
- Step 1: Click on the “Magnifying Glass” icon on the taskbar and type “Windows Update” in the designated field.
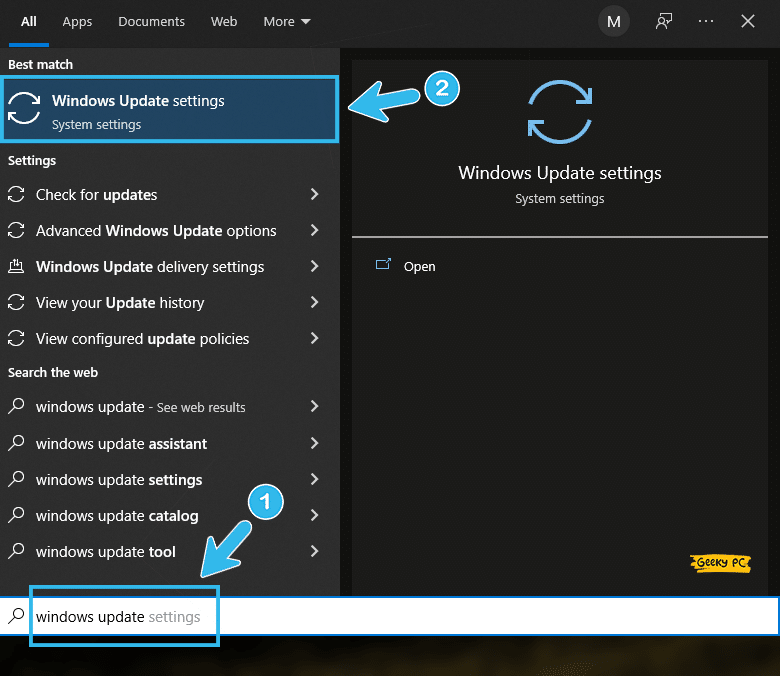
- Step 2: Click on the very first result that appears to initiate the “Windows Update” center.
- Step 3: Click on the “Windows Update” icon located on the left panel.
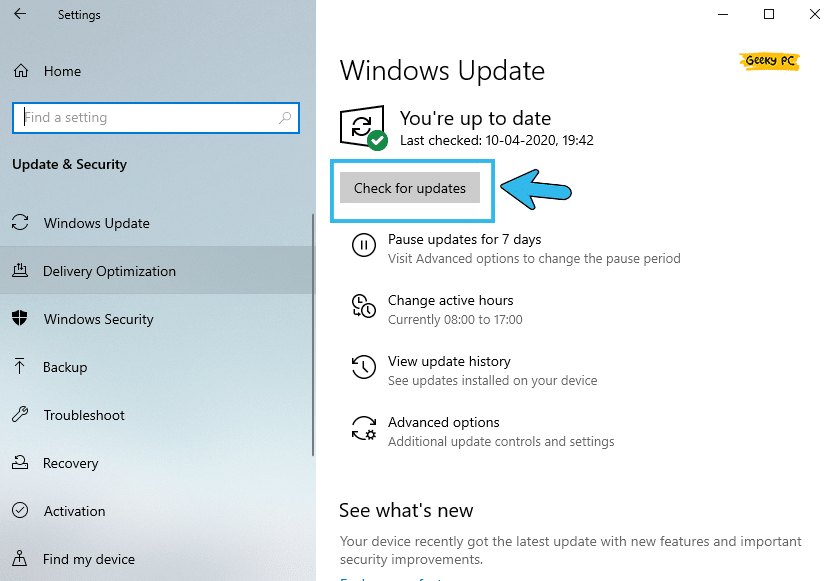
- Step 4: Now, navigate to the right panel and click on the “Check for updates” button.
- Step 5: Let Windows connect to the Microsoft server and install the latest update.
- Step 6: Once your OS is fully updated, reboot your system.
After rolling out the newest Windows update, many people have started getting an unresponsive taskbar due to a specific glitch in the system.
2. Uninstall The Security Updates On Windows
If the l2tp connection attempt failed because the security layer encountered a processing error on your system, it might be because of the latest security updates released by Windows.
So, to eliminate this issue, you need to manually delete the latest security updates on your system.
- Step 1: Click on the “Magnifying Glass” icon on your taskbar to launch the “Search” field.
- Step 2: Type “APPWIZ.CPL” in the designated field and click on the very first result that appears.
- Step 3: Once the “Programs and Features” window launches, navigate to the left panel and click on the “View installed updates” option.
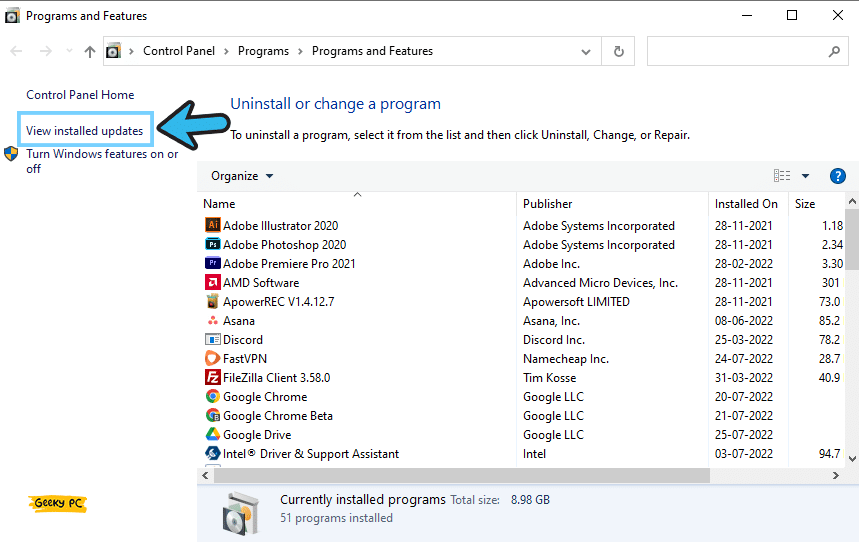
- Step 4: Now, locate the newest security updates (starts with the “KB” number) under the “Microsoft Windows” header.
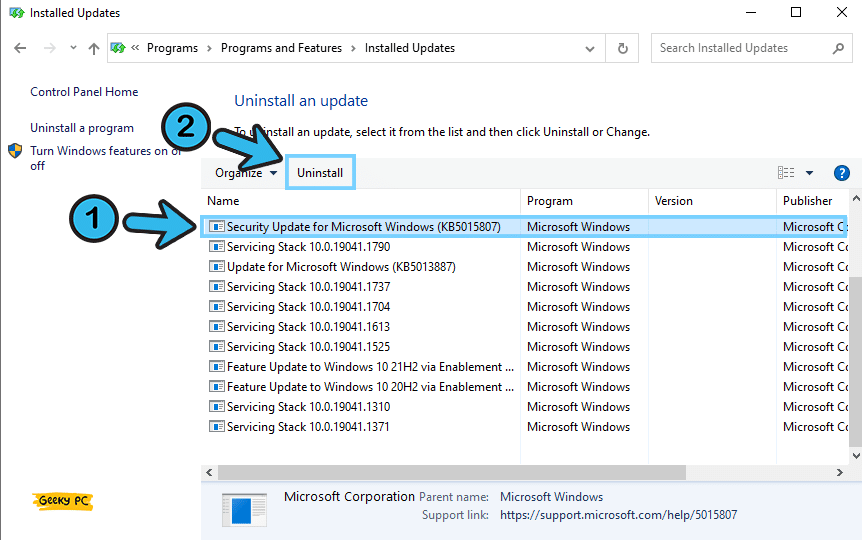
- Step 5: Right-click on the update file and click on the “Uninstall” button.
- Step 6: Once you have deleted all the latest security updates, restart your system.
A few people have told us that they have started getting an unresponsive start button once they have deleted the latest update from Windows.
If you are also encountering similar situations on your system, follow our comprehensive guide to fixing the “Start button not working” error in Windows devices.
3. Disable The Windows Defender Antivirus
Windows Defender antivirus now comes preinstalled with the latest generation of Windows OS. There is no doubt that it is one of the most robust security software in the market.
However, at times, it can block the L2TP connection. So, you should disable it temporarily to minimize interference.
- Step 1: Press the “Windows + I” buttons together to launch the “Settings” app.
- Step 2: Scroll down at the bottom of the app and click on the “Update & Security” option.

- Step 3: Once the new window pops up, navigate to the left panel, and click on the “Windows Security” option.
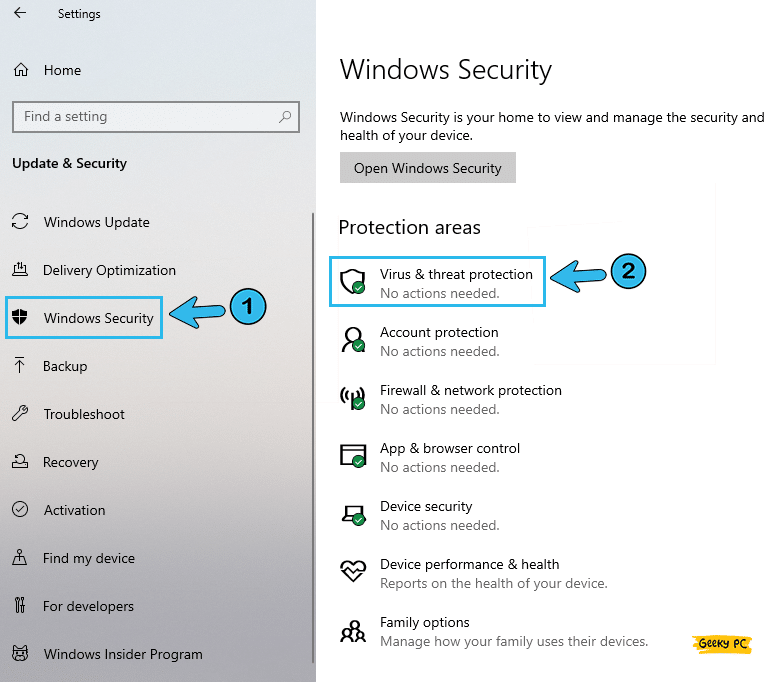
- Step 4: Navigate to the right panel and click on the “Virus & threat protection” option.
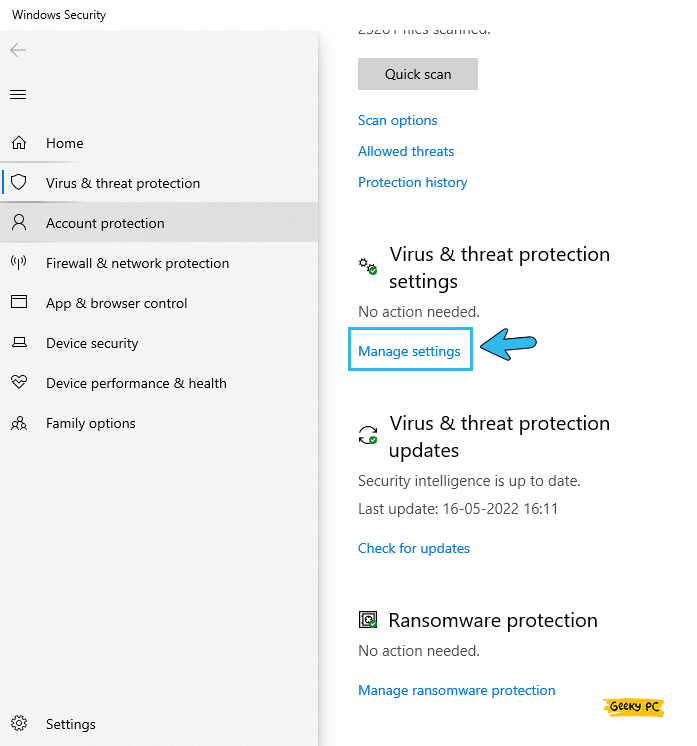
- Step 5: Once you get a new window, click on the “Virus & threat protection settings” button.

- Step 6: Locate the toggle switch beside the “Real-time protection” option and click to disable it.
- Step 7: Click the “OK” button to save the settings and exit from the “Settings” app.
If you are using your system under a network administrator, you may get a group policy error once you disable the Windows Defender antivirus.
In such cases, follow our step-by-step guide to resolve the “This program is blocked by group policy” error in Windows devices.
4. Reinstall Your VPN Network Adapter
If the security layer encountered a processing error when you tried to connect to the VPN server, the problem might lie in the VPN network adapter itself.
So, you should uninstall and then reinstall the VPN adapter again to resolve this issue. However, you may also need to stop your firewall beforehand.
- Step 1: Press the “Windows Key + R” buttons together to initiate the “Run” dialog box.
- Step 2: Type “devmgmt.msc” in the designated field and hit the “Enter” button.

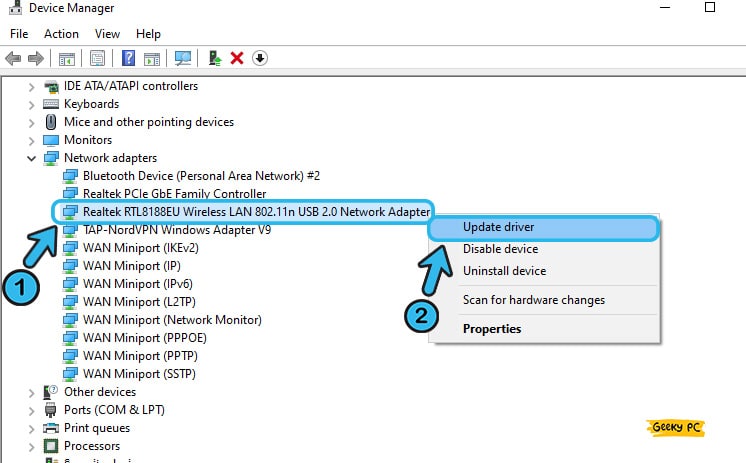
- Step 3: Once the “Device Manager” window launches, navigate to the left panel and click on the “Network Adapters” option.
- Step 4: Once the menu is expanded, locate your VPN adapter, and click on it to select.
- Step 5: Now, right-click on it and select the “Uninstall Device” option.
- Step 6: Once you get a new prompt, click on the “Uninstall” button to confirm.
- Step 7: After removing all the VPN drivers, reboot your system.
- Step 8: Now, go to the website of your VPN and download the latest driver pack depending on your OS architecture (32-bit or 64-bit).
- Step 9: Install the newest driver on your system and reboot your system again once it is done.
Many users have reported to us that they have started getting a strange undefined ethernet error with a yellow triangle once they have uninstalled their VPN adapter.
5. Tweak Your IKE (Internet Key Exchange) Protocol
Internet Key Exchange, or IKE, is an advanced protocol that establishes a secured connection between your system and the server.
But at times, this protocol may start behaving weirdly and blocks the incoming connections, mainly due to an improper value. However, you can easily tweak it.
- Step 1: Press the “Windows Key + R” buttons together to launch the “Run” window.

- Step 2: Type “CMD” in the designated field and click on the “OK” button.
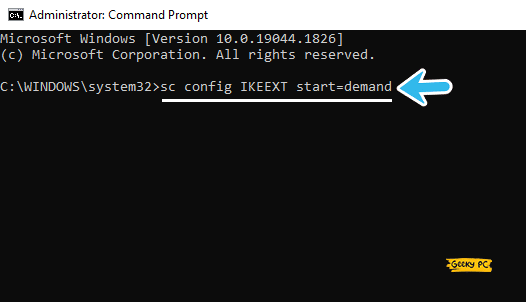
- Step 3: After the black “Command Prompt” window launches, type the “sc config IKEEXT start=demand” command and hit the “Enter” button.
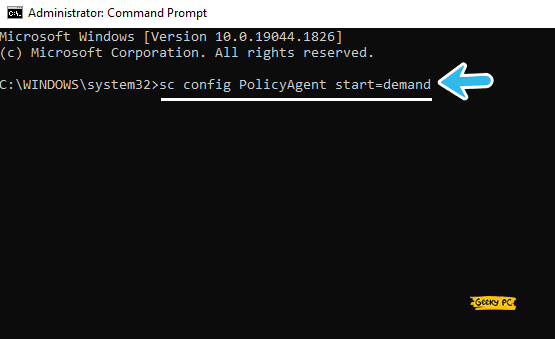
- Step 4: Now, type the “sc config PolicyAgent start=demand” command and hit the “Enter” button again.
- Step 5: Type “Exit” and hit the “Enter” button to close the “Command Prompt” app.
- Step 6: Reboot your system and check if the VPN server can establish the L2TP connection now.
At times, the Windows Defender antivirus can also block the IKE protocol when it tries to establish a connection with a VPN server.
So, it is better to disable your antivirus and firewall before you try to tweak the IKE settings.
6. Turn the Microsoft CHAP V2 Protocol On
Microsoft CHAP V2 is a password-based authentication protocol that is now used by several VPN providers. And if you have disabled it on your system, your network can fail to establish a secured connection with the VPN server.
So, you first need to manually turn it on to fix the L2TP connection attempt failed error.
- Step 1: Press the “Windows Key + R” buttons together to initiate the “Run” dialogue box.
- Step 2: Type “ncpa.cpl” in the designated field and click the “OK” button.

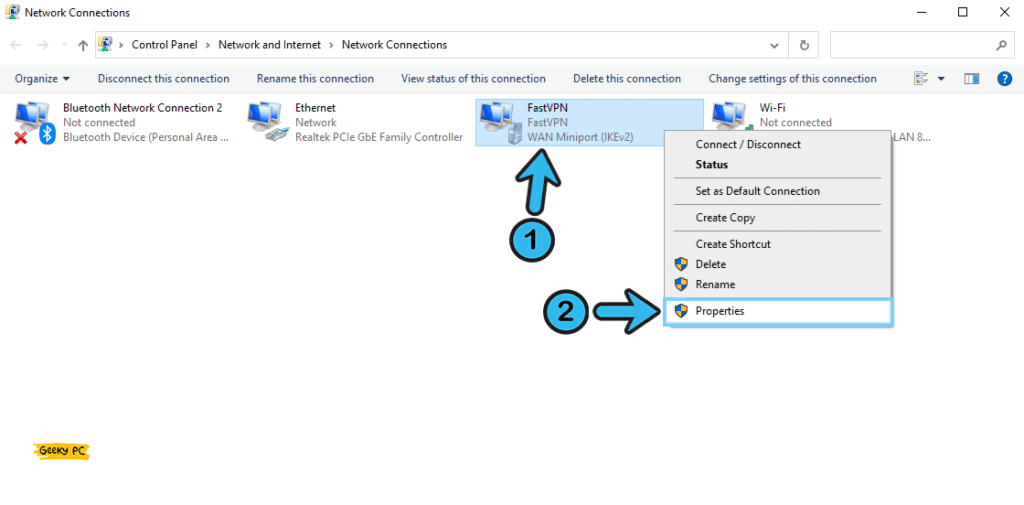
- Step 3: Once the “Network Connections” window launches, navigate to your VPN connection.
- Step 4: Right-click on the VPN adapter and click on the “Properties” option
- Step 5: Once the “VPN Properties” window launches, navigate to the “Security” tab from the header selection menu.
- Step 6: Now, click on the “Allow these protocols” option.
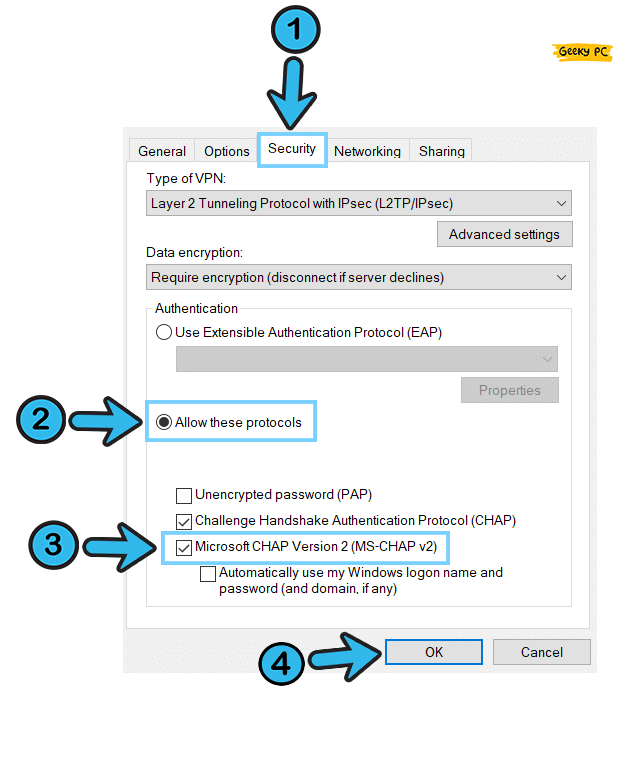
- Step 7: Tick the box beside the “Microsoft CHAP Version 2 (MS-CHAP v2)” option.
- Step 8: Click on the “OK” button to save the settings and exit from the window.
- Step 9: Try to enable your VPN now and check whether it can establish a connection with the global server.
If you are not getting the “Security” tab under the “Properties” menu in your VPN network adapter, you may have to disable it first and then reenable it.
Besides, you may also need to update your VPN network driver first before you proceed with this step.
6+ Advanced Fixes For The L2TP Connection Attempt Failed Error In VPN
If you are still getting the L2TP connection attempt failed error on your system even after trying the generic methods we have mentioned above, you don’t have any other way to resort to the pro methods.
However, try these steps under expert supervision and with extreme precaution.
7. Restart The IPsec Service
Internet Protocol Security or IPsec is a new-age network security protocol that encrypts and authenticates the data exchange between two computers or between a computer and a server.
And most VPN services now use this protocol to secure their connection. You may also need to restart the IPsec service to resolve the L2TP connection failure.
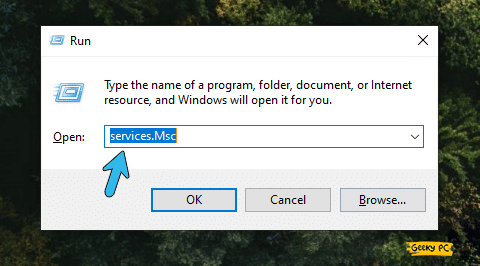
- Step 1: To launch the “Run” command, press the “Windows Key + R” buttons together.
- Step 2: Type “services.msc” in the designated field and click on the “OK” button.
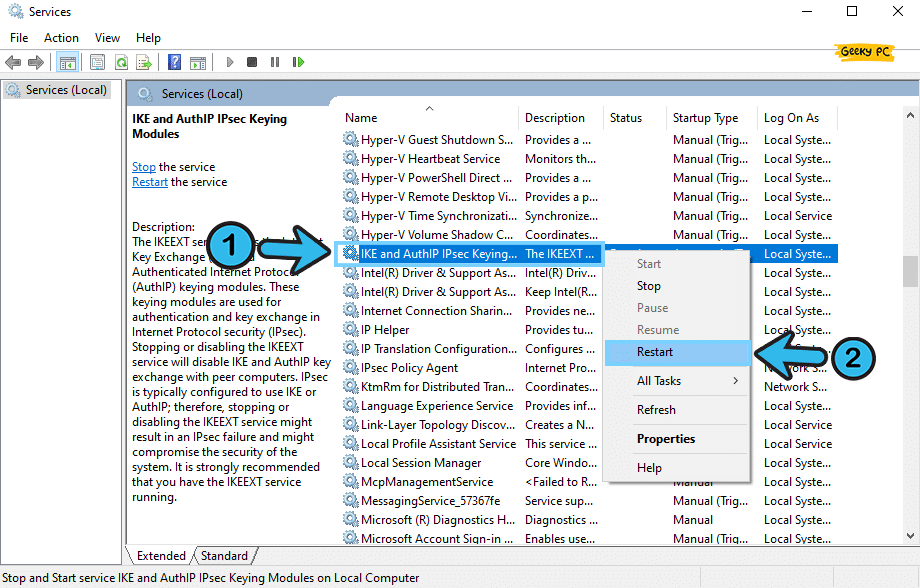
- Step 3: Once the “Services Manager” window launches, navigate to the right panel and locate the “IKE and AuthIP IPSec Keying Modules” service.
- Step 4: If the “Running” status is showing, right-click on it, and select the “Restart” option.
- Step 5: Now, double-click on the service and select the “General” tab from the header selection menu.
- Step 6: Click on the drop-down menu beside the “Startup type” option and select the “Automatic” value.
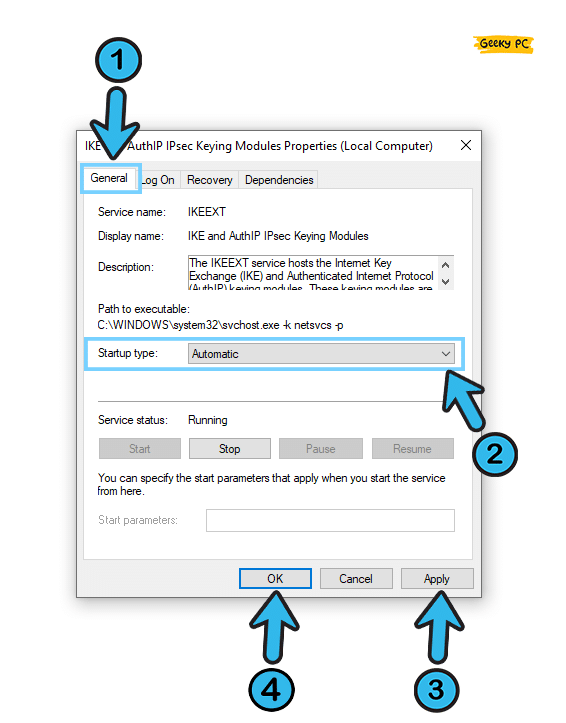
- Step 7: Click on the “Apply” button to save the settings and then on the “OK” button to close the window.
- Step 8: Now, return to the “Services Manager” window and locate the “IPSec Policy Agent” service from the list.

- Step 9: Follow the same process to restart it and change the startup type.
- Step 10: Reboot your system and try to switch on your VPN connection now.
If you are not able to perform the “Restart” operation in the “IKE and AuthIP IPSec Keying Modules” service, you may need to disable it first completely and then reenable it. And to do that, right-click on the service and select the “Stop” option.
After a few seconds, right-click on the service again and click on the “Start” option. Also, you can follow our comprehensive guide to fixing Shift S Is Not Working on Windows device
8. Enable LCP Protocol Extensions
Link Control Protocol or LCP is a new-age PPP protocol that helps to maintain an encrypted and secured connection between two computers. Many VPN providers now use this protocol to secure their connection.
So, you need to enable the LCP protocol extensions beforehand to resolve the L2TP connection error in Windows devices.
- Step 1: Press the “Windows Key + R” buttons together to launch the “Run” dialog box.
- Step 2: Type “ncpa.cpl” in the designated field and press the “OK” button.
- Step 3: Once the “Network Connection” window appears, right-click on your VPN adapter and select the “Properties” option.
- Step 4: After the “Properties” window launches, navigate to the “Options” tab from the header selection menu.

- Step 5: Now, click on the “PPP Settings” option.
- Step 6: Tick the adjacent box to the “Enable LCP extensions” option.
- Step 7: Click “OK” to save the settings and exit the app.
A few users have reported getting a gateway error once they have enabled the LCP protocol on their system, especially while using a static IP connection.
If you are also facing similar issues on your system, follow our step-by-step guide to fix the “Wi-Fi Keeps Disconnecting” error in Windows devices.
9. Enable The EAP-MSCHAPv2 Encryption
All the VPN providers use encryption services to secure their connection with the host server. And, if your VPN uses EAP-MSCHAP v2 encryption for their connection, you need to manually enable it from the system settings.
However, you can easily do it with a few simple steps.
- Step 1: Press the “Windows Key + R” buttons together to initiate the “Run” dialog box.
- Step 2: Now, type “ncpa.cpl” in the designated field and hit the “Enter” button.
- Step 3: Once the “Network Connections” window appears, navigate to the VPN adapter.
- Step 4: Right-click on it and select the “Properties” option from the context menu.
- Step 5: Navigate to the “Authentication” section and click on the “Security” tab.
- Step 6: Now, select the “Use Extensible Authentication Protocol (EAP)” option.
- Step 7: Click on the drop-down menu and select the “Microsoft: Secured password (EAP-MSCHAPv2) (encryption enabled)” option.
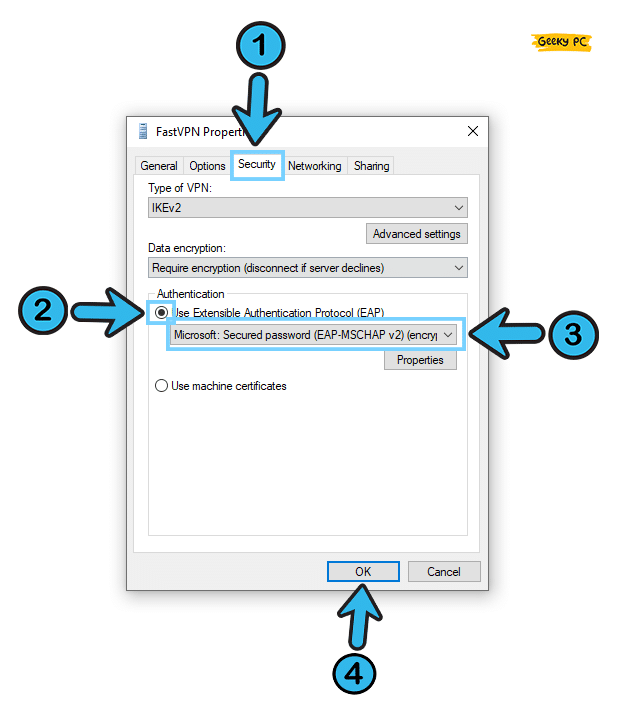
- Step 8: Click “Apply” to save the settings and “OK” to exit the app.
Once you have enabled the EAP-MSCHAPv2 encryption protocol on your system, reboot your device before turning on your VPN connection.
However, if you can’t get the “Authentication” option under the “Properties” tab, you may need to update your VPN network adapter first before proceeding with these steps.
10. Forward Your VPN Ports Manually
Most VPNs use particular ports to establish the connection between the computers and the host server. However, at times, some of the ports may be blocked on your device, which restricts establishing the L2TP connection.
And in that case, you need to forward specific ports manually.
- Step 1: To initiate the “Run” dialog box, press the “Windows Key + R” buttons together.
- Step 2: Type “CMD” in the run field and click on the “OK” button.
- Step 3: Once the black “Command Prompt” window launches, type “ipconfig” and hit the “Enter” button.
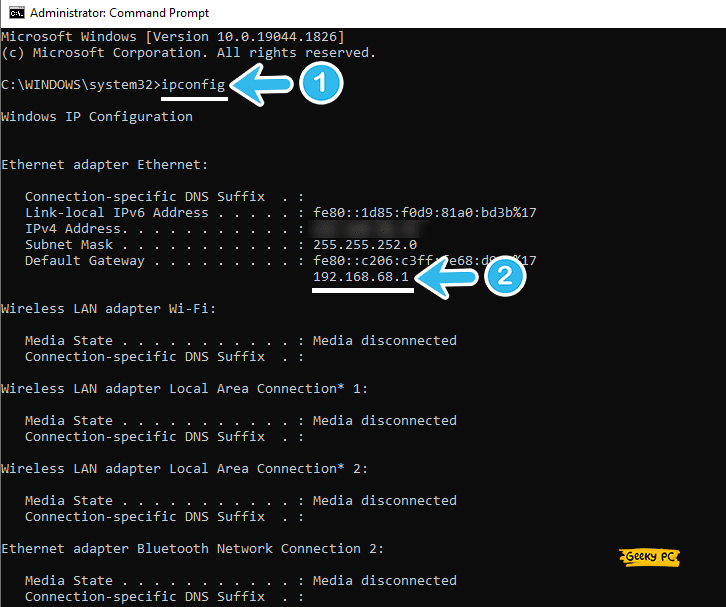
- Step 4: Now, note down the address under the “Default Gateway” option.
- Step 5: Open your web browser, type that address, and hit the “Enter” button.
- Step 6: After the login window appears, sign in with the proper ID and password.
- Step 7: Now, navigate to the left panel and select the “Forwarding” option.
- Step 8: Enter your gateway IP address in the designated box and save it.
- Step 9: Now, navigate to the “Virtual Server” option and click on the “Add New” button.
- Step 10: Enter “80, 443, 1935, 3478-3480” in the TCP field and “3478-3479” in the UDP field.
- Step 11: Save the settings and exit from the window.
You may get a service host delivery optimization error once you forward the ports on your Windows systems, especially due to mismatched port numbers. In that case, you can follow our comprehensive guide to resolve the service host delivery optimization error in Windows devices.
11. Modify The UDPE Encapsulation Registry Key
Due to a wrong system configuration, the VPN client may be forced to operate behind a secured NAT service on your device. And that can effectively block all incoming and outgoing connections.
So, you need to manually tweak it through the registry editor if the VPN l2tp connection attempt failed on Windows 10.
- Step 1: Press the “Windows Key + R” buttons together to launch the “Run” field.

- Step 2: Type “regedit” in the designated box and hit the “Enter” button.
- Step 3: Once you get a new prompt, click on the “OK” button to launch it.
- Step 4: After the “Registry Editor” window appears, navigate to the “HKEY_LOCAL_MACHINE\ SYSTEM\ CurrentControlSet\ Services\ PolicyAgent” path.
- Step 5: Now, navigate to the right panel and right-click on the empty space.
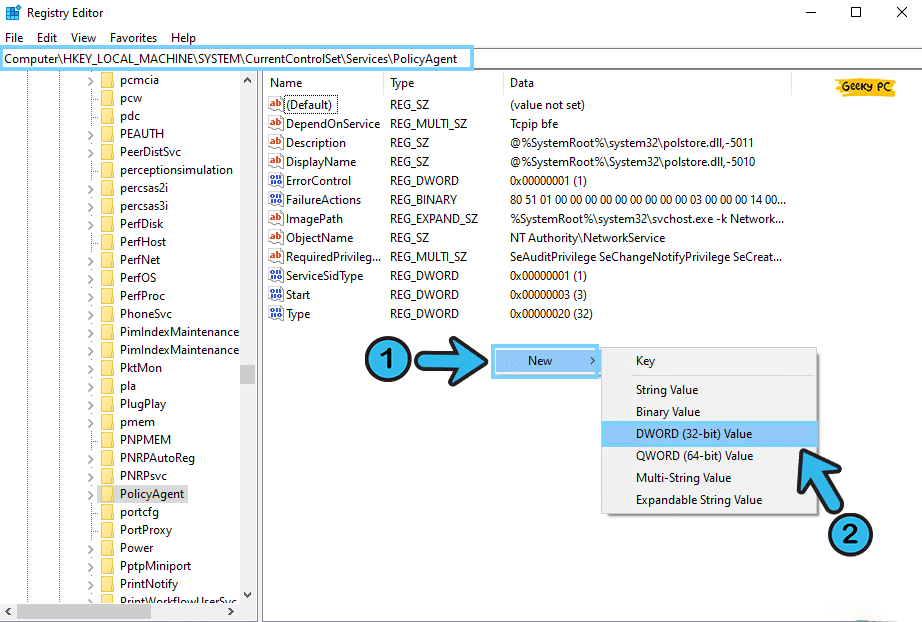
- Step 6: Select the “New” option and then the “DWORD (32-bit) Value” option.
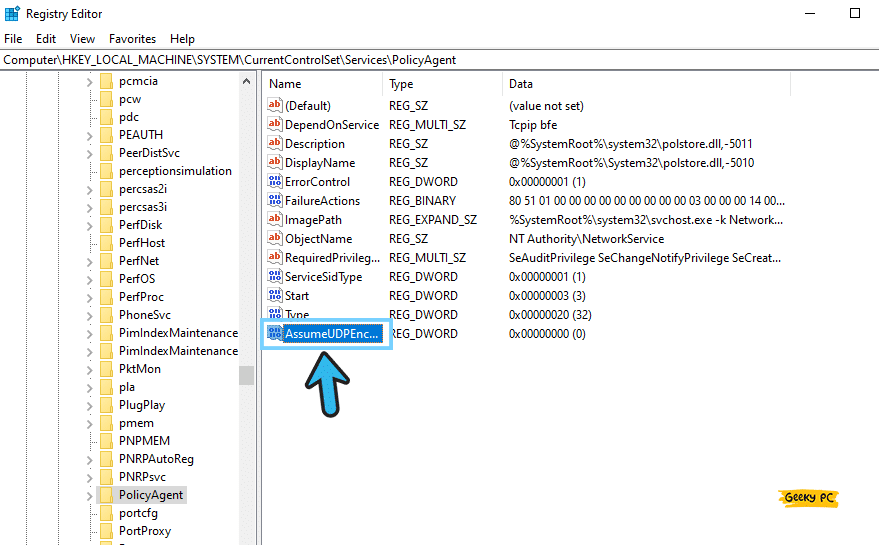
- Step 7: Rename the new registry file to “AssumeUDPEncapsulationContextOnSendRule”.
- Step 8: Put “2” in the Value field and click on the “OK” button to save the settings.

- Step 9: Now, reboot your system and try to turn on your VPN.
Modifying UDPE Encapsulation through the registry editor is a very sensitive process, where a series of errors can trigger in a cycle if anything goes wrong. So, try this method with extreme precaution or only under expert supervision.
12. Create a New Entry in Windows Registry
If you can’t tweak the UDPE Encapsulation through the registry editor to resolve the L2TP connection attempt failed error in Windows devices, you can alternatively create a new key and set the values. And you can easily do it with the registry editor in a few simple steps.
- Step 1: Press the “Windows Key + R” buttons together to initiate the “Run” dialog box.
- Step 2: Type “regedit” in the Run field and hit the “Enter” button.
- Step 3: Once you get a new prompt message, click on the “OK” button.
- Step 4: After the “Registry Editor” app opens, navigate to the “HKEY_LOCAL_MACHINE\System\CurrentControlSet\Services\Rasman\Parameters” path.
- Step 5: Now, navigate to the right panel and right-click on empty space.
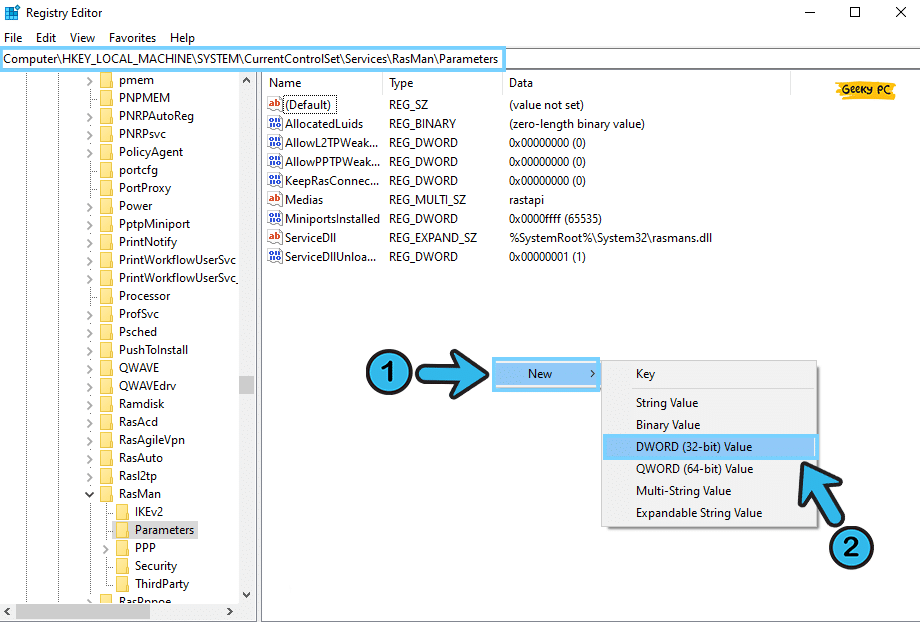
- Step 6: Select the “New” option from the context menu and then click on the “DWORD (32-bit)” option.
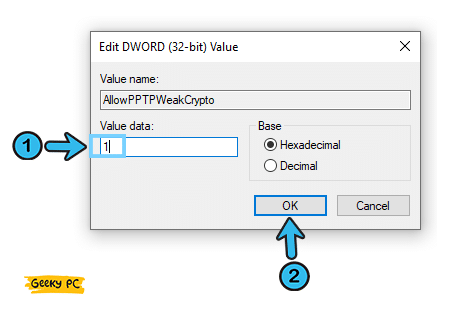
- Step 7: Now, rename the file to “AllowL2TPWeakCrypto.”
- Step 8: Set “1” in the “Value Data field” and click on the “OK” button to apply the settings.
- Step 9: Restart your Windows device and check whether you are still getting the same issue.
You need to first check in the “Registry Editor” if you already have the “AllowL2TPWeakCrypto” key or not. If you don’t have it, proceed with the steps we have mentioned above.
And if you have it already, right-click on the key, select the “Modify” option, and set the value to “1” in the designated field.
What Is An LT2P Connection?
L2TP, or “Layer Two Tunneling Protocol,” is a new-age variant of the PPTP (Point-to-Point Tunneling Protocol) that is now widely used by VPN providers. It adds a layer of privacy and security between the client and host connection. Besides, it also builds on an encryption model that makes this connection more secure than general PPP connections.
L2TP creates a secured tunnel between the L2TP network server (such as a VPN server) and the L2TP access concentrator (such as a Windows system). It also enables a PPP layer link that transfers the L2 data over either an IP or an L3 network.
In the L2TP connection, the user mainly initiates the secured connection through either a publicly switched telephone network service or an ISDN (Integrated Services Digital Network).
L2TP is one of the most secured PPP connections that supports multiple authentication models, including password-based authentication protocol and CHAP (Microsoft Challenge-Handshake Authentication Protocol). Besides, it can also implement an added layer of security by implementing the IPsec service.
Conclusion
Before you try the advanced methods, you should always resort to the generic methods we have listed above, as they are relatively easy and safe to try.
However, if you really need to try the pro methods that need some severe tweaks in your system, it is better to create a “System Restore Point” beforehand to roll back if anything goes wrong.
So, that’s all the solutions we have for the L2TP connection attempt failed error on Windows devices. If you think we have missed any solutions or if you have any methods that can effectively resolve this issue, feel free to drop your suggestions and feedback in the comment box below.
FAQs
Q. What to do if you can’t connect to VPN L2TP?
First, you need to check if both the L2TP and IPsec ports are open on your computer and the VPN server to establish a secure connection. You can also alternatively check the L2TP VPN connection from another device to check if the problem is on the server side.
If everything is all right, you can just enable the Microsoft CHAP V2 Protocol and restart the IPsec service on your device.
Q. How do I fix the L2TP connection attempt that failed because of the security layer?
Start by disabling the antivirus and firewall on your system. And then, you can try enabling the Microsoft CHAP V2 Protocol and the LCP extension in the network PPP settings on your device.
You can also restart the IPsec service. And if nothing works, you can just uninstall the VPN network adapter from your system and then reinstall it again.
Q. What to do if you can’t connect to VPN in Windows 10?
First, check if you have the correct date and time set on your computer. And then, you can temporarily disable the antivirus and firewall on your system, as these security apps can block the VPN connection.
Besides you can also enable both the Microsoft CHAP V2 Protocol and the LCP extension on your service to establish a secured connection.
Q. Is my firewall blocking my VPN connection?
It is highly possible that your firewall can block the VPN connection on your system, especially if the VPN connection fails to override the connections. Besides, your antivirus (especially the Windows Defender) can also block the VPN connection.
So, it is better to disable both your antivirus and firewall temporarily before you try to connect to a VPN server.