
Capturing screens seems necessary at times for many reasons. It is even more important for students and working professionals when they need to grab data or info displayed right on their screens. But it does annoy us if the print screen is not working in Windows 10, isn’t it?
Updating the keyboard driver and the Windows 10 OS can fix this issue in most cases. You can also disable antivirus and all the startup applications to give your device a clean boot. You should also check the writing permission on the default save folder of the screenshots.
These are not all, as there are several advanced fixes available that can solve this print screen bug. But before we reveal those, let’s understand the right way to take a screenshot and what could be the possible reasons behind this bug!
How To Take A Screenshot With The Print Screen Key On Windows 10?
Before you know how to enable print screens in Windows 10, you should know how to take screenshots properly. And you can simply take it with two easy methods.
- Press The Print Screen Button: Just press the “PrtSc” button on your keyboard. And then, open either MS paint or MS word and press the “Ctrl + V” buttons together to paste the screenshot. Now, save the file to either jpeg or png.
- Press Alt + PrtScn Buttons Together: This operation will also capture your screen but will let it stay on the clipboard. And when you need that particular screenshot, you can directly paste it into any software.
Alternatively, you can download any third-party screen capturing or screen recording tool from a trusted source to perform these tasks.
What Are The Root Causes If The Print Screen Not Working In Windows 10?
Although it is not uncommon, a buggy print screen can definitely annoy us to the core. However, it is easy to solve this common error if you know the root causes behind it.
In a broader spectrum, the problem lies in seven main reasons for Windows 10 devices.
- The keyboard hardware or the USB/PS2 jack of the keyboard is damaged. And same goes for the hardware of the wireless keyboards as well.
- You are using an obsolete version of Windows 10 or using an outdated keyboard driver.
- Any antivirus or even start program may be interfering with the keyboard driver.
- You have an incorrect setting in One Drive or any other cloud storage tool.
- You may have accidentally disabled the print screen button from the settings.
- The “Write” permission is disabled in the folder where the screenshot is supposed to save.
- The “ScreenshotIndex” registry file is missing on your device.
Besides these, the problem may lie in the hotkey combinations as well, especially if you are using a laptop. In that case, you should try pressing “Fn + PrtSc” or “Windows Key + PrtSc” together.
4+ Easy Fixes If The Print Screen Is Not Working In Windows 10
Before you resort to any pro methods that need advanced controls, there are four generic methods you should try if the print screen is not working in Windows 10.
And in at least 90% of the cases, these four generic fixes alone can solve this error.
1. Use On-Screen Keyboard
Before you draw into conclusion that the print screen key itself is broken on your keyboard, you should know if there are any interference issues from other drivers.
And for that, you can crosscheck the hardware with the on-screen keyboard to be sure about its input recognition.
- Step 1: Click on the “Windows” button (or “Start” button) in your taskbar and click on the “Gear Icon” to launch the “Settings” app.
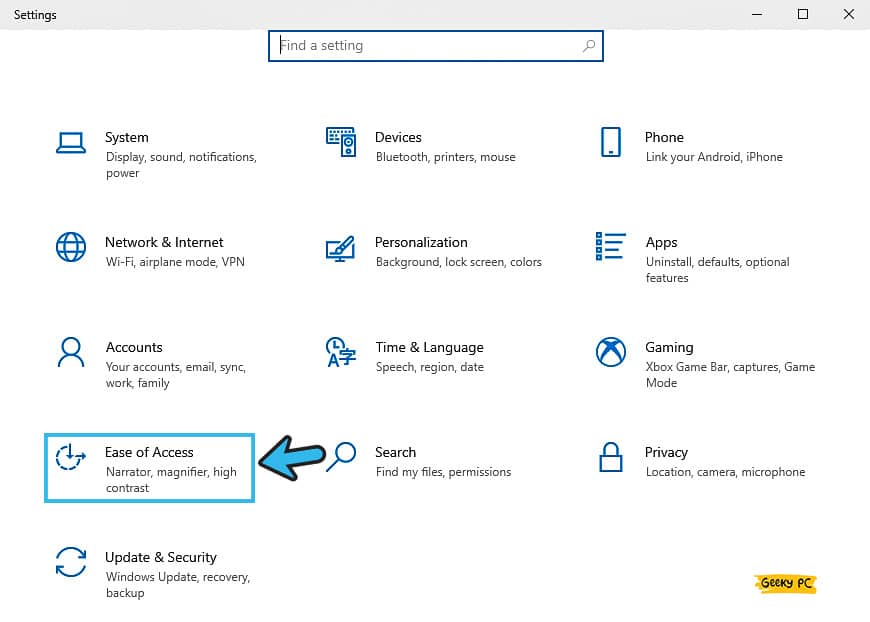
- Step 2: Once the “Windows Settings” app appears, click on the “Ease of Access” option.
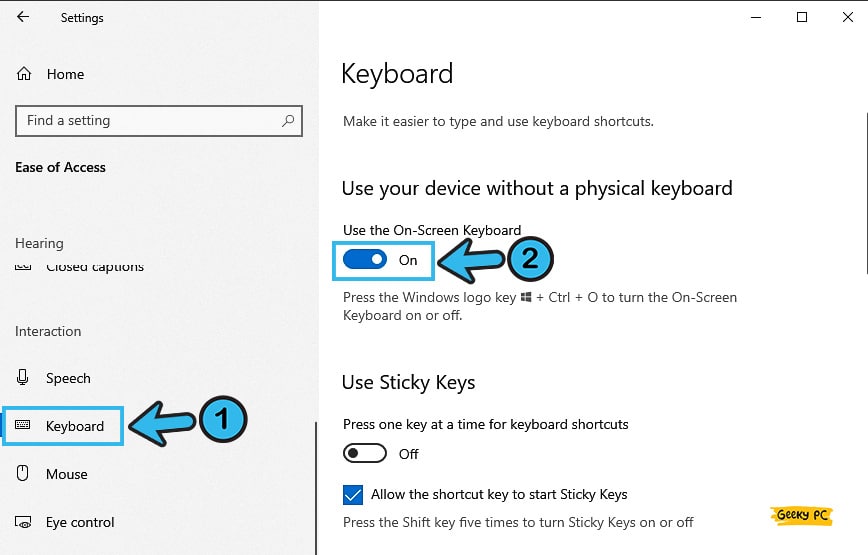
- Step 3: Once the settings menu launches, navigate to the left panel and click on the “Keyboard” option.
- Step 4: Now, navigate to the right panel and drag the toggle switch beside the “Use the on-screen keyboard” option to enable it.
- Step 5: Once the on-screen keyboard appears on the window, exit from the “Settings” app and check whether the print screen button is working on the virtual keyboard or not.
Press the print screen button on your actual keyboard a couple of times and tally it with the virtual keyboard.
If they are working, the print screen button will automatically light up on the on-screen keyboard every time you press it on your physical keyboard.
2. Update Your Keyboard Driver
If you can’t see the output on the on-screen keyboard and the print screen button is not working in Windows 10, the problem may lie with the driver. And to solve it, you need to download and install the latest driver for your physical keyboard.
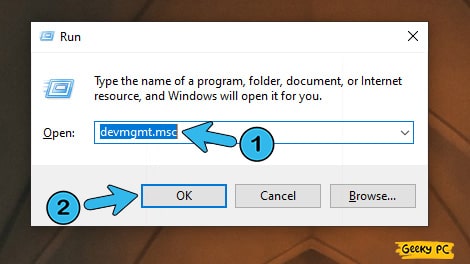
- Step 1: Press the “Windows Key + R” buttons to initiate the “Run” command window.
- Step 2: Once the dialog box appears, type “devmgmt.msc” in the designated field and hit enter.
- Step 3: After the “Device Manager” app launches, click on the “Keyboards” option to expand the menu.
- Step 4: Right-click on your keyboard option (“HID Keyboard Device” is the default) and select the “Update Driver” option from the list.
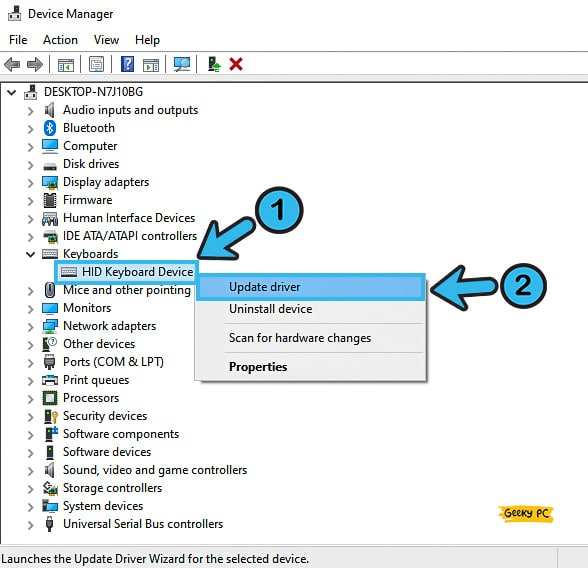
- Step 5: After the new window appears, click on the “Search automatically for updated driver software” option.
- Step 6: Follow the on-screen instruction to install the latest keyboard driver and restart your device once it is done.
It is absolutely safe to download and update with the generic driver for your keyboard.
But, if you are using a high-end keyboard or a mechanical keyboard that uses a different driver, refer to the manufacturer’s website to know if there is any new update available or not!
3. Update Windows 10
If you have already updated the keyboard driver but still using an obsolete pack of OS, the driver itself may create interference.
And as a possible outcome, you may see that the print screen key is not working in Windows 10. In such cases, updating your OS will solve the issue!
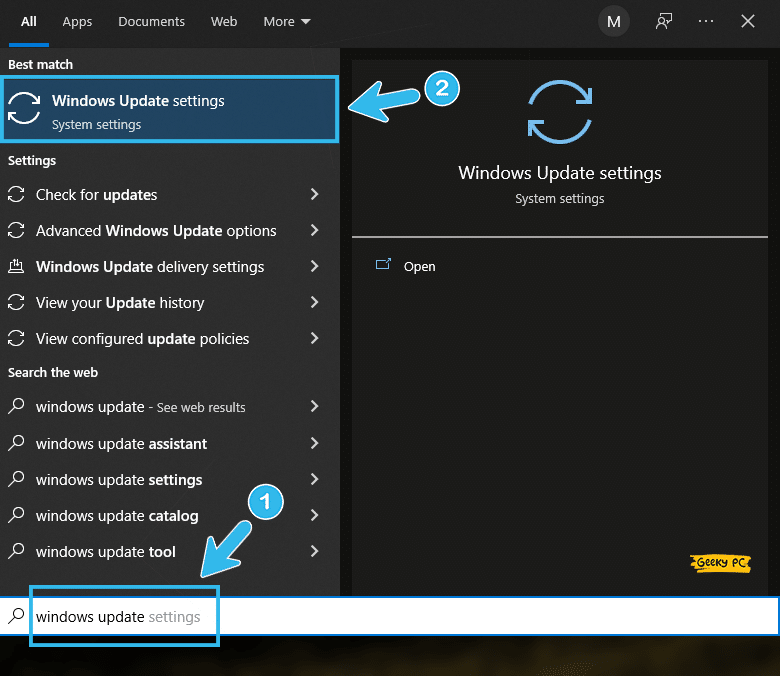
- Step 1: Click on the “Magnifying Glass” icon on the bottom-left corner of your taskbar to launch the search menu.
- Step 2: Type “Windows update” in the search field and click on the first option on the result page.
- Step 3: Once the update window launches, click on the “Windows Update” option in the left panel.
- Step 4: Now, navigate to the right panel and click on the “Check for updates” button.
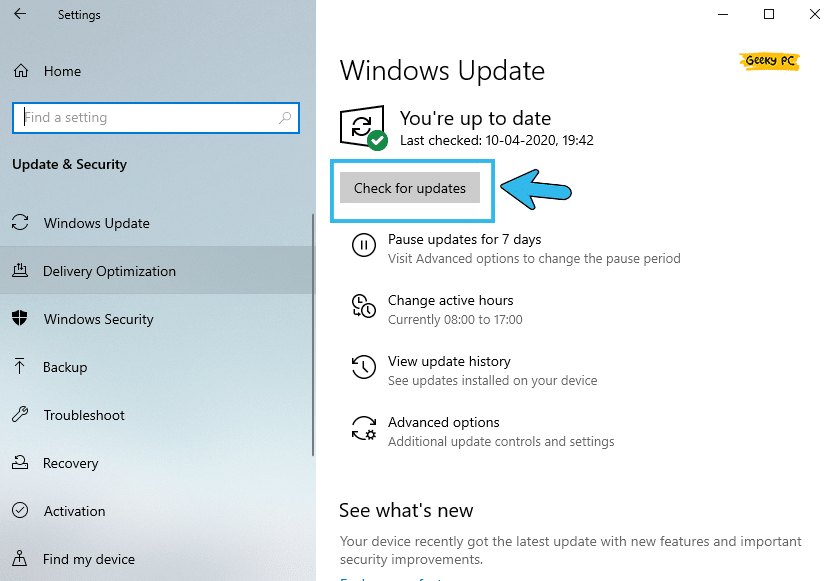
- Step 5: Let Windows automatically download and install the latest update and reboot your system once it is done.
If you are using a cracked version of Windows OS and forcefully downloaded the latest update, you may see that the taskbar will stop working after the update.
4. Troubleshoot Keyboard
If the keyboard is still malfunctioning after updating the keyboard driver and the OS itself, you may have software issues causing the problem. In such cases, troubleshooting your keyboard can correctly identify and rectify the root cause of this print screen error.
- Step 1: Launch the “Settings” app by clicking the “Windows” button and then clicking on the “Gear” icon.
- Step 2: Once the app launches, scroll and click on the “Update & Security” button.

- Step 3: Navigate to the left panel and click on the “Troubleshoot” option.
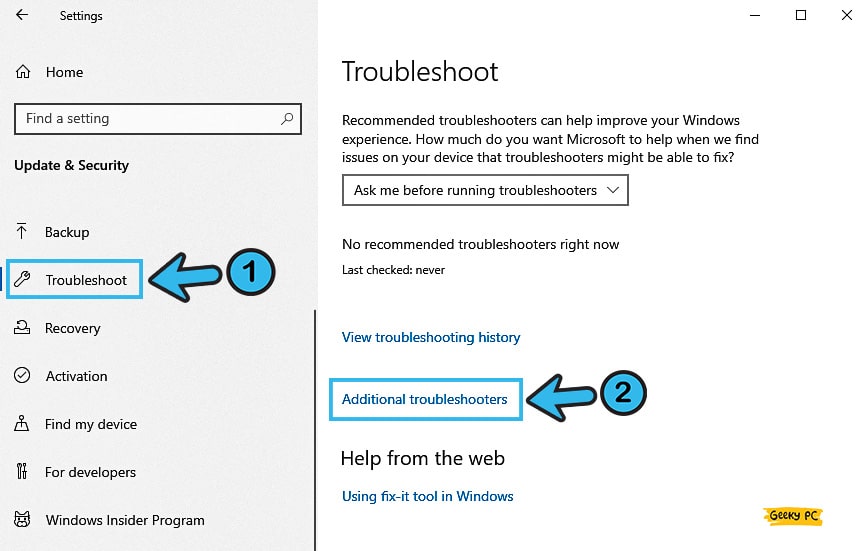
- Step 4: Now, navigate to the right panel and click on the “Additional Troubleshooters” option.
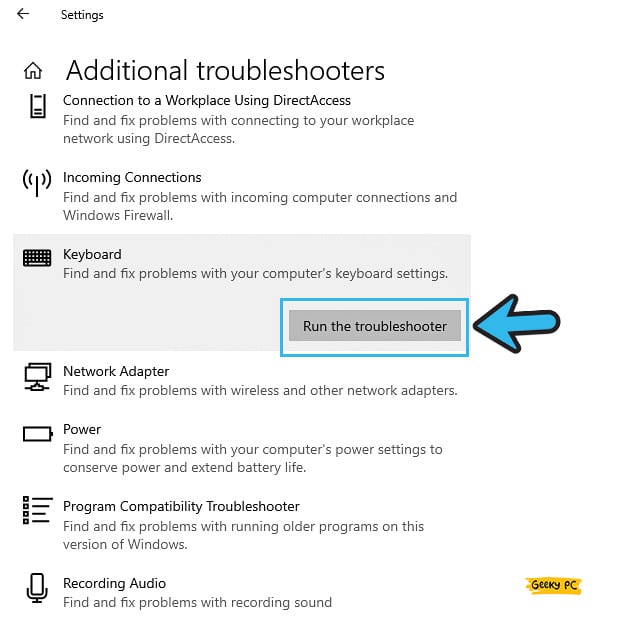
- Step 5: Once the troubleshooting popup menu appears, click on the “Keyboard” option.
- Step 6: Follow the on-screen instruction and reboot your system when the procedure is over!
If the troubleshooting option can’t figure out the cause, you can alternatively plug in your keyboard USB in a different port on your CPU.
Besides, upgrading to a USB keyboard will be the best solution if you are still using the old-school PS2 keyboard.
7+ Pro Fixes For The Unresponsive Print Screen In Windows 10
If the generic methods can’t solve the situation where the print screen is not working in Windows 10, your issue may be triggered from the core settings. And to fix it, there are several advanced methods you can try that will solve this issue in no time.
5. End Certain Tasks
It is highly possible that any other software, especially the third-party one, is constantly interfering with the keyboard driver.
And for that, not just the print screen but several other keys start malfunctioning. So, it is better to close those interfering tasks to rectify this bug.
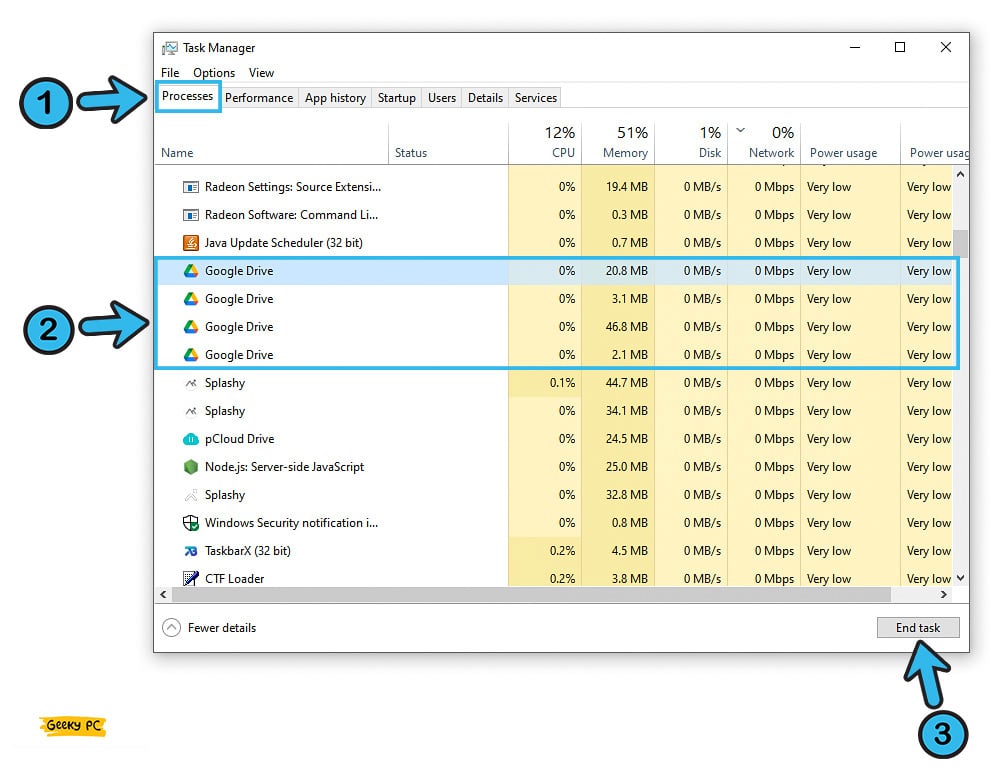
- Step 1: Press the “Ctrl + Shift + Esc” keys altogether to launch the “Task Manager” app.
- Step 2: Click on the “Processes” tab from the header menu and let all the running processes load.
- Step 3: Select the “OneDrive,” “Dropbox,” and “Snippet tool” tasks from the list and click on the “End Task” button to stop those.
- Step 4: Now, go to the “Details” tab from the header menu and select these three apps again from the list.

- Step 5: Right-click on the option and select the “End Task” option from the list.
- Step 6: Once you close all these three apps, reboot your system and check whether the print screen button is now working or not.
If you mistakenly close the graphics-related tasks, especially while using the Nvidia graphics card, several error messages may pop up.
In that case, follow our detailed guide to fix the We Couldn’t Complete The Updates Undoing Changes in Windows 10 devices.
6. Temporarily Disable Windows Defender
Windows Defender is a robust antivirus system that comes pre-installed with the latest Windows 10 versions.
However, this antivirus program can interfere with several drivers on your system, especially if they have any error codes or security loopholes.
- Step 1: Press the “Windows Key + I” buttons together to initiate the “Settings” app.
- Step 2: Click on the “Update & Security” option once the new menu launches.
- Step 3: Now, navigate to the left panel from the newly launched window and click on the “Windows Security” button.
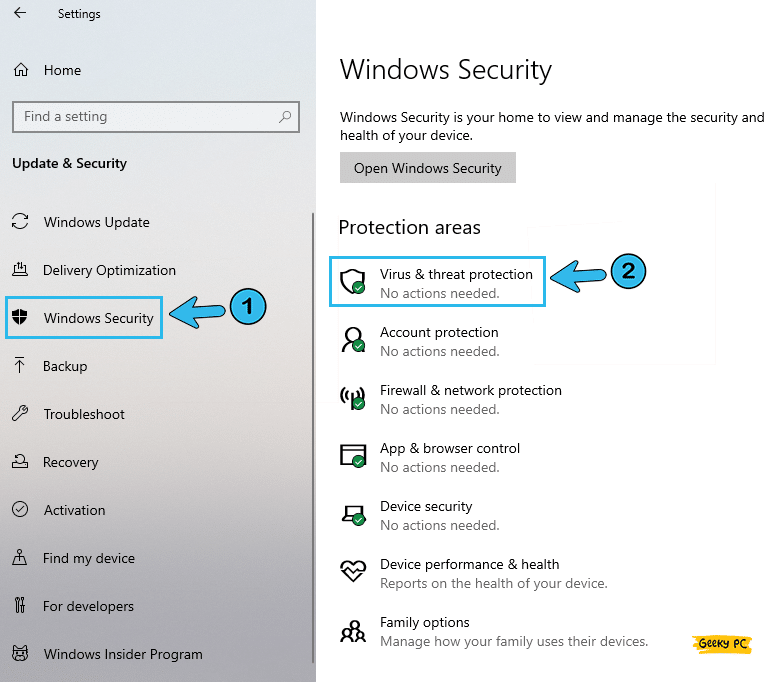
- Step 4: Come back to the right panel and click on the “Virus & threat protection” option.
- Step 5: Click on the “Virus & threat protection settings” from the new menu.
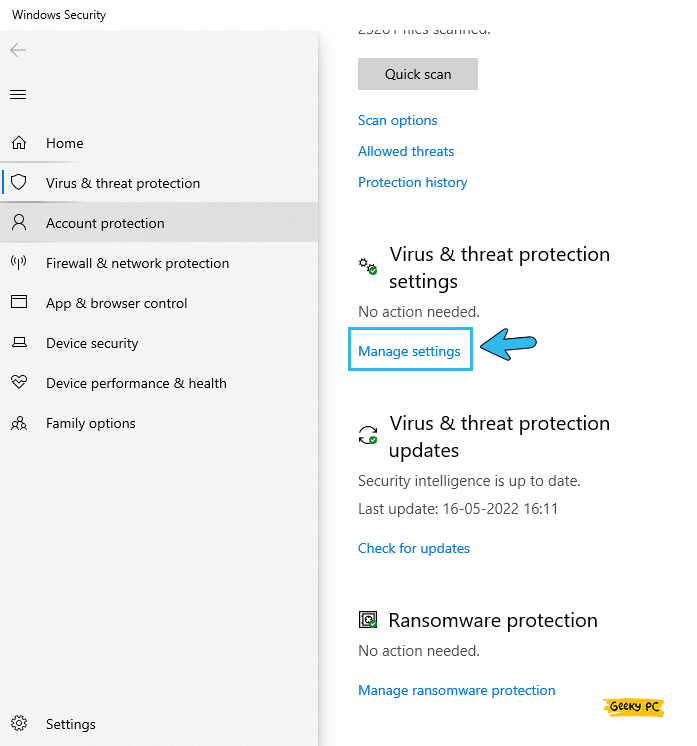
- Step 6: Toggle the switch beside the “Real-time protection” option to turn it off.

- Step 7: Click “OK” to save the settings and reboot your system without the antivirus.
You may get the solution if you disable the antivirus after the print screen stops working in windows 10. However, it may trigger several group-policy errors, especially if you are using a computer under network administrators.
In such cases, follow our complete guide to resolve the “This program is blocked by group policy” error in Windows 10.
7. Clean Boot Your Device
In usual conditions, any Microsoft OS starts with a lot of programs; and Windows 10 is no different!
But at times, many startup programs may start interfering with your keyboard driver to attract anomalies. So, it is better to give your system a clean boot.
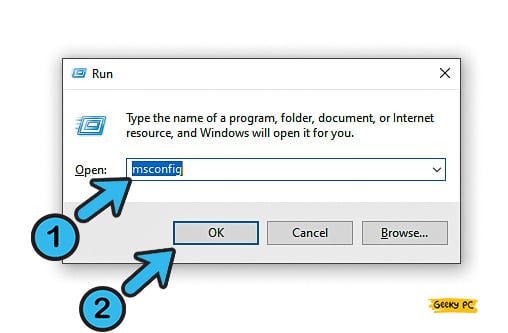
- Step 1: Press the “Windows Key + R” buttons together to launch the Run command.
- Step 2: Type “msconfig” in the designated field and hit enter to launch the system configuration app.
- Step 3: Once the new window launches, navigate to the “General” tab from the header menu.
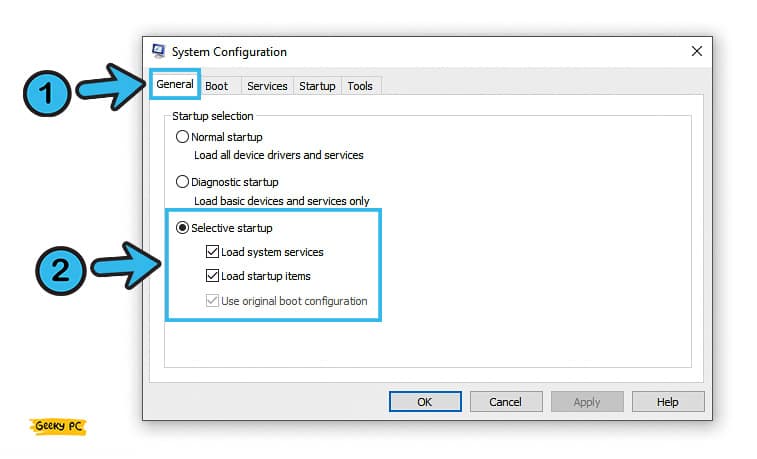
- Step 4: Uncheck the box beside the “Load startup items” under the “Selective startup” menu.
- Step 5: Now go to the “Services” tab from the header menu and tick the box adjacent to the “Hide All Microsoft Services” option.
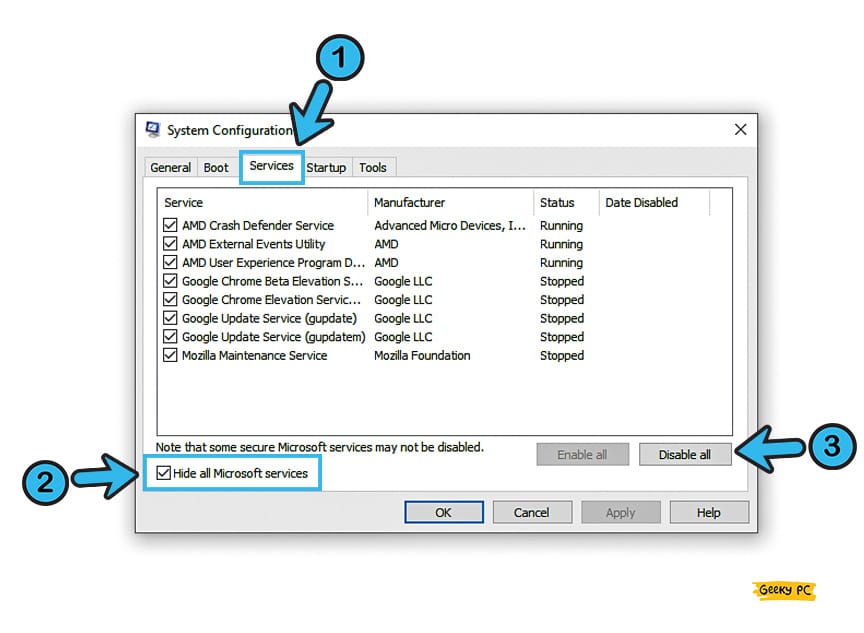
- Step 6: Once the list of services refreshes, click on the “Disable All” button.
- Step 7: Click “Apply” to save the settings and then “OK” to exit from the system configuration.
- Step 8: Reboot your system without any startup application and check whether the key is working or not!
Many users have reported getting gateway errors after clean booting their Windows system. If you are also encountering a similar situation, follow our complete guide to fix the “Backspace Is Not Working” in Windows systems.
8. Enable ‘Write’ Permissions
You may not know, but the OS automatically saves that snap in a particular target folder when you press the print screen button.
If the issue is not with the key but with the target folder itself, you may get a similar error. So, it is better to check and enable the writing permission.
- Step 1: Press the “Windows Key + E” button together to launch the “File Explorer” app.
- Step 2: Double-click on the “Pictures” folder from the left panel.
- Step 3: Now, return to the right panel and right-click on the “Screenshots” folder.
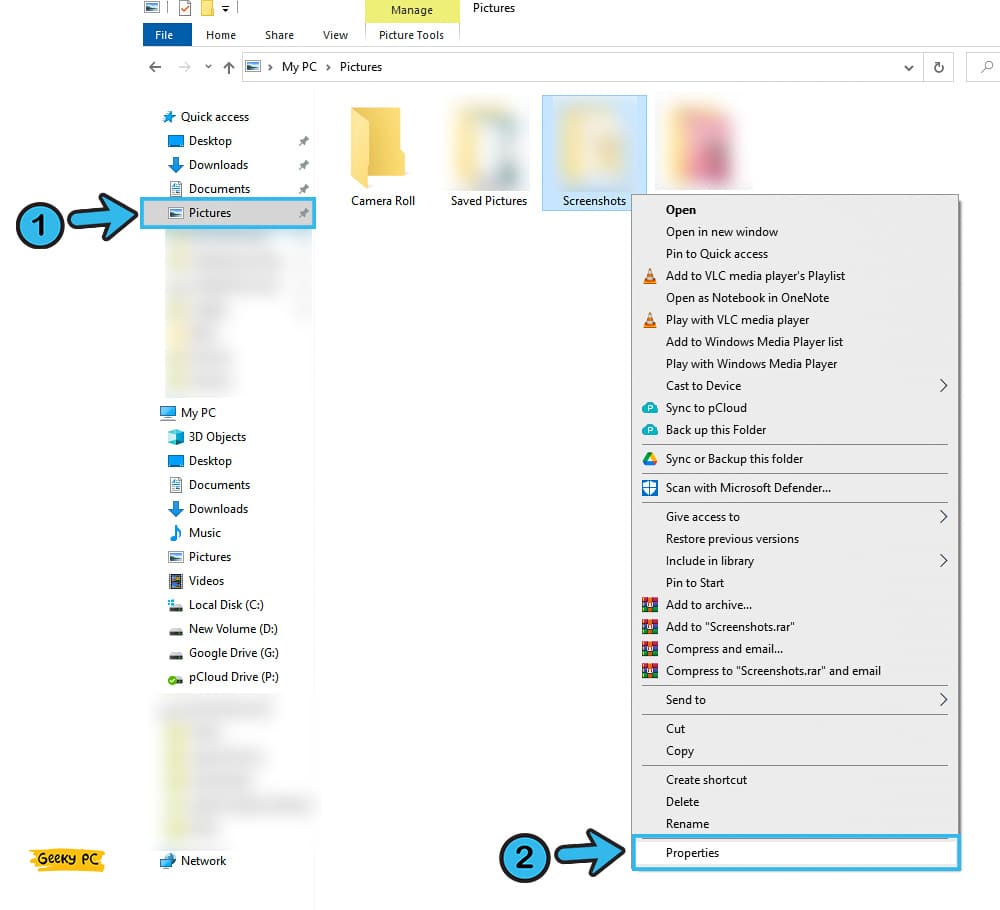
- Step 4: Click on the “Properties” button from the additional menu.
- Step 5: Once the new window appears, click on the “Security” tab from the header menu.
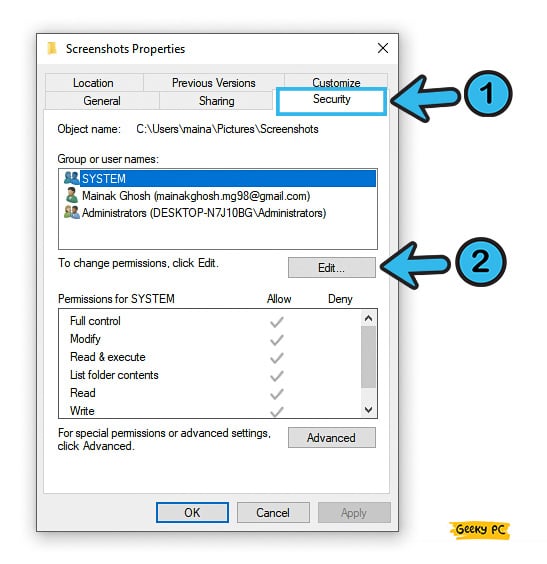
- Step 6: Enable the “Write” permission for both the “SYSTEM” and “Administrator” profiles.
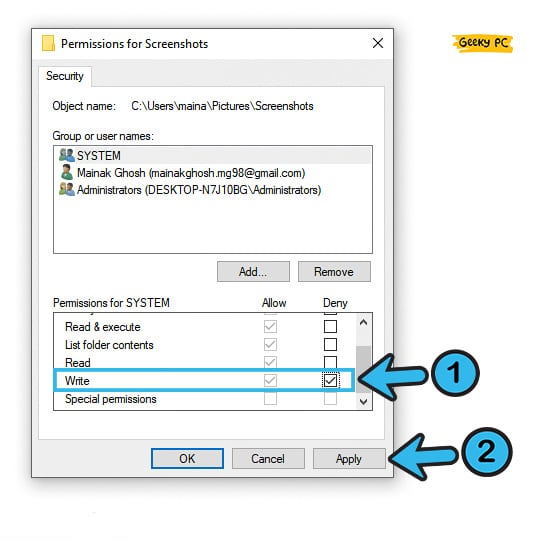
- Step 7: Click “Apply” to save the settings and then “OK” to exit.
If you are using the hotkey combination of the “Windows Key + Prt Scr” buttons to save the screenshot, press it once after enabling the “Write” permission to check whether the default folder is opening or not. If it doesn’t open, you need to follow the steps all over again!
9. Check The Settings In OneDrive
If you are not using the default system folder to save the screenshot you take with the print screen button but using the One Drive folder to do it instead, you also need to check the settings of the online drive too.
And if the print screen button doesn’t work in windows 10, you have to tweak the entire One Drive settings as well.
- Step 1: Right-click on the “One Drive” folder (A cloud icon) located at the bottom-right corner of your taskbar.
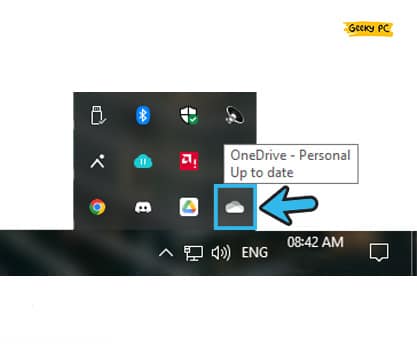
- Step 2: Select the “Settings” option from the menu to launch the One Drive settings option.
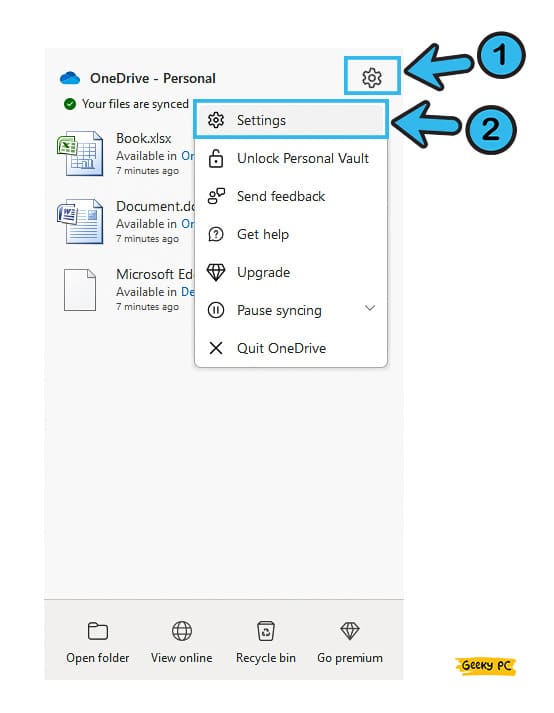
- Step 3: Once the new window appears, click on the “Backup” option from the header tabs.
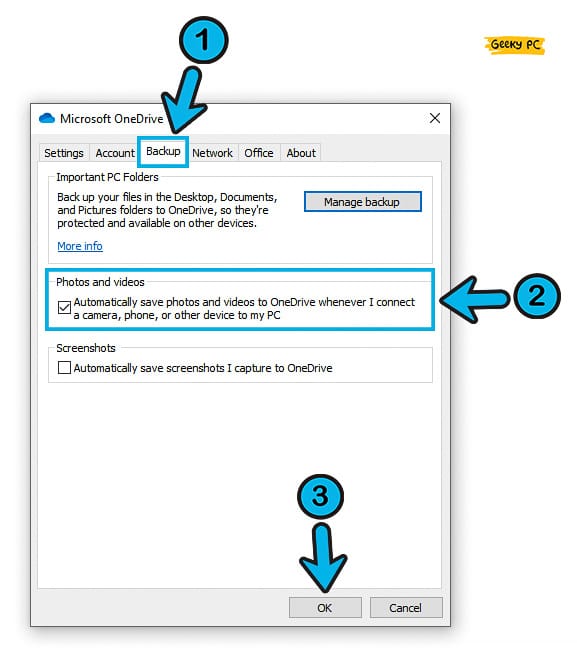
- Step 4: Check the box adjacent to the “Automatically Save Screenshots I Capture To OneDrive” option.
- Step 5: Click “OK” to save the settings and exit from the settings menu.
You may face service host delivery optimization issues if you shift your default save folder entirely online on your One Drive.
In that case, follow our step-by-step guide to fix the service host delivery optimization in Windows 10 systems.
10. Fix With Registry Editor
If the hardware is all right, but the print screen button still can’t take and save screenshots, the problem is way more deep-rooted than you can possibly imagine.
But you can solve these advanced issues by tweaking the registry editor in Windows 10 systems.
- Step 1: Press the “Windows Key + R” buttons together to launch the Run command window.
- Step 2: Type “regedit” in the command field and hit “Shift + Enter” together.

- Step 3: Once the popup message appears, click on the “OK” button to launch it with administrative access.
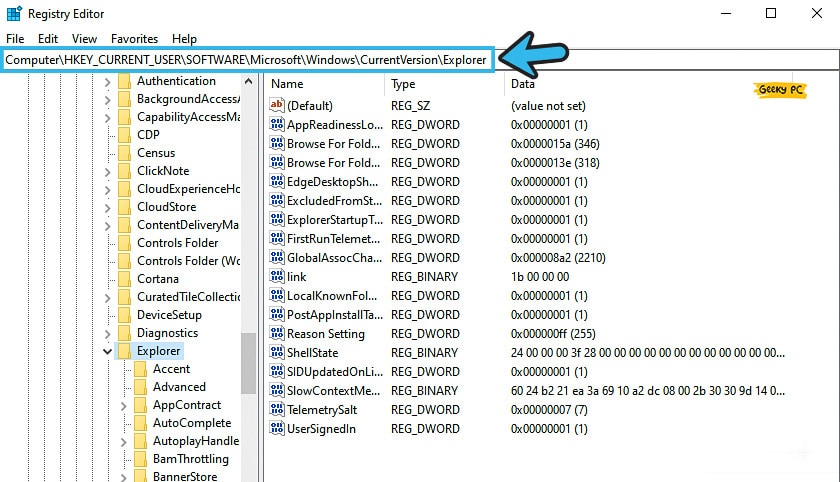
- Step 4: Type
Computer/HKEY_CURRENT_USER/Software/Microsoft/Windows/CurrentVersion/Explorerin the search field and hit enter.
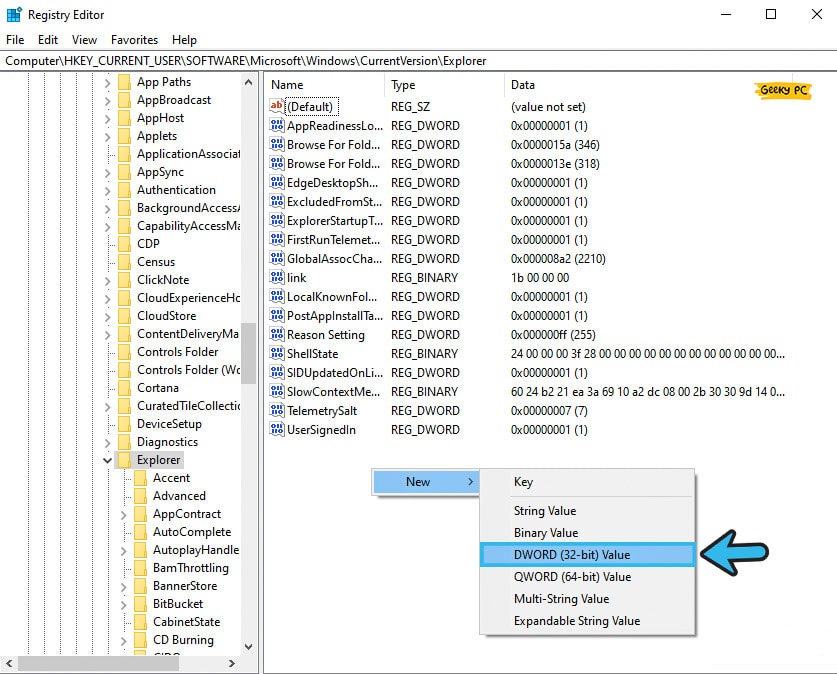
- Step 5: Now, come to the right panel, right-click on the white space, and select the “New” option.
- Step 6: Click on the “DWORD (32-bit)” value under the “New” option.
- Step 7: Rename the file to “ScreenshotIndex,” double-click to open the value field, and set the value to 4.
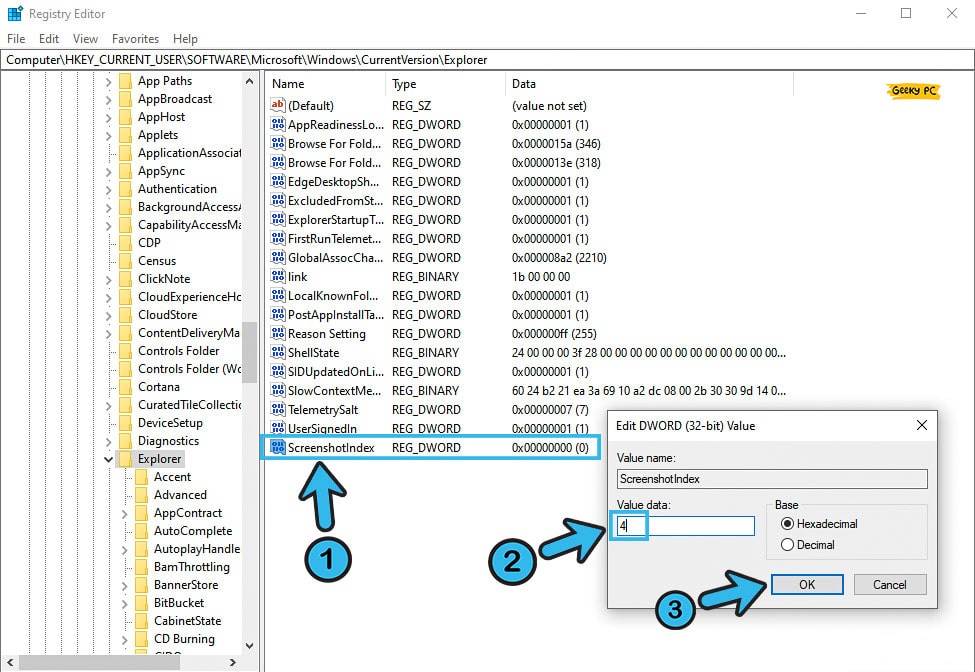
- Step 5: Save the settings and reboot your Windows 10 system with a new registry file.
Editing any registry file needs utmost care and precise action. If you mistakenly put any wrong value in any field inside the registry editor, it can trigger a chain of buggy operations. So, it is better to strictly follow the steps to edit the registry file.
11. Use Steam overlay (For Gamers)
If the print screen button is not working exclusively while playing any game, you can use the steam overlay to rectify this issue.
But yes, fixing with this method will not resolve the root cause. Instead, it will create an alternative way to save your in-game screenshots.
- Step 1: Open your steam account with proper credentials and go to the “Settings” option.
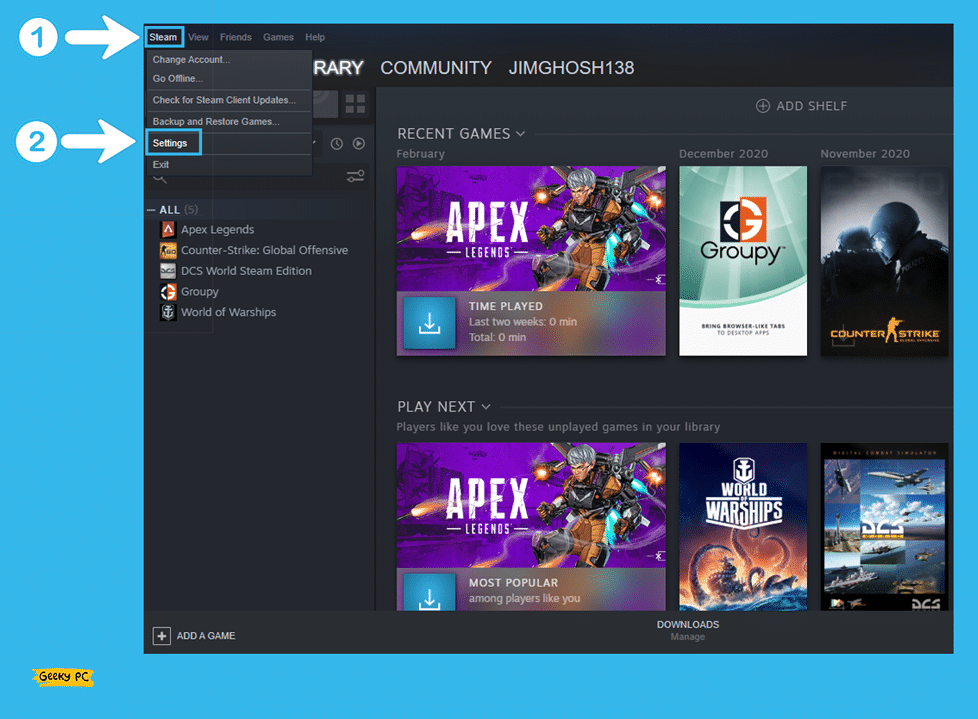
- Step 2: Select the “In-Game” section from the menu.
- Step 3: Now, come to the right panel and tick the adjacent box of the “Enable the Steam Overlay while in-game” option.
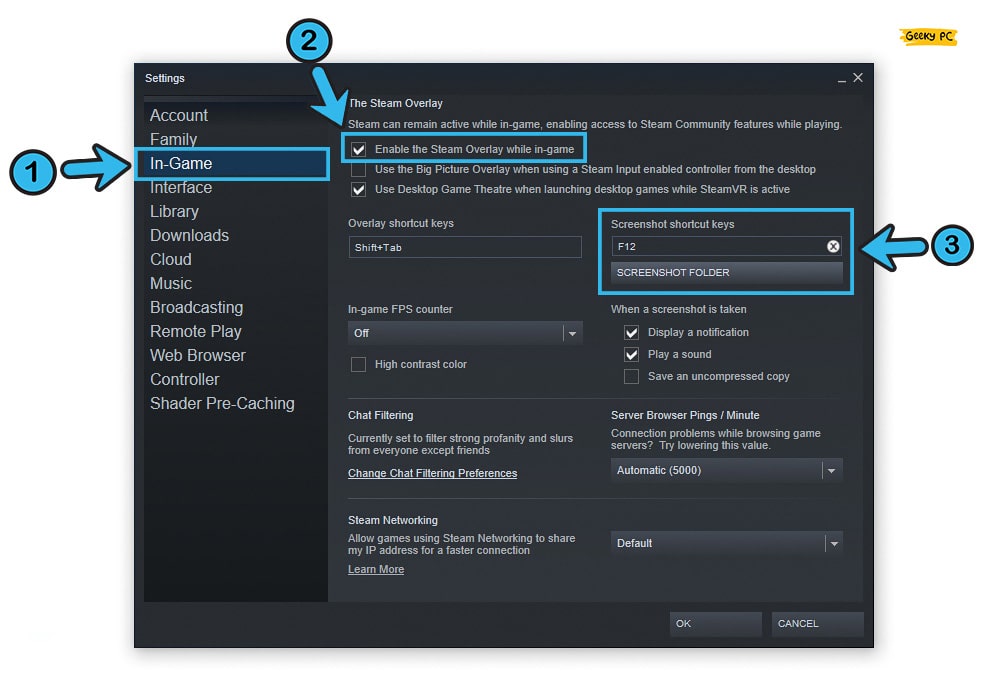
- Step 4: Enable the desired key under the “Screenshot shortcut key” option. (The default is F12)
- Step 5: Click “OK” to save the settings and exit from the settings menu.
Print Screen Alternatives For Windows 10
If none of the generic or advanced methods are working to fix your print screen bug, you can simply take alternative routes to capture your screen and even record it.
As you may not know, several alternate options come pre-installed with the Windows 10 OS nowadays.
1. Use Hotkey Combination
Pressing the “Prt Scr” button is not the only way to take a screenshot, as there are several combination keys already available in Windows 10 that can do your job. And the best part, you don’t even need to enable these hotkeys, as they are enabled by default.
- Alt Key + PrtSc: If you press the “Alt Key” and the “Print Screen” buttons together, it will automatically take a snap of the currently active window. And it will either prompt you to choose a save location or will save directly to the default screenshot folder.
- Windows Key + PrtSc: If you need automatic naming of your screenshots, this is the hotkey combination to try. Pressing these two buttons together will save your screenshot with the “Screenshot <number>” name in the default folder.
- Fn + Windows Key + PrtSc: It is identical to the “Windows Key + Print Screen” function, although it works exclusively on laptops. But yes, the naming and the default screenshot folder will be the same.
Besides you can also use any other third-party tools to capture your screens. Several call conferencing tools like Zoom and Teams now also offer screenshot facilities.
2. Screen Snip And Snagit
Screen snip is a pre-installed tool that comes with the latest Windows 10 variant. Although it works similarly to a print screen, screen snip gives you better control.
And to enable it, all you need is to just click on the notification icon located at the bottom-right corner of your taskbar and click on the “Screen Snip” tool to activate it.
On the other hand, Snagit is also a screen-capturing tool made by TechSmith. And since its initial release in 1990, this tool has already become an integral part of the Windows and macOS systems. You can download Snagit 10 for free and use it to take screenshots.
3. Use The Game Bar
Many people don’t even know that the game bar comes pre-installed with the latest version of Windows 10 and 11. And with this tool, you can perform several tasks alternatively, such as taking a screenshot when the print screen button is not working.
- Step 1: Press the “Windows Key + G” buttons together to launch the “Xbox Game Bar” menu.
- Step 2: Navigate to the top portion of your left panel to find the “Screen Capture” tool.
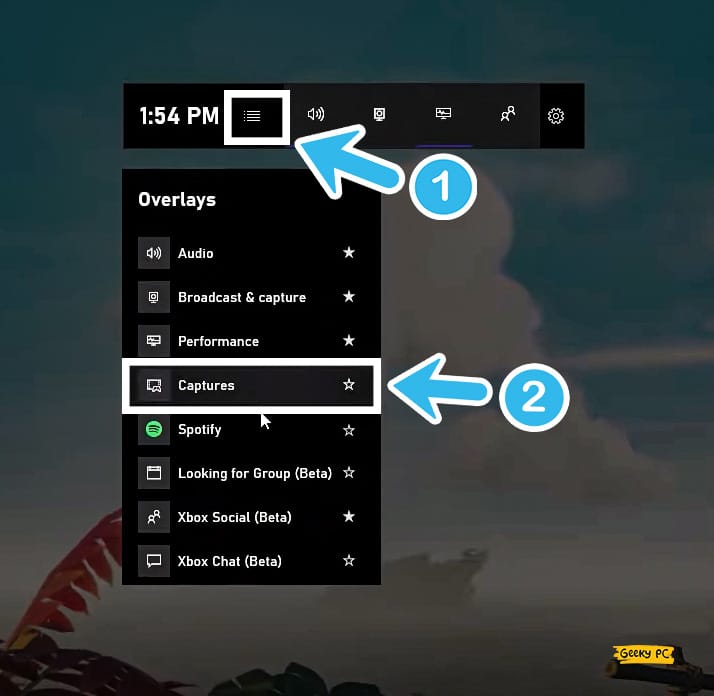
- Step 3: Click on the “Camera” icon to capture a screenshot and a dot icon to start recording.
- Step 4: Go to “This PC > Local Disk C > Username > User > Videos > Captures” to find your screenshot and screen recording. (You can also alternatively press the “Windows Key + Alt + Prt Scr” buttons to take a screenshot with the game bar.)
Not just take a screenshot; you can also record your screen through the game bar. However, it is better to enable your gaming mode from the Windows 10 settings to give your PC an optimal boost when it is absolutely necessary.
Conclusion
Trying any alternative method to capture the screen or even trying the generic methods if the print screen is not working in Windows 10 is absolutely safe. And in most cases, these easy fixes alone will solve it! However, it is better to create a restore point first and then try the advanced methods if you really have to resort to those.
So, that’s all the solutions for this print screen bug so far. But, if you think we have missed any solution or if you have any alternative method, feel free to drop that in the comment box below!
FAQs
Q. How do I get my Print Screen button to work?
If the print screen button alone can’t take the screenshot on your Windows 10 PC, press the “Windows Key + Print Screen” buttons together to check whether these combination keys are working.
You can also alternatively try to take a screenshot by pressing the “Fn + Windows Key + Space Bar” together.
Q. How do I fix Print Screen not working?
Start by checking your F-Lock key and then press the “Windows Key + Prt Scr” together. If this doesn’t work, you need to update your keyboard driver and your Windows OS.
You can also resort to the troubleshooting option to pinpoint the origin of this error.
Q. How do I enable screenshots in Windows 10?
You can simply enable the screenshot option by pressing the “Prt Scr” button or the “Windows Key + Prt Scr” buttons together.
you can also take a screenshot with the “Screen Snip” tool that you can find on the notification panel of the latest Windows 10 OS. Moreover, you can now also take a screenshot by activating the game bar.
Q. How do I turn on the PrtSc button on my laptop?
Click on the “Gear” icon on the start menu to launch the “Settings” app and navigate to the “Ease of Access” option. You need to then navigate to the left panel and click on the “Keyboard” option.
Once the new menu appears on the right panel, just toggle the switch beside the “Use the PrtScn button to open screen snipping” option.