
Isn’t it annoying when you run into a dead green screen while playing a game or running an important app? Yes, that has annoyed us too! So, we will uncover all the working methods to fix the green computer screen right here!
You can fix the green-screen error simply by replacing your monitor or connecting a VGA or HDMI cable. Besides you should also update your Windows OS and the GPU driver to resolve it. Many people have also fixed it by disabling the antivirus and the hardware acceleration on their systems.
However, these are not all the solutions that can fix this issue. But before we reveal all those methods, let’s understand what this green-screen error actually is and what are the primary causes behind it.
What Are The Primary Causes Of Green Computer Screens?
Before you delve deep into the solutions to fix green computer screens on Windows devices, you need to know about the primary causes that can trigger this bug.
And in a broader horizon, this particular error can arise for six main reasons.
- Your monitor or the monitor connection cable is faulty or completely broken.
- You are using an outdated version of Windows OS or an obsolete version of the GPU driver.
- You are running a display setting on your system that is not supported by your hardware.
- Windows Defender or any other third-party antivirus is interfering with the graphics driver.
- You may have enabled the hardware acceleration.
- You have bugs or errors in the root installation directory of your Windows device.
Besides these causes, there are several other causes that can also trigger this green screen error. And if you are using browsers like Google Chrome and Mozilla Firefox, this issue can also arise if you have enabled the hardware acceleration from the browser settings.
2+ Hardware Tweaks To Resolve The Green Screen Of Death
Before you resort to any system tweaks while your computer screen turns green and freezes, you first need to check your hardware and peripherals.
And in most cases, this green-screen error occurs if you have a broken connector or a faulty monitor.
1. Disconnect All Peripherals And Reconnect Them
Sometimes, wrong or mismatched peripherals can create issues with the monitor display in Windows devices. The same problem can still trigger if you have any loose cable connections on your device as well.
So, it is better to disconnect and then reconnect all the peripherals to fix this issue.
- Step 1: Shut down your system and let it rest for at least 15 seconds.
- Step 2: Unplug your device from the power source and let it cool down.
- Step 3: Remove all the cables and peripherals from your CPU cabinets, such as the power cord, USB drives, and printer cable (if any).
- Step 4: Keep the cabinet without any connections for at least 2 minutes.
- Step 5: Re-plug all the peripherals and connectors to the cabinet tightly and securely (Tighten the screws if you have any with the monitor cable).
- Step 6: Plugin the cabinet into the power source and boot up your system.
If you know pro-level hardware tweaks, you can also open your cabinet and manually remove RAM, HDD, and GPU from the motherboard. Clean all the connectors on your motherboard with a blower and reinsert everything.
2. Replace The Connector/Cable
If you are still getting the green-screen error on your windows devices even after removing and reinserting the connectors and peripherals, you may have a broken cable that is creating this error on your monitor.
So, you need to manually check and replace those broken cables.
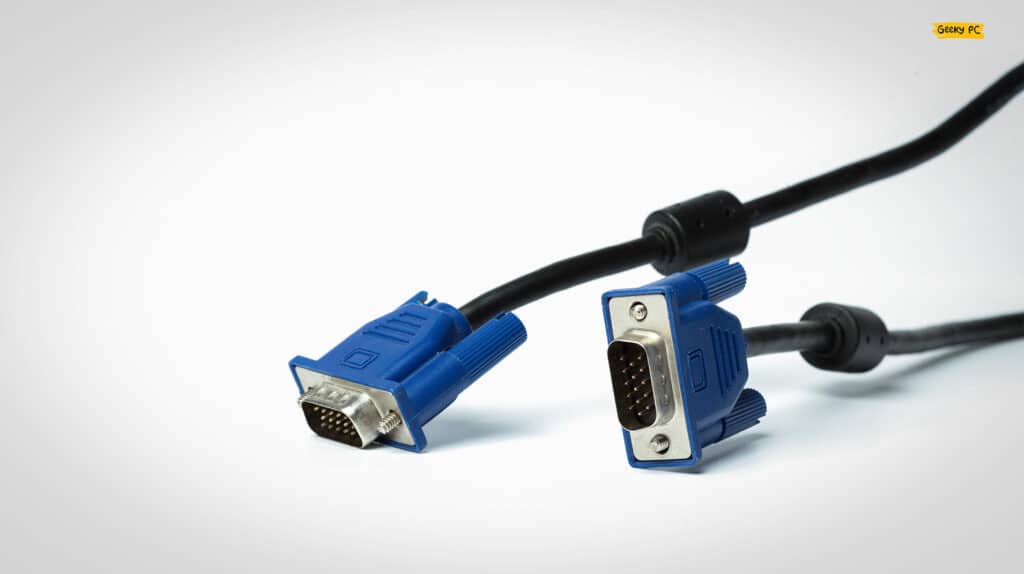
- Step 1: Remove your monitor cable from the cabinet and also from the monitor (unscrew it first if you are using a VGA cable).
- Step 2: Check whether the cable has any wear and tear.
- Step 3: Buy a new cable and plug it into your cabinet and monitor.
- Step 4: Boot up your system and check whether the issue persists.
If you are using a VGA cable, it is better to replace it with an HDMI cable (if your GPU supports it). Using an HDMI cable not only enhances the overall connection but also gives you a much-refined display on your monitor.
After replacing their connectors, many people have also reported getting a black screen on their generic PnP monitor. If you are also facing this issue, follow our detailed guide to fix generic PnP monitor errors in Windows devices.
6+ Easy Methods To Fix The Green Computer Screen
Before trying any advanced methods to fix the green computer screen that needs pro-level tweaks on your system, you should proceed with the generic fixes that are relatively safe to try.
And in almost 80% of the cases, these generic fixes alone are sufficient to resolve this issue.
3. Troubleshoot Your Hardware
If you are frequently getting green computer screen errors on your system, you first need to troubleshoot all your hardware to find out if this error keeps coming for any internal hardware issues.
And now, you can troubleshoot and rectify with the preinstalled troubleshooting tool on Windows devices.
- Step 1: Press the “Windows Key + I” buttons together to launch the “Settings” app.
- Step 2: Now, scroll down and click on the “Update & Security” option.

- Step 3: Once the new window opens, navigate to the left column, and click on the “Troubleshoot” option.
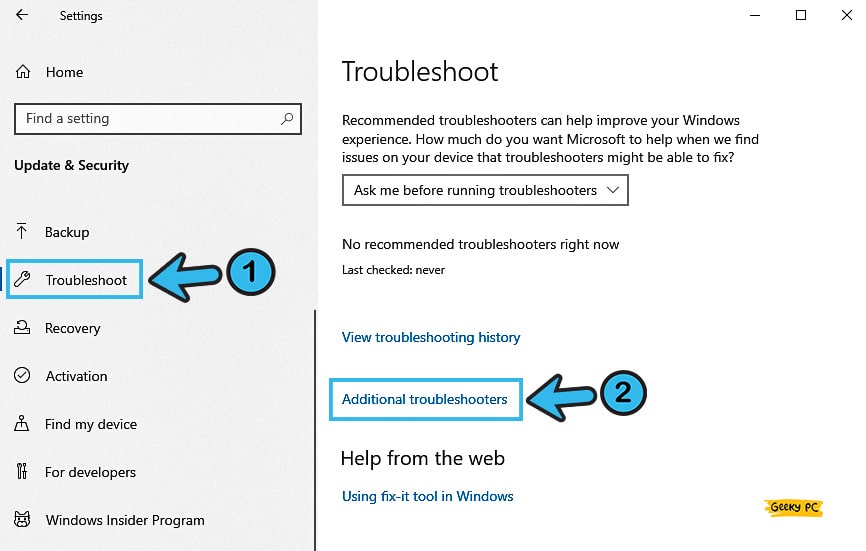
- Step 4: Navigate to the right column, scroll down, and click on the “Additional Troubleshooter” option.
- Step 5: After the new page opens, scroll down, and click on the “Video Playback” option to troubleshoot graphical issues.
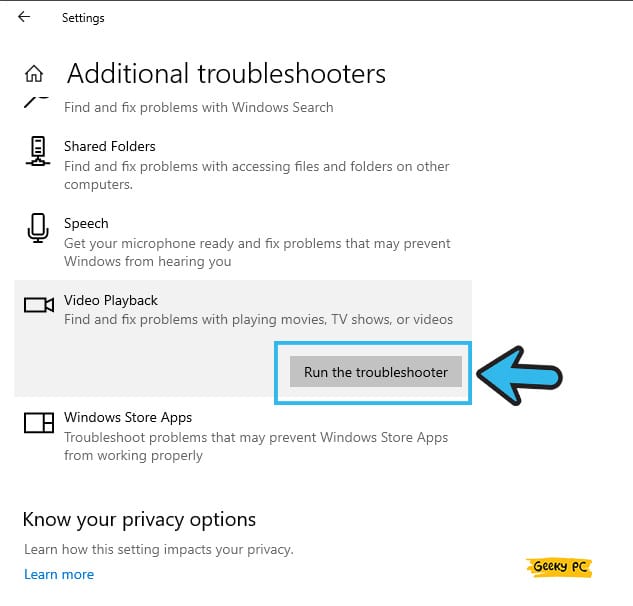
- Step 6: Let windows search for the error, rectify it, and reboot your system when the troubleshooting is over.
Alternatively, you can keep the troubleshooting on in the background by selecting the “Run troubleshooters automatically, then notify me” option on the fourth step.
If you proceed with these settings, Windows will automatically start detecting hardware-related issues in the background and fix them.
4. Restart Your Device In Safe Mode
It may happen that a third-party application is interfering with your graphics drivers, and that’s why you keep getting this green-screen error on Windows devices.
In such cases, you can effectively block the interference and test your system by rebooting your device to the safe mode.
- Step 1: Press the “Windows Key + I” buttons together to initiate the “Settings” app.
- Step 2: Once the new window appears, scroll down the page, and click on the “Update & Security” option.
- Step 3: After the new menu launches, navigate to the left panel, and click on the “Recovery” option.
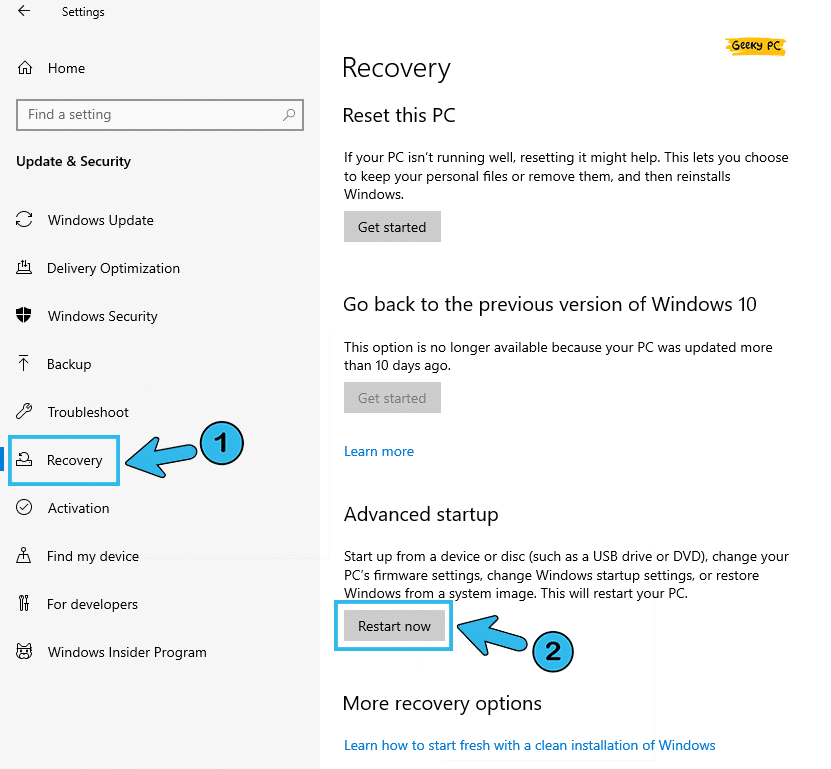
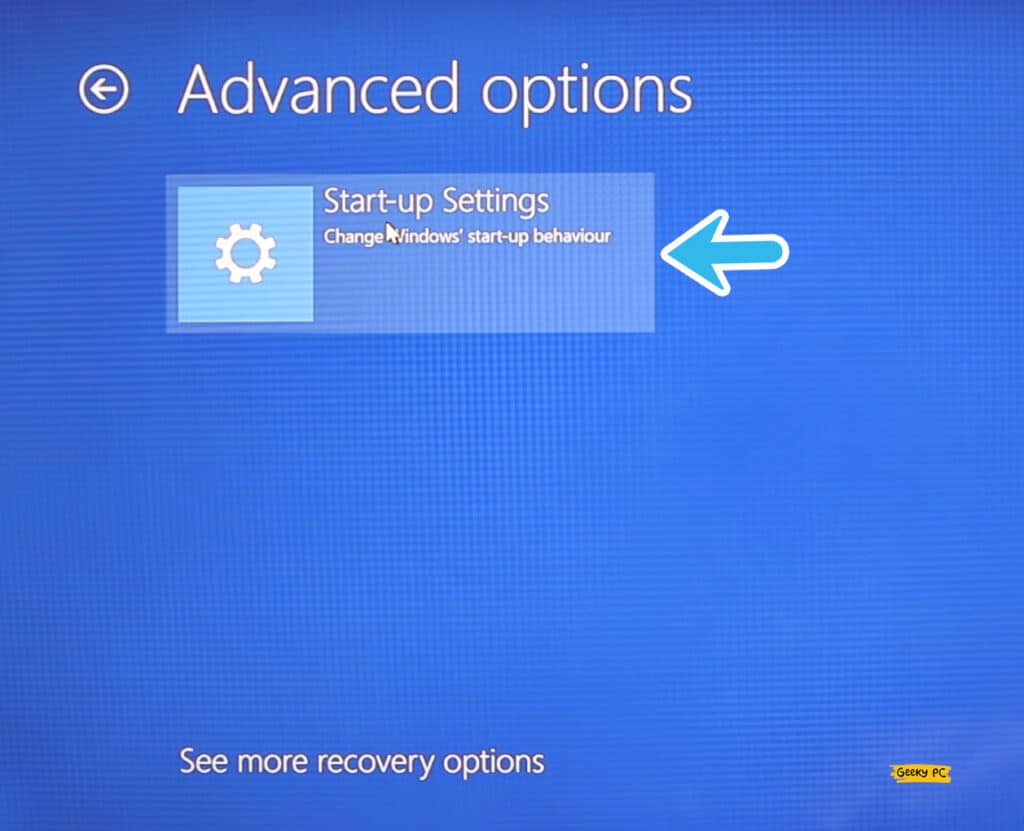
- Step 4: Now, navigate to the right panel, and click on the “Restart” button located under the “Advanced startup” option.
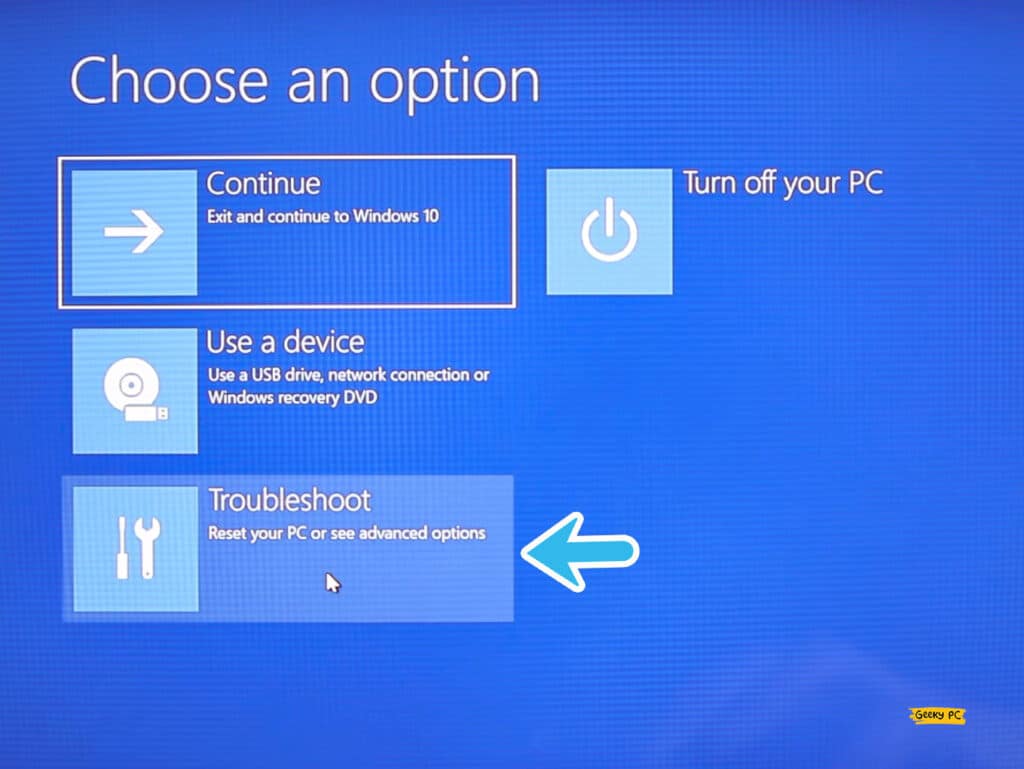
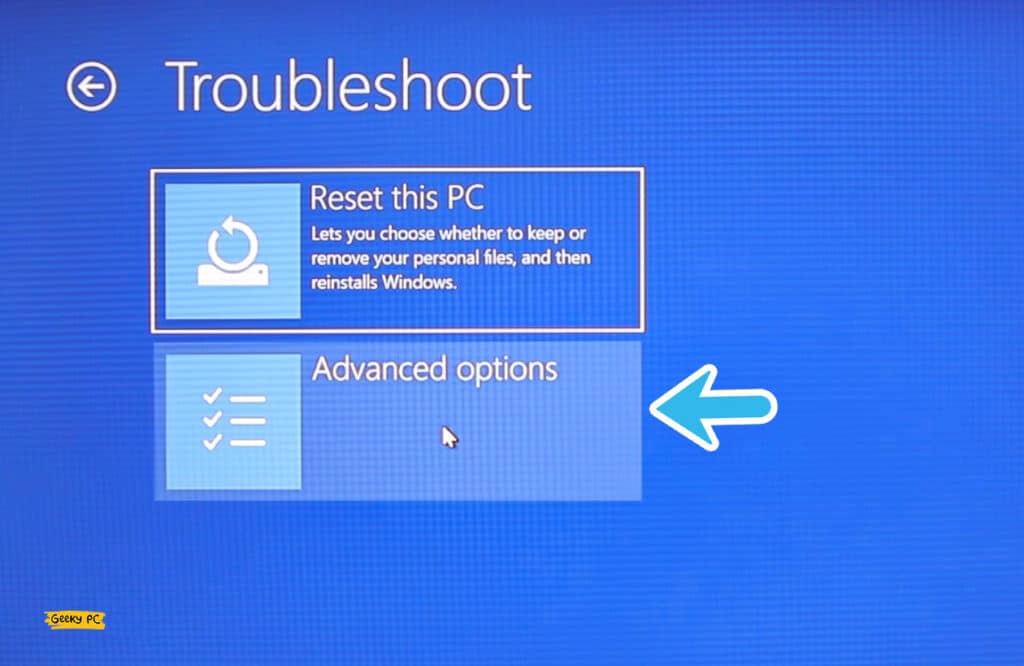
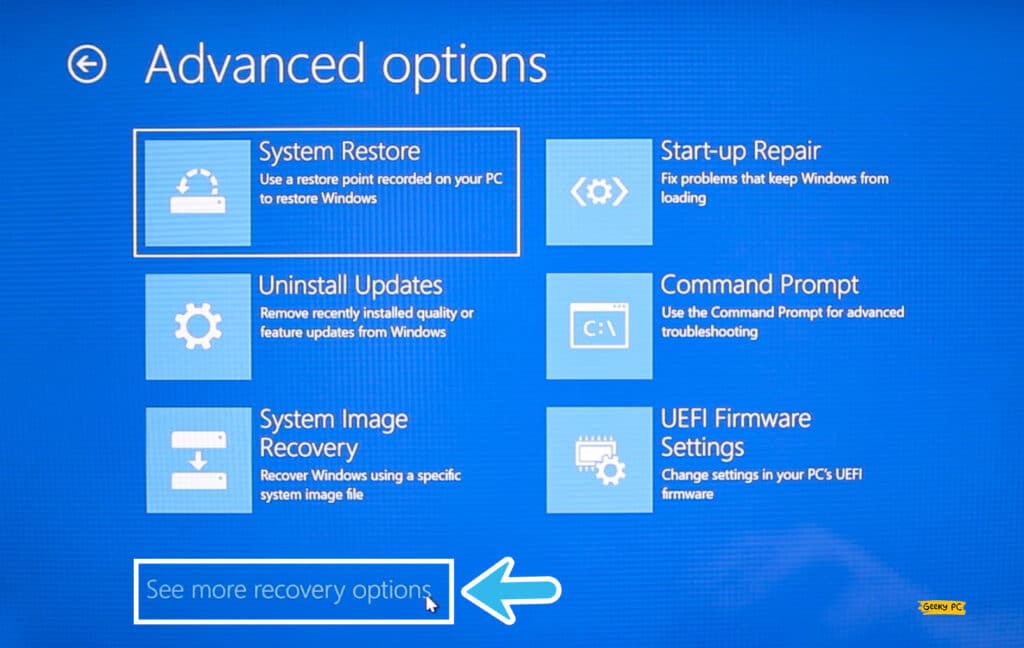
- Step 5: Windows will automatically reboot and select the “Safe Mode” option from the bootup screen.
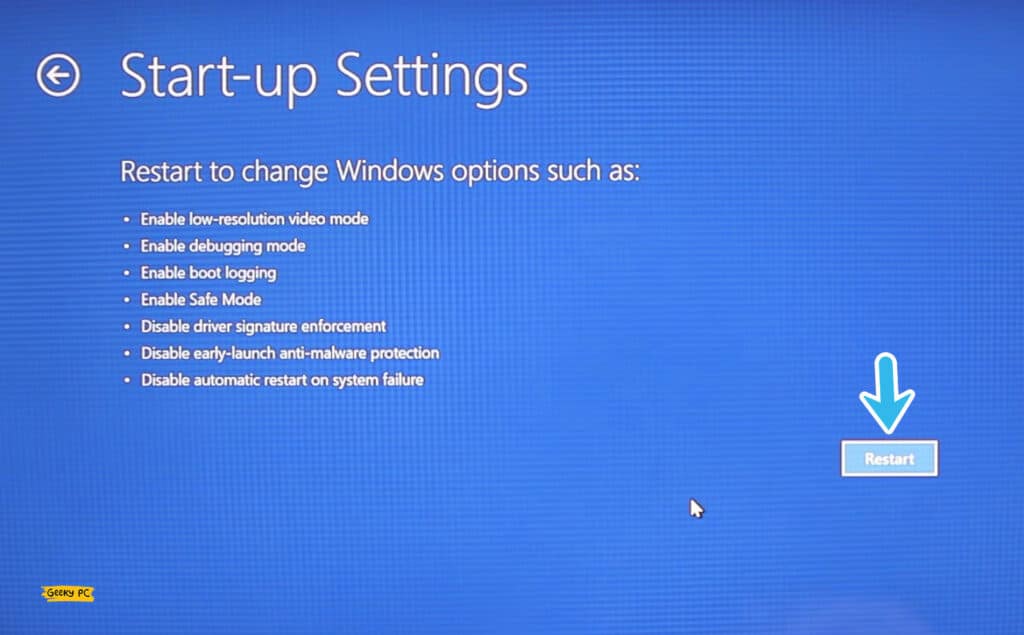
- Step 6: Let the window start itself on safe mode and check if you are still getting the error.
You can manually find the troublemaking software or app on safe mode. And then, you need to uninstall that particular software and give your computer a fresh restart.
Besides you should also check it by disabling all your antiviruses in safe mode. Also, you can follow our step-by-step guide to fix the Application Error 0xc0000005 error in Windows devices.
5. Update Your Operating System
Updating your OS in frequent intervals not only solves the minor glitches but also fixes all the security loopholes on your devices.
So, not only when you encounter any problem, but you should regularly update your Windows to experience a smooth computing experience.
- Step 1: Click on the “Magnifying Glass” icon located at the bottom-left corner of your taskbar.
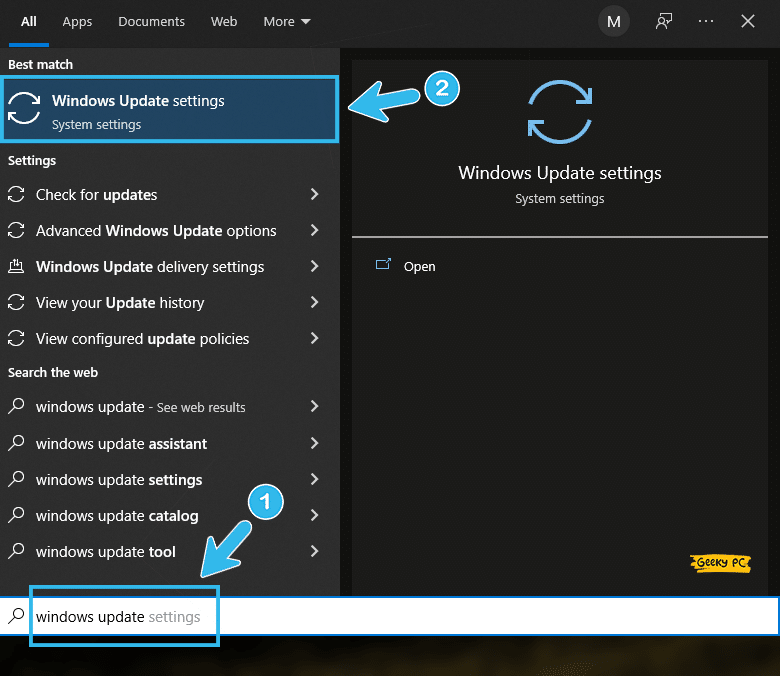
- Step 2: Once the search window appears, type “Windows update” and click on the first result that appears.
- Step 3: After the “Update” window launches, navigate to the left panel, and click on the “Windows Update” option.
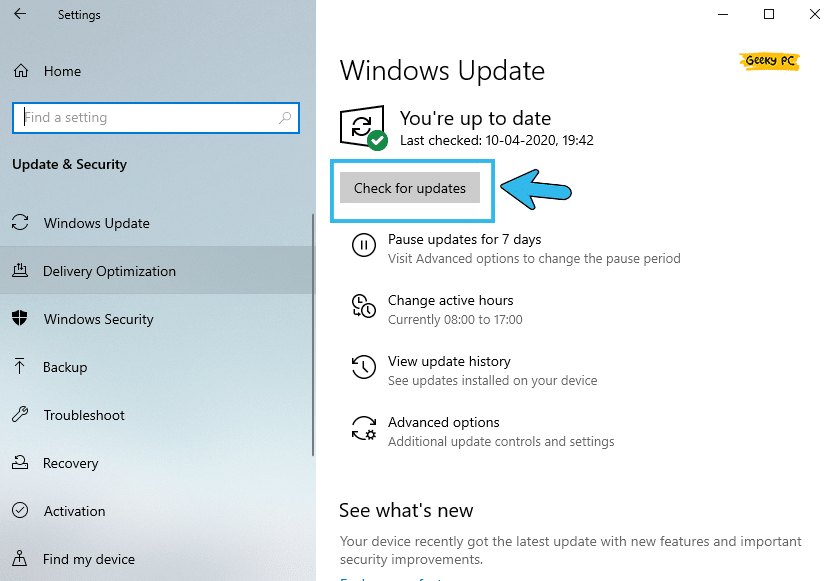
- Step 4: Now, navigate to the right panel, and click on the “Check for updates” option.
- Step 5: Windows will automatically find the latest update and will install it.
Several Windows users have reported getting a nonresponsive taskbar once they have installed the newest updates on their devices.
6. Update Graphics Card Driver
Many people have already noticed that their computer screen turned green tint while using an obsolete variant of the graphics driver.
So, not just the Windows OS, you also need to update all your GPU drivers to rectify these bugs and also to fix other minor graphics-related glitches.
- Step 1: Depending on your windows version, right-click on either the “Windows” or “Start” button to launch the additional menu.
- Step 2: Now, click on the “Device Manager” option to launch the app.
- Step 3: Once the new window launches, click on the “Display Adapters” option to expand it.
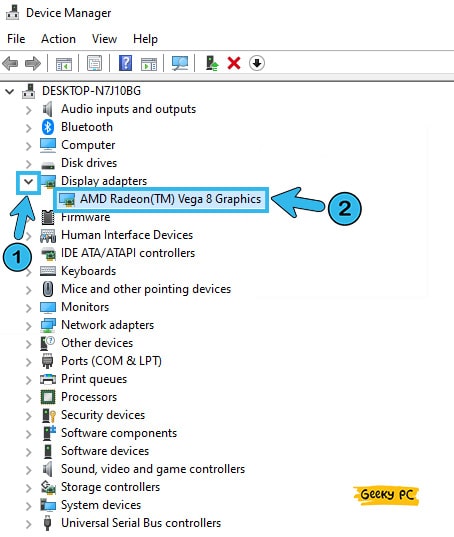
- Step 4: Navigate to the GPU driver, right-click on it, and click on the “Update Driver” option.
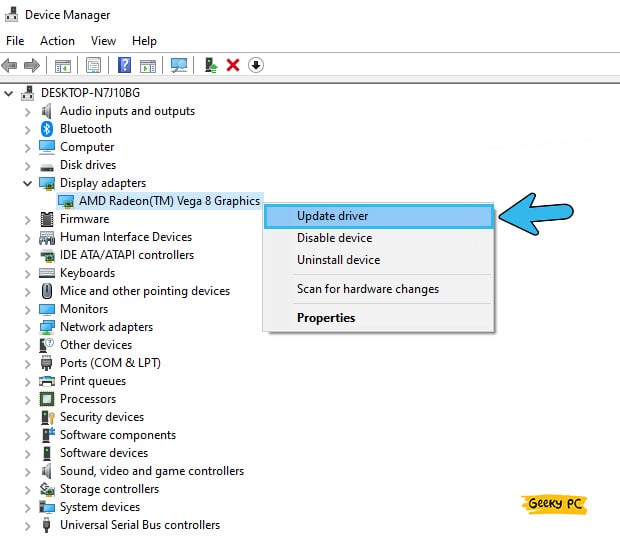
- Step 5: Click on the “Search automatically for drivers” option and follow the on-screen instructions.
- Step 6: Now, update all the available graphics-related drivers and reboot your system when all the drivers are updated.
7. Change Your Display Settings
It may happen that you keep getting the green-tin error on your Windows devices due to improper display settings. It may also happen that the current GPU settings are not complementing your monitor settings.
And in both cases, tweaking your display settings will solve it.
- Step 1: Press the “Windows Key + R” buttons together to initiate the “Run” command.
- Step 2: Type “Control” in the command field and click on the “OK” button to launch it.
- Step 3: Once the “Control Panel” app opens, navigate to the drop-down menu beside the “View by” option.
- Step 4: Select “Large Icons” from the drop-down menu and navigate to the main window.
- Step 5: Now, click on “Display” and further click on the “Change Display Settings” option.
- Step 6: Once the new window appears, click on the “Advanced Settings” option and select the “Monitor” tab.
- Step 7: Select the “High Color 16-bit” option and click “Apply” to save the settings.
If you are using an external graphics card, the “Display” option may not show in the Settings or Control Panel app to tweak your color schemes.
In that case, you need to open the GPU software in your system and tweak it from the software only.
8. Uninstall GPU Driver (And Move To Default Driver)
If you are frequently running into the Windows 10 blank green screen error, there may be an issue with your GPU driver.
And if updating the GPU driver can’t solve it, you need to manually uninstall the GPU driver and roll back to the default driver to fix this issue.
- Step 1: Press the “Windows Key + X” buttons together to launch the additional menu on your taskbar.
- Step 2: Launch the app by selecting the “Device Manager” option.
- Step 3: Once the new window opens, click on the “Display Adapters” option to expand it.
- Step 4: Now, navigate to your graphics card and right-click to launch the additional menu.
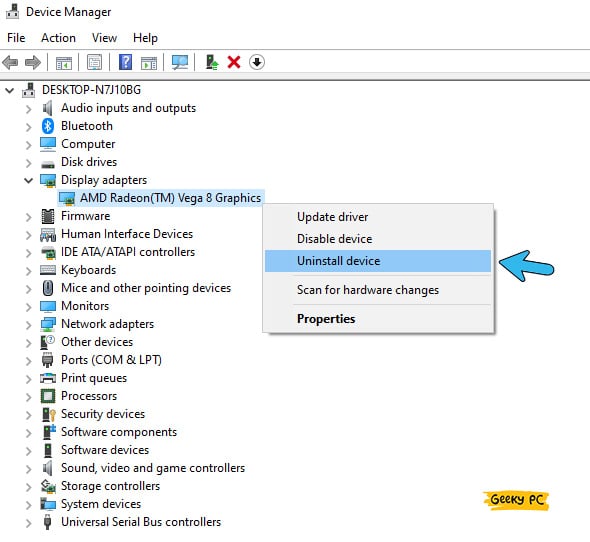
- Step 5: Select the “Uninstall device” option and further tick the box adjacent to the “Delete the driver software for this device” option.
- Step 6: Finally, click on the “Uninstall” button to remove the driver altogether from your device.
You need to reboot your system to relaunch Windows with the default graphics driver settings.
However, you may need to unplug your monitor cable from your GPU and insert it on your motherboard to run the system in default driver mode.
7+ Advanced Methods To Fix The Green Screen Error
If the generic fixes we have mentioned above are not sufficient to fix the green computer screen, your problem may be way more deep-rooted than you can possibly assume.
And in those cases, trying the advanced methods is the only option left to resolve this error in Windows devices.
9. Temporarily Disable Windows Defender
Although Windows Defender is a strong antivirus that comes preinstalled with the latest Windows OS, this software can create interference issues with your GPU driver, especially if you have a faulty driver installed on your system.
So, you can effectively eliminate the interference issue simply by disabling the antivirus temporarily.
- Step 1: Press the “Windows Key + I” buttons together to initiate the “Settings” app.
- Step 2: Once the new app launches, scroll down and click on the “Update & Security” option.
- Step 3: Navigate to the left panel and click on the “Windows Security” option.
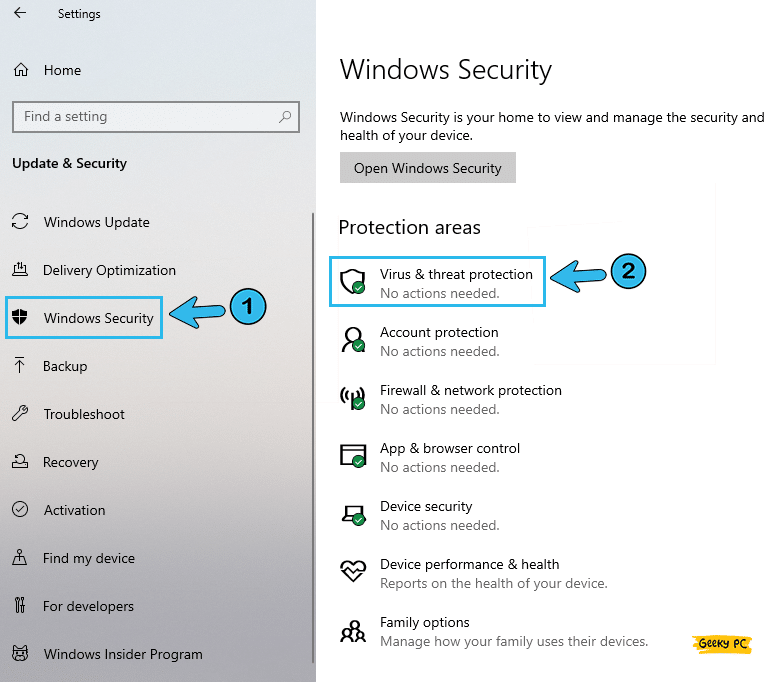
- Step 4: Now, navigate to the main panel and click on the Manage Settings under “Virus & threat protection” option.
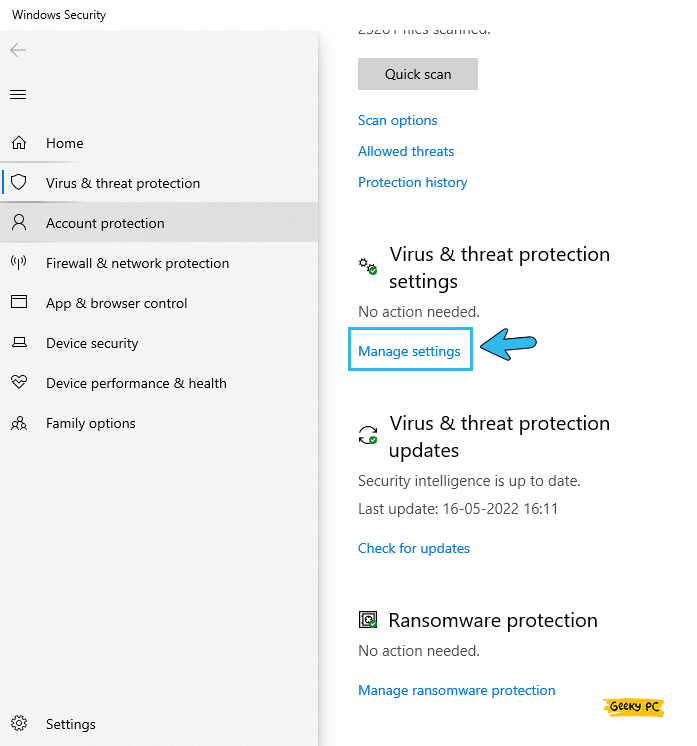
- Step 5: Once the new menu launches, further click on the “Virus & threat protection settings” option.
- Step 6: Locate and toggle the switch adjacent to the “Real-time protection” option.

- Step 7: Click “OK” to save the settings and exit from the “Settings” app.
If you are using your system under a network administrator, you may run into a group policy error once you disable the Windows Defender antivirus. In that case, follow our step-by-step guide to fix the “This program is blocked by group policy” error in Windows devices.
10. Disable Hardware Acceleration
Hardware acceleration forces your system to override the graphical outputs through your GPU rather than your CPU.
And if you are frequently running into the computer green screen crash, the problem may be on the hardware acceleration. So, you need to check it by disabling the acceleration.
- Step 1: Right-click on any blank space on your home screen and select the “Display Settings” option from the menu.
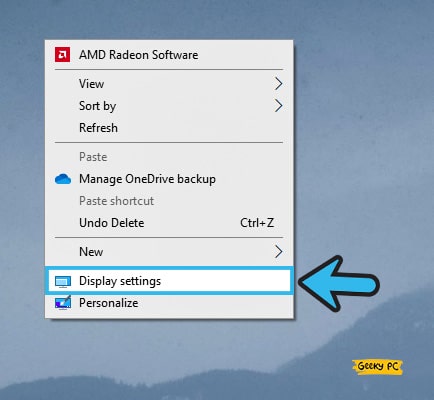
- Step 2: Once the “Settings” app launches, navigate to the right- panel, and click on the “Advanced display settings” option.

- Step 3: After the new window appears, click on the “Display adapter properties for Display 1” option.
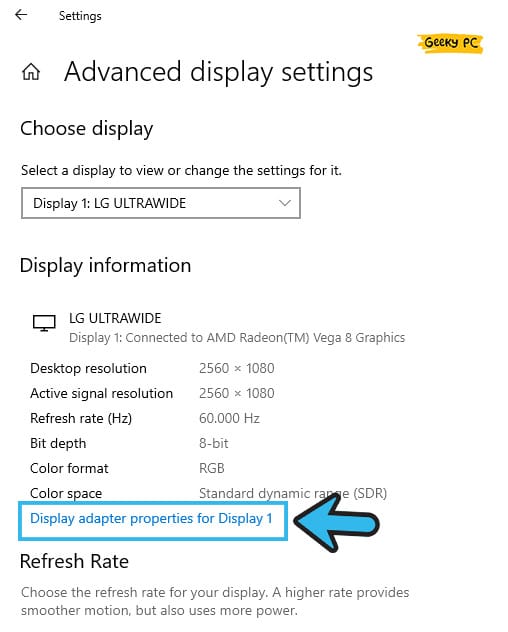
- Step 4: Navigate to the “Troubleshoot” option from the header menu.
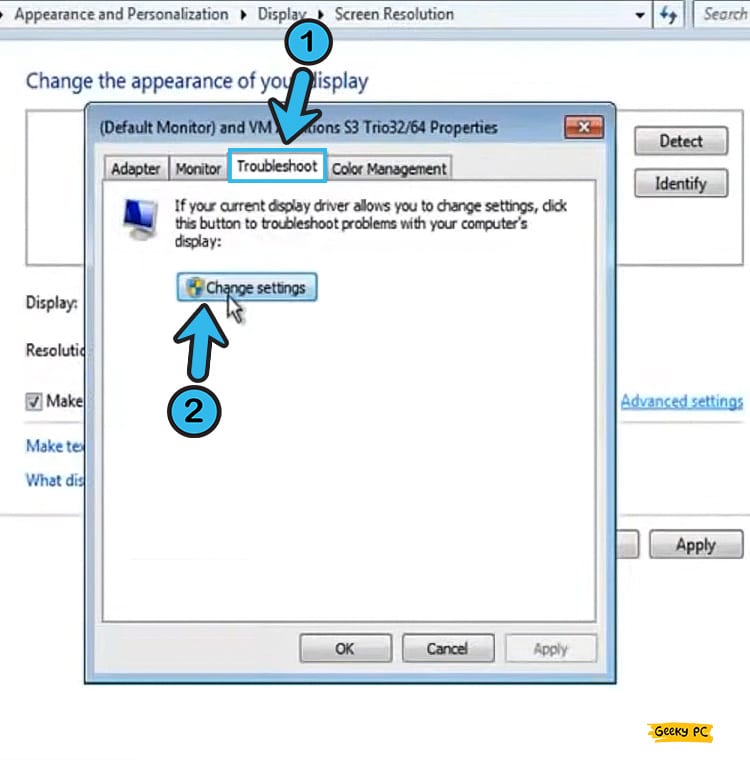
- Step 5: Click on the “Change Settings” button on that window.
- Step 6: Once the new window launches, move the slider beside the “Hardware Acceleration” option to the left (Towards the “None” option).
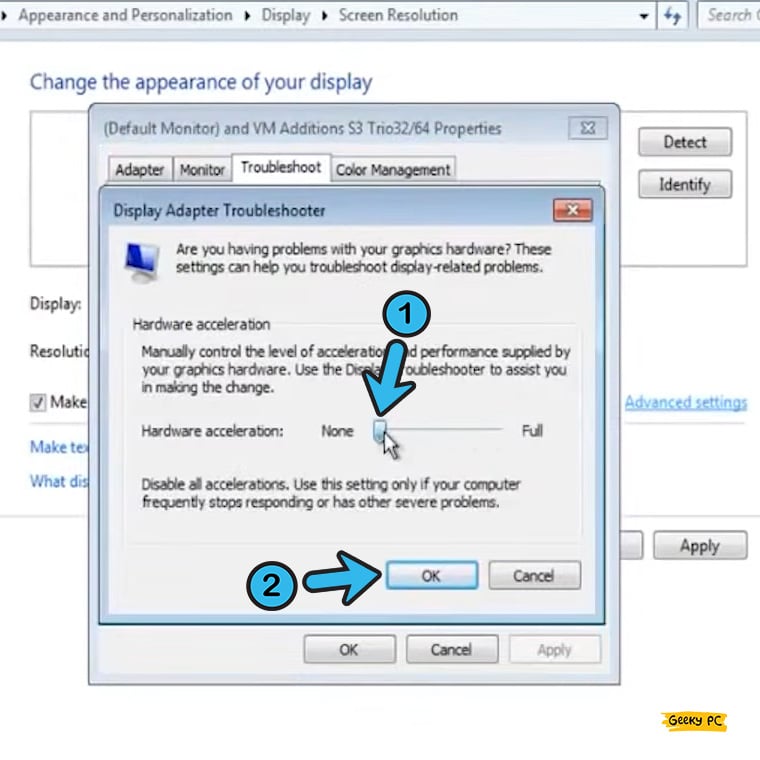
- Step 7: Click “OK” to save the settings and close the “Display Settings” app.
If the “Troubleshoot” tab is not showing on the header menu, you can alternatively just click on the “Properties” button under the “Adapter Type” header.
And once the new window appears, simply select the “Resources” tab from the header menu. But, if the “Hardware Acceleration” menu is still not appearing, your GPU doesn’t support the disabling of hardware acceleration.
11. Reset Windows 10/11
Although it is a pretty advanced method, many of the minor glitches can be effectively solved by resetting your Windows OS altogether.
And if you are not willing to proceed with a fresh OS installation, resetting your OS is the only option left for you that can solve this issue.
- Step 1: Press the “Windows Key + I” buttons together to initiate the “Settings” app.
- Step 2: Scroll down the newly launched windows and click on the “Update & Security” option.
- Step 3: Navigate to the left panel and click on the “Recovery” option.
- Step 4: Now, navigate to the right panel and click on the “Get Started” option located under the “Reset this PC” option.
- Step 5: Once you get a new prompt, select the “Keep my files” option from the menu.
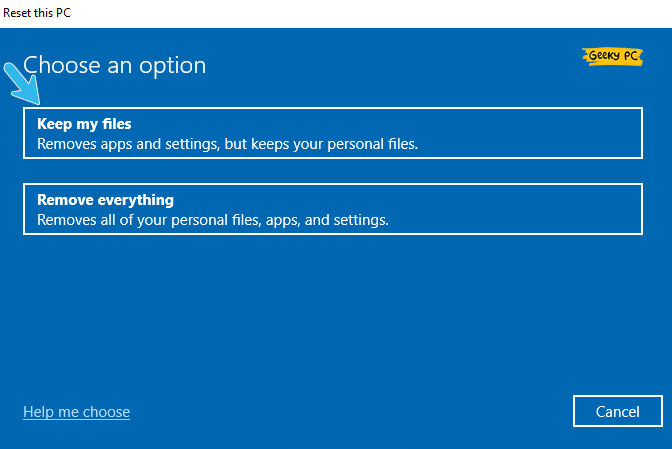
- Step 6: Click on the “Local reinstall” option and then click on the “Next” button.
- Step 7: Click on the “Reset” button and reboot your system when the OS is completely restored.
Once you reset your Windows OS, you may get an undefined network error, especially if you use a static IP connection assigned by your ISP.
12. Restore Your System To A Previous Point
If you don’t want to restore or reset your entire OS to safeguard your data and already installed apps, you can restore your system to a previously assigned point when everything is running smooth. And this “system restore” feature is now available in the latest Windows OS.
- Step 1: Right-click on either the “My Computer” or “This PC” icon (depending on your Windows OS) and select the “Properties” option.
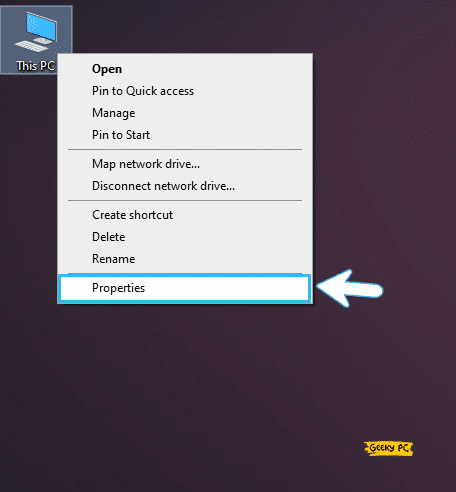
- Step 2: Click on the “Advanced System Settings” option once the new window appears.
- Step 3: Once the “System Properties” window launches, click on the “System Protection” tab on the header menu.

- Step 4: Further click on the “System Restore” option and then click on the “Next” button.
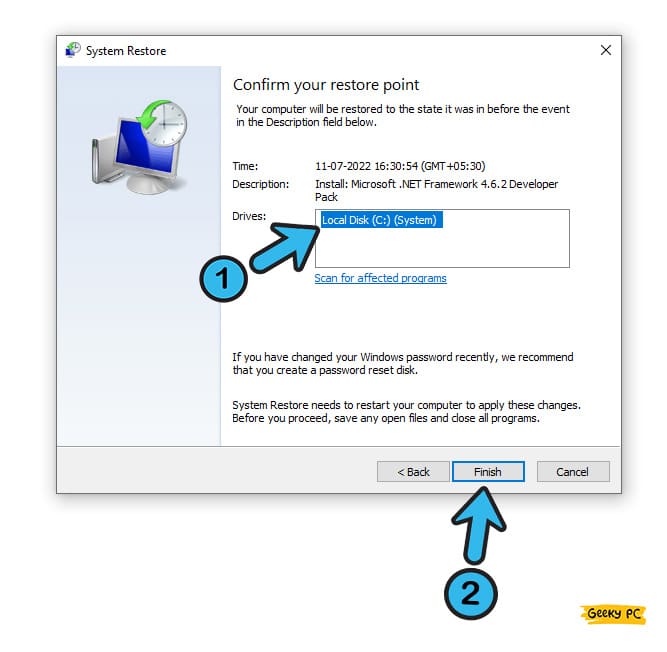
- Step 5: Click on the “Show more restore points” option and click on any of your previous restore points.
- Step 6: Once the new dialog box appears, click on the “Finish” button.
It is better to create and assign new system restore points whenever your Windows is running errorless and smoothly.
And if you run into any bug or error in the future, you can simply restore your entire OS to this restore point to get rid of those issues.
13. Reinstall Windows 10
If resetting your Windows OS or restoring it to a previous point can’t solve the green-screen error, you may need to proceed with a fresh OS installation.
However, you can also roll back to an earlier version of Windows OS from the settings option to proceed with a fresh installation.
- Step 1: Press the “Windows Key + I” buttons together to launch the “Settings” app.
- Step 2: Once the app launches, scroll down, and click on the “Update & Security” option at the bottom of the page.
- Step 3: After the new window appears, navigate to the left panel and click on the “Recovery” option.
- Step 4: Now, navigate to the right panel and click on the “Get Started” button located under the “Go back to the previous version of Windows 10” option.
- Step 5: Follow the on-screen option and click on the “Choose an Operating System” option.
- Step 6: Once you select an operating system, click on the “Windows Rollback” option.
- Step 7: Let windows roll back to the previous version and reboot your system.
Before proceeding with this step, you should take a backup of all your data on the cloud or any other external memory (preferably of an external HDD or pen drive). Otherwise, you will lose all your data and the installed apps on your current Windows OS. You can also safeguard your saved passwords with the “Google Password Manager,” which is a free tool.
14. Tweak Your Browser Settings (Google Chrome & Mozilla Firefox)
If you are not getting the green-screen error while doing usual stuff but frequently get this error while surfing the web, the problem may lie in the browser settings. And in that case, you need to tweak your browser settings to get rid of this error.
For Google Chrome:
- Step 1: Open the “Google Chrome” browser and click on the “Menu” option (The “Three vertical dots” at the top-right corner of your browser).
- Step 2: Once the “Menu” launches, click on the “Settings” option.
- Step 3: After the “Settings” window launches, navigate to the left panel, and click on the “Advanced” option.
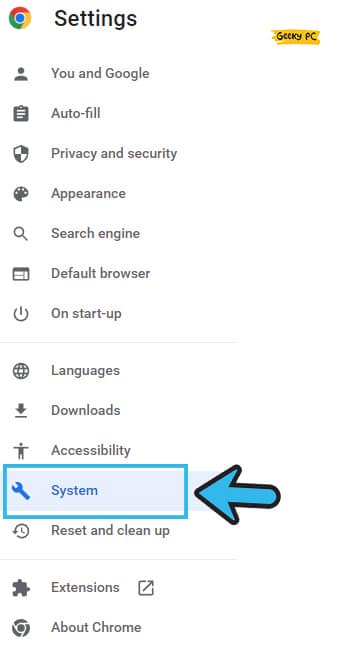
- Step 4: Once the “Advanced” option expands, scroll down, and click on the “System” option.
- Step 5: Toggle the slider to disable the “Use hardware acceleration when available” option.
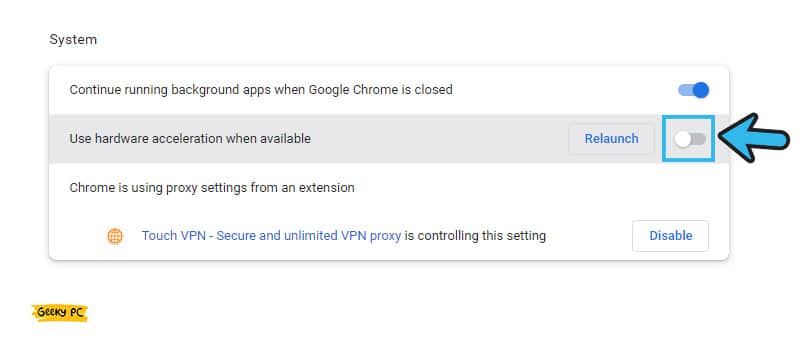
- Step 6: Now, restart your browser and check if the problem still persists.
For Mozilla Firefox:
- Step 1: Open “Mozilla Firefox” browser on your device and click on the “Menu” option located at the top-right corner.
- Step 2: Go to the “settings” option and further click on the “General” tab.
- Step 3: Scroll down and uncheck the box adjacent to the “Use recommended performance settings” option.
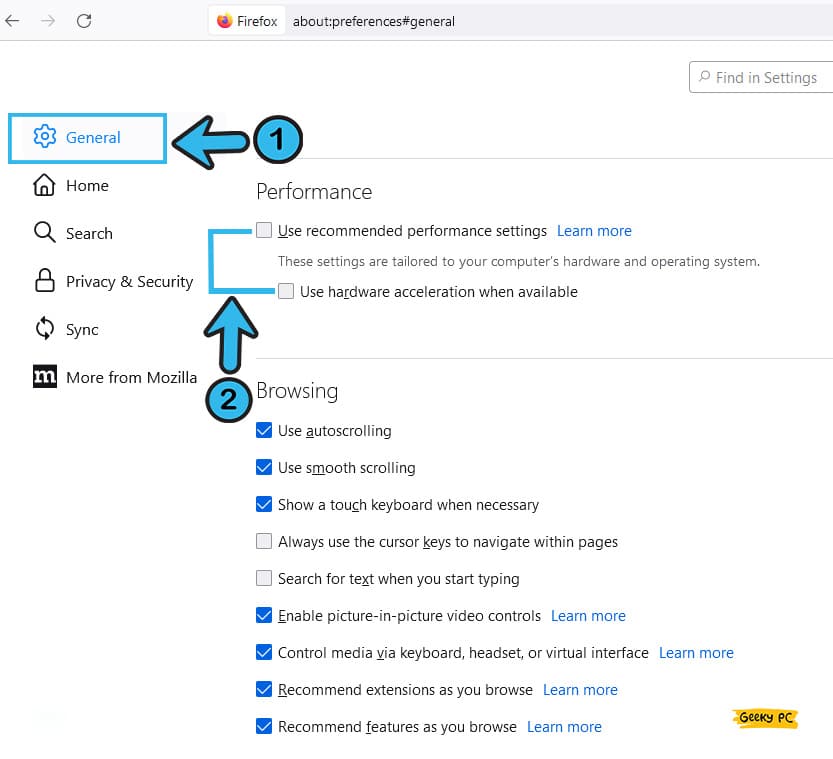
- Step 4: Now, scroll down again and uncheck the box beside the “Use hardware acceleration when available” option.
- Step 5: Restart Firefox and check whether the problem still persists.
Many users have reported getting a screen error on Twitch. And if you are particularly getting a green-screen or a black-screen error while opening Twitch on your browser, you can follow our detailed guide to fix Twitch black screen error on Windows devices.
15. Use A PC Repair Tool
If none of the generic and advanced methods are working to fix the green-screen issue on your Windows device, you may need an advanced PC repair tool to proceed with even more profound tweaks. These tools are also available for free, as well as the pro versions of them.
The third-party PC repair tools will automatically search and replace any broken or infected file on the root directory. Besides, these tools can also effectively fix and replace damaged or infected files on your system to resolve all the errors.
However, you may need to temporarily disable the antivirus on your system as it may interfere with the third-party repair tools. But don’t worry; these tools are absolutely safe to use.
What Is The Green Screen Of Death?
While most of us already know about the blue screen of death, green screen bugs are relatively new phenomena in the newer versions of the Windows OS. And this error occurs when there are any graphics-related issues while running your OS or opening any particular app.
Like the blue screen, the green screen error can also trigger when you boot up your computer or if you try to open a buggy application on your system. It can also occur if there is a problem with your graphics card hardware or the driver of that GPU.
Conclusion
You better start by checking your hardware, peripherals, and connecting cables to resolve this green screen error. And if you want to proceed with any advanced methods that can fully reset your Windows OS, it is better to take a backup of your data and apps beforehand.
So, that’s all the solutions we have to fix the green computer screen. If you think we have missed any, or if you have any other working solutions in mind, feel free to let us know about those methods in the comment box below.
FAQs
Q. Why is my monitor turning green?
The highest chances are your connecting cable, or the monitor is broken. Besides, you may also get the green screen error if you are using an obsolete version of the GPU driver or have installed an outdated version of the Windows OS. The problem may even arise if you have enabled the hardware acceleration.
Q. How do I find the display settings on my monitor?
Depending on the type of monitor you are using, the control switches can be either on the bottom of the monitor or at the back panel. So, you should check the manufacturer’s instruction manual. And if you are using any high-end LED or gaming monitors, you can even tweak the monitor settings from the software that comes with those monitors.
Q. How to know if my monitor is broken?
If you are getting green screen or pink screen errors too frequently, the highest chances are your monitor is broken, and it’s time to replace it. If you are getting vertical lines or any dead pixels, that also means your monitor is broken.
Q. What is the difference between a blue screen and a green screen error?
Blue screen error typically occurs when the OS or any application faces a massive error and completely stops functioning. But on the other hand, the green screen error occurs mainly due to graphics or monitor-related issues.